ICTBroadcast SP Edition
Version: 4
Last Updated: 20/08/2019
By: ICT broadcast
Email: info@ictbroadcast.com
Administration Guide
Thank you for purchasing ICTbroadcast. If you have any questions that are beyond the scope of this help file, please feel free to email via contact form here. Thanks so much!
1) Overview – top
ICTbroadcast is multi-tenant Voice, SMS & Fax broadcasting software solution for SMB’s and Service Providers. ICTbroadcast has smart autodialer and smart predictive dialer capabilities. It enables service providers to offer broadcasting services to their users. It can be scaled to blast thousands of simultaneous calls using either VoIP or PSTN. ICTbroadcast can handle most voice broadcasting scenarios. It is simple, reliable and easy to use and has user friendly web portal to manage.
How to Prepare ICTbroadcast
2) Roles – top
ICTBroadcast support following roles Admin, User and Agent.
I) Administrator – top
This role actually manages overall resources of system like managing users, configuring trunks, making payments, adding new destinations, setting routes and most importantly allocating available extensions, DIDs and channels to users.
II) User – top
This role is enable user to manage his contacts, voice recordings and scheduling of campaigns. It also enables user to broadcast his message and interact with desired recipients by creating different type of campaigns and view results/statistics.
III)Agent – top
This role embed WebRTC based VoIP Phone in browser which will remain connected to the main server. It is also responsible for inbound and outbound calls, transfer calls as well as sending DTMF. Agent can access contents, contacts from a single application.
3) Modes – top
ICTBroadcast support following three modes of operation with all voice based campaigns of ICTBroadcast as listed below :
1.Outbound – top
Outbound is default modes of all ICTBroadcast campaigns all ICTBroadcast unified autodialer perform outbound calling as its default mode and originate calls toward remote destinations and perform required operation and actions on said calls as an example, in survey campaign , an outbound call will generated and when call get answered, pre recorded voice based questions will be played and call recipient will be asked to respond through DTMF or voice recordings and later these responses will be reported back as summary or full details to admin
2.Inbound – top
With inbound mode enabled , all campaign can receive incoming calls on published DID numbers and these campaign will respond with IVR or with prescribed action, as an example, we can conduct an inbound survey campaign where caller will call on published DID numbers and on answer , IVR may play voice message asking user to enter proper extension number to connect him with related professional or take prescribed act
3.Permanent – top
Permanent mode requires REST API’s . With this mode activated , campaign always remain in listening mode, It accepts contact number from external application using Rest APi in real time and add said contact into contact list of campaign and said contact called real time and necessary action performed on it, ICTBroadcast Rest APi are used to automate business process and we can integrate any third party applications with ICTBroadcast using these Api’s
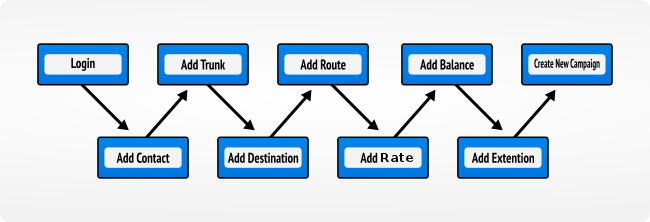
4)Setup of ICTBroadcast – top
To configure ICTBroadcast follow the steps given below:
1.Login as User – top
ICTBroadcast allow user to login as type the user name and password and click on “log in” button. As the user is logged in a successfull message appears “Logged in successfully”.
2.Add new Contact – top
ICTBroadcast allow to add new contact by going to the “Contacts” in menubar, then click on “Contacts” button, then click on “Add New” button.A form will appear type the detail given in the form as “Personal information”,”Contact Addresses”,”Groups”,”Custom data”, and “Comments/Remarks”,.Click on “Save” button to save the contact.
3.Add Contact Group – top
ICTBroadcast allow to add contact group by going to the “Contacts” in menubar,then click on “Contact groups”,then click on “Add New” button. A form appears type the detail as “Group description” and “Import Contacts”.Click on “Save” button to save the contact group.
4.Add Voice Recording – top
ICTBroadcast in this area allow to upload recordings, sms messages, fax and email documents . These could be messages, survey questions, introductory message etc. If user don’t have recordings. Don’t worry, system also provides user with TTS (text-to-speech) feature.
5.Create a new Campaign- top
ICTBroadcast in this area allow to create a new campaign by going to the “Campaigns” in the menu bar. Click on “Campaign Management”.Click on “Add new’ button.LIst of campaigns appears. Select the campaign that want to be created.
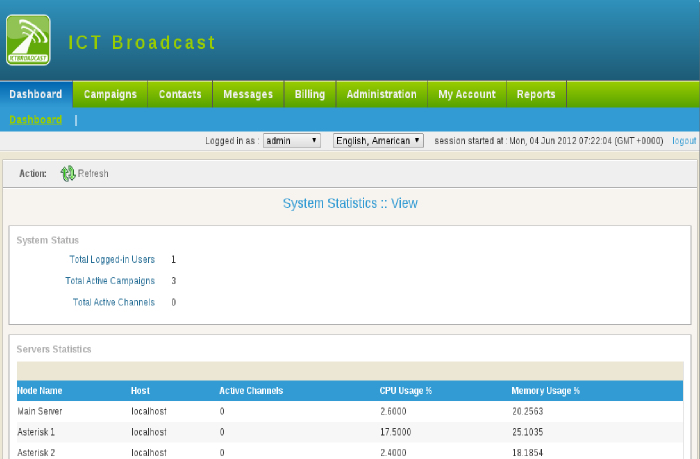
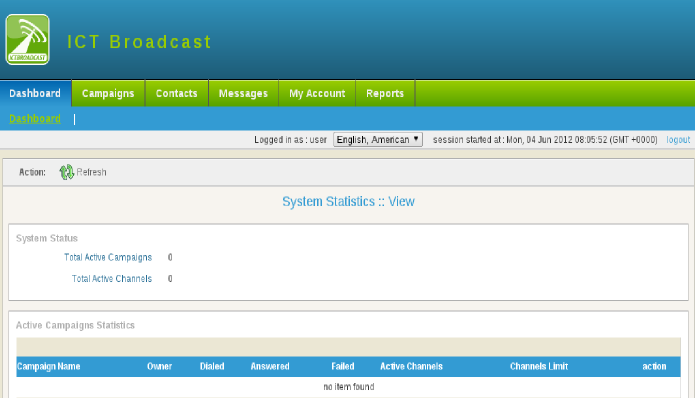
5) Dashboard – top
Dashboard is system monitoring page and It show important live statistics of overall system described below:
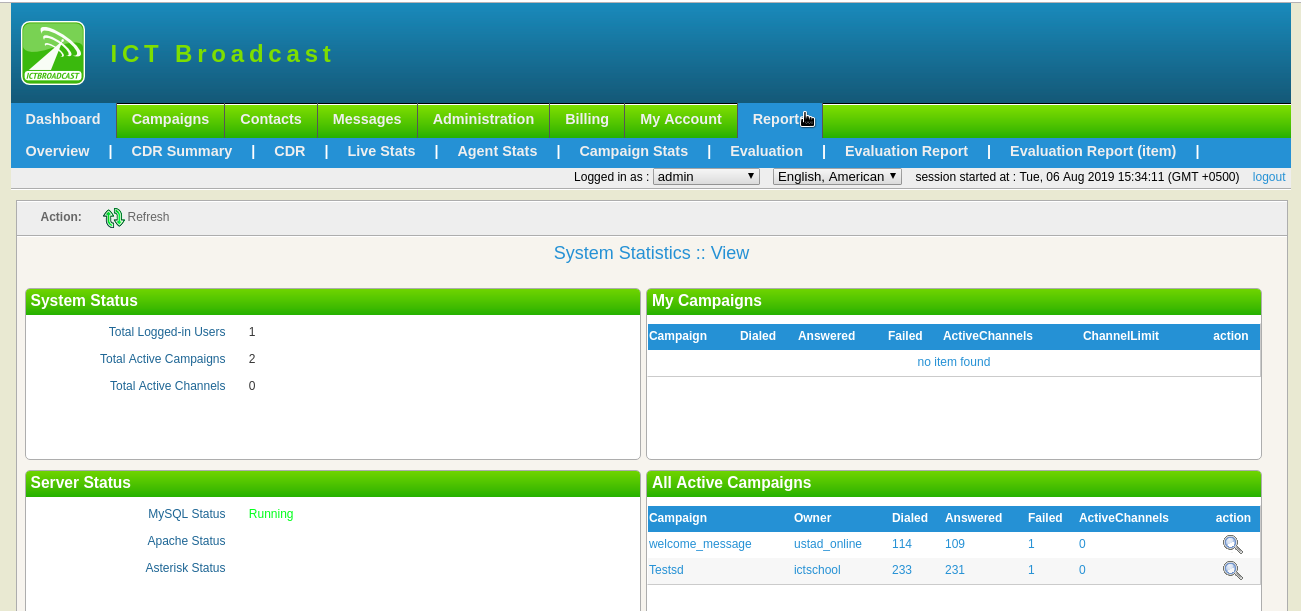
I)Contact Dialed – top
Shows currently Contact Dialed that are using the ICTbroadcast
II) Campaign Launched – top
Campaign Launched shows the number of active campaigns and total number of active channels
How to Manage Active Campaigns?
III)My Active Campaign – top
Campaign Statistics shows real time statistics of running campaigns with number of dialed , answers and failed calls
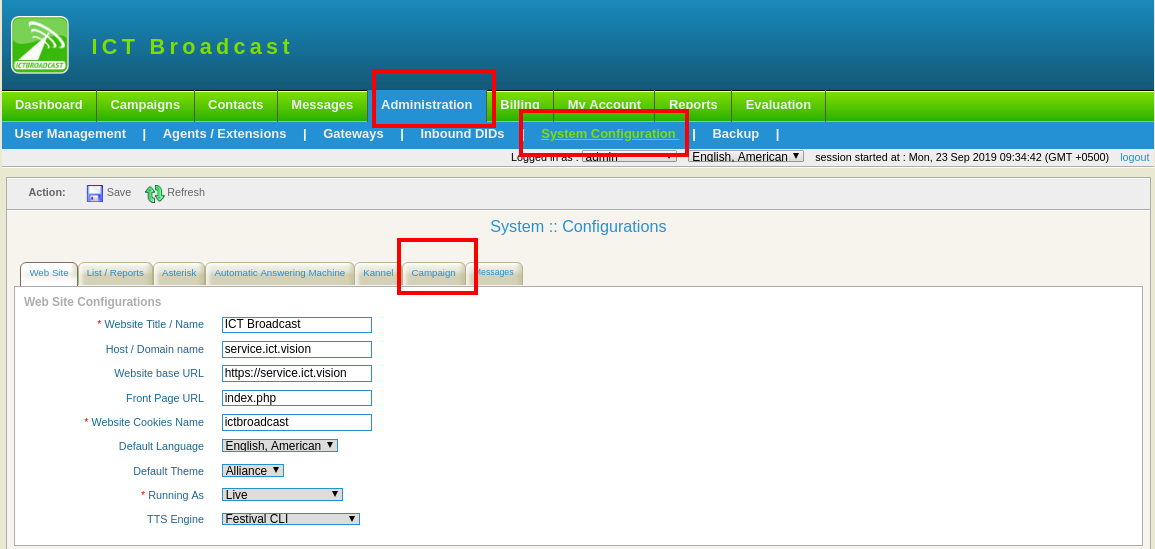
6) Campaigns – top
User can click on “Campaigns” tab on main menu bar to access this functionality. It has two menu items. That is Campaign Management and Campaign Summary. These two are described below.
I) Campaign Management – top
When User click on Campaign Management menu, it will open a page as shown below. Here user have various options for campaign management.
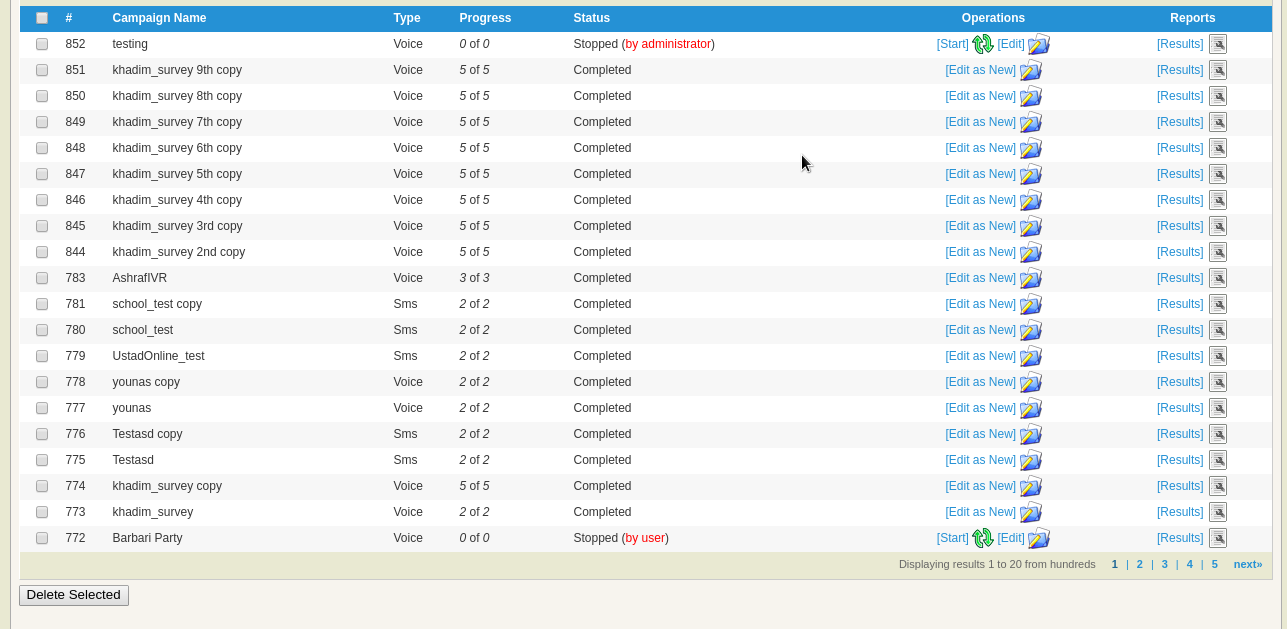
Add new: User can create a new campaign (see section Add new campaign below)
Operations: Modify/Edit existing campaign parameters before it starts, Start and Stop Campaigns manually , Monitor Live calls of Campaign
Results: Call statistics of completed calls with data that called contact entered
Delete Selected button: Deletes selected campaigns
II) Add New Campaign – top
User can access this option from:
- Click on “Campaign” tab.
- Click on “Campaign Management” tab.
- Click on “Add New”
- Select the type of campaign (e.g. Voice, Fax and SMS)
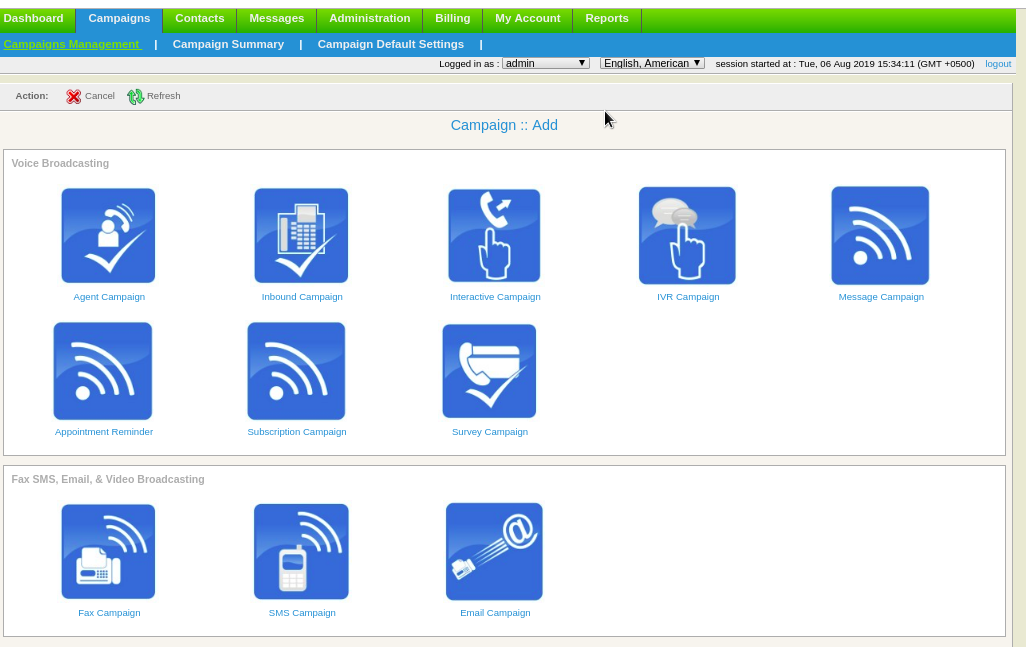
A detailed overview of each of the campaigns shown in figure above is given below. This detail will highlight the purpose of the campaign, how to create it, and its important fields that should be filled.
a) Voice Message Campaign – top
The purpose of this campaign is to broadcast a voice message. This type of campaigns dial numbers from contact list, on answer by the recipient, play recorded voice message and hangup. If user select “Message Campaign” from the figure above. This will open a form that lists all the options and settings for creating this campaign. The general parameters that user need to fill out for any type of campaign are:
Campaign:
Name: Name of the campaign for identification
Campaign Mode:
When selected to Normal, it stops campaign after processing all the contacts. When selected to Permanent, it allows campaign to keep running even after processing all the contacts and waiting for new contact in background.
Campaign Contact:
Contact group:
Select contact group/List of phone numbers that this campaign will dial.
Caller ID:
Caller ID Type:Enter Caller ID type to use with outgoing calls.
Caller ID:Enter Caller ID to use with outgoing calls.
Caller Name:Enter caller name to use with outgoing calls.
Voice Message:
Select from list of already created / recorded messages.
General Options:
Introductory Message:
When enabled, this field allows