ICTBROADCAST Tenant Guide
For Contact:
Email: Support@ictinnovations.com
Tenant Guide:
Thank you for selecting ICTBroadcast. If you have any questions that are beyond the scope of this help file, please feel free to contact us. Click here or email directly at Support@ictinnovations.com
Table of Content
1. Overview
2. Roles
3. Modes
5. Dashboard
6. Campaigns
ii) Voice => Integration Campaign
vi) Voice => Appointment Reminder Campaign
7. Contacts
iv) Access Numbers
8. Messages
i) Recordings=>Preparing Voice Recording
v) IVR=> Introduction to IVR Designer=> Creating IVR Applications
10. Administration
11. My Account
12. Reports
13. Agent Evaluation
ICTBroadcast is white label, multilevel and multi-tenant unified communications contact center software supporting voice, SMS, fax, and email communications technologies suitable for SMB and Service Providers. ICTBroadcast has smart auto-dialer and smart predictive dialer capabilities. It enables service providers to offer call center and broadcasting services to their users.
We can scale it to blast thousands of simultaneous calls using either VoIP or PSTN. ICTBroadcast can handle most telemarketing and call center scenarios. It is simple, reliable, and easy to use and has a user-friendly web portal to manage.
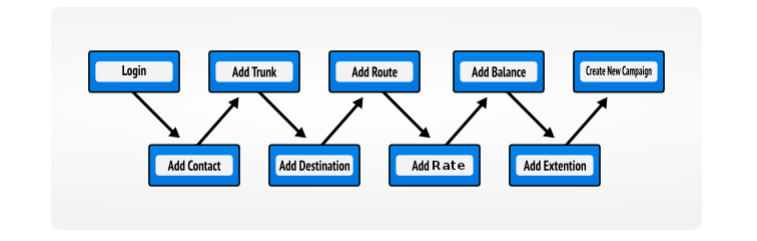
How to prepare ICTBroadcast:
ICTBroadcast support following roles Client, User and Agent.
Client role is basically a manager or tenant role, its purpose is to manage users centrally under his organizations. This role enable client to create users and assign resources to these users also utilize resources centrally, this role enable client to set permissions, manage resources. Resources include ‘Timeslot’ and ‘Weekday’ to run campaigns. It also enables clients to assign extensions and DIDs.
In “Allowed Time Slot to run campaign” section client select time range. Campaign dial contact in selected range. In “Allowed Weekdays” section, client select days. In “Permission” section client set our permission.
It enabled the user to manage his contacts, voice recordings and scheduling of campaigns, manage fax documents, make payments, view is/her balance, view Call Detail Reports and IVR. It also enables the user to broadcast his message and interact with desired recipients by creating different type of campaigns and view results/statistics.
This role embed WebRTC based VoIP Phone in the browser, which will remain connected to the main server. It is also responsible for inbound and outbound calls, transfer calls as well as sending DTMF. Agent can access contents, contacts from a single application.
ICTBroadcast support following three modes of operation with all voice-based campaigns of ICTBroadcast as listed below:
Outbound mode is the default modes of all ICTBroadcast campaigns. ICTBroadcast unified auto dialer performs outbound calling as its default mode and originates calls toward remote destinations and performs required operation and actions on said calls. For example, in survey campaign, an outbound mode will generate call and when call get answer, pre-recorded voice-based questions will play and call recipient will ask to respond through DTMF or voice recordings and later these responses will report back as summary or full details to admin.
When inbound mode enabled, all campaigns can receive incoming calls on published DID numbers and this campaign will respond with IVR or with prescribed action. For example, we can conduct an inbound survey campaign where caller will call on published DID numbers and on answer, IVR may play voice message asking user to enter proper extension number to connect him with related professional or take prescribed act.
Permanent mode requires REST APIs. When this mode activates, the campaign always remains in listening mode. It accepts contact number from external application using Rest API in real time and adds said contact into contact list of campaign and said contact called real time and necessary action performed on it. ICTBroadcast Rest API used to automate business process and we can integrate any third-party applications with ICTBroadcast using these APIs.
To configure ICTBroadcast, follow the steps given below:
For login as a Tenant:
Type the user’s name and password and click on “log in” button. As you logged in as a tenant, a successful message appears “Logged in successfully”.
ICTBroadcast allow to add new users by going to the “Administration” in menu bar, then click on “User Management” button, then click on “Add New” button. A form will appear to type the detail given in the form as “User Name”, “Active Status”, “User Role”, “Password”, and “Personal Contact Information”.
Click on “Save” button to save New User.
ICTBroadcast in this area allow to create a new campaign by going to the “Campaigns” in the menu bar. Click on “Campaign Management”. Click on “Add new” button. List of campaigns appears. Select the campaign that you want to create.
ICTBroadcast allow to add a new contact by going to the “Contacts” in menu bar, then click on “Contacts” button, then click on “Add New” button. A form will appear to type the detail given in the form as “Personal information”, “Contact Addresses”, “Groups”, “Custom data”, and “Comments/Remarks”. Click on “Save” button to save the contact.
ICTBroadcast in this area allows to upload recordings, SMS messages, fax, and email documents. These could be messages, survey questions, introductory message, etc. If tenant do not have recordings. Do not worry, the system also provides tenant with TTS (text-to-speech) feature.
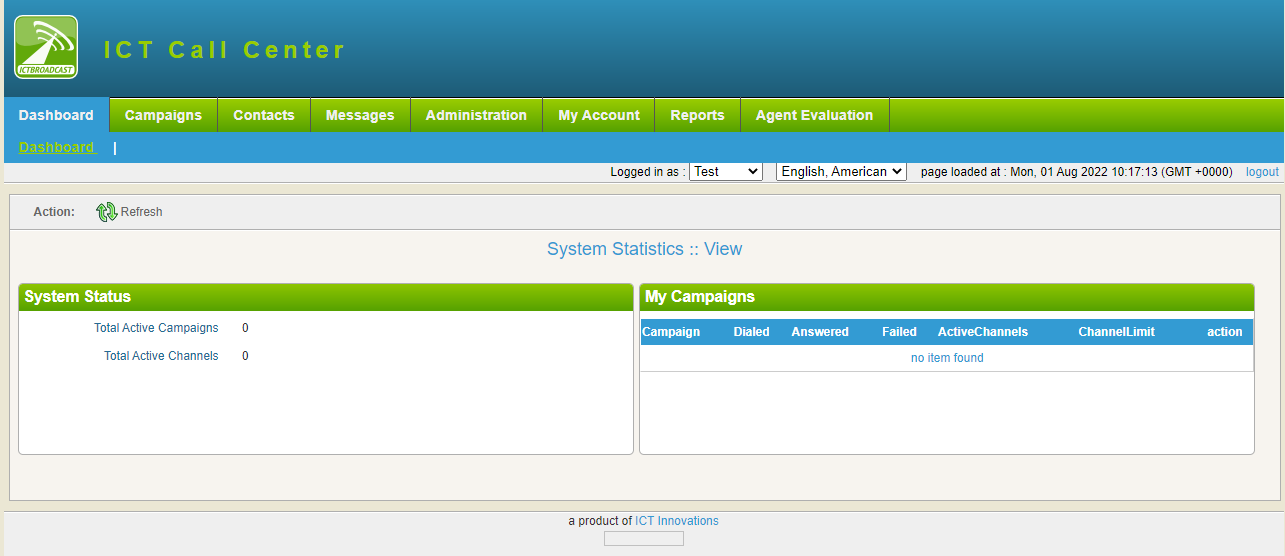
Dashboard is a system monitoring page, and it shows important live statistics of the overall system described below.
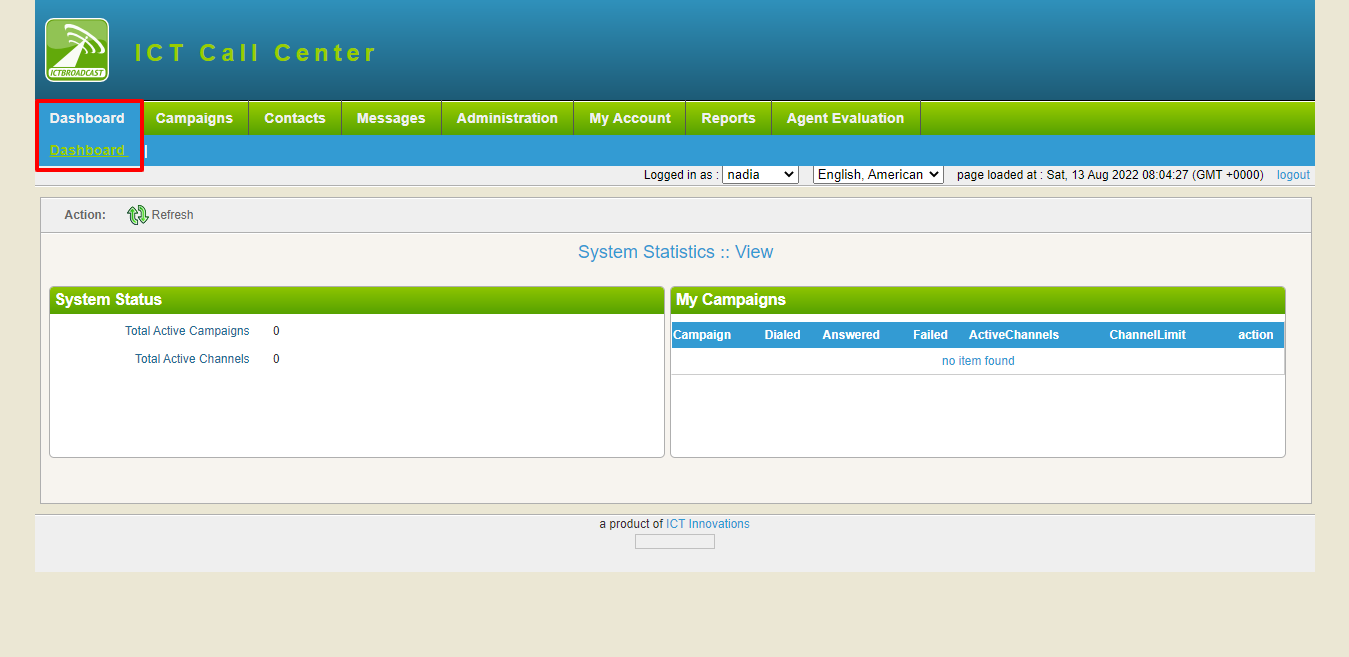
It will show total logged-in users, total active Campaigns and total active channels that are using the ICTBroadcast.
My Campaigns shows the number of active campaigns that how much will dial, answer or failed and total number of active channels.
Tenant can click on “Campaigns” tab on the main menu bar to access this functionality. It has three menu items. That is Campaign Management and Inbound Campaigns and Campaign Default Settings. We describe these three below.
When tenant click on Campaign Management menu, it will open a page as shown below. Here tenant has various options for campaign management.
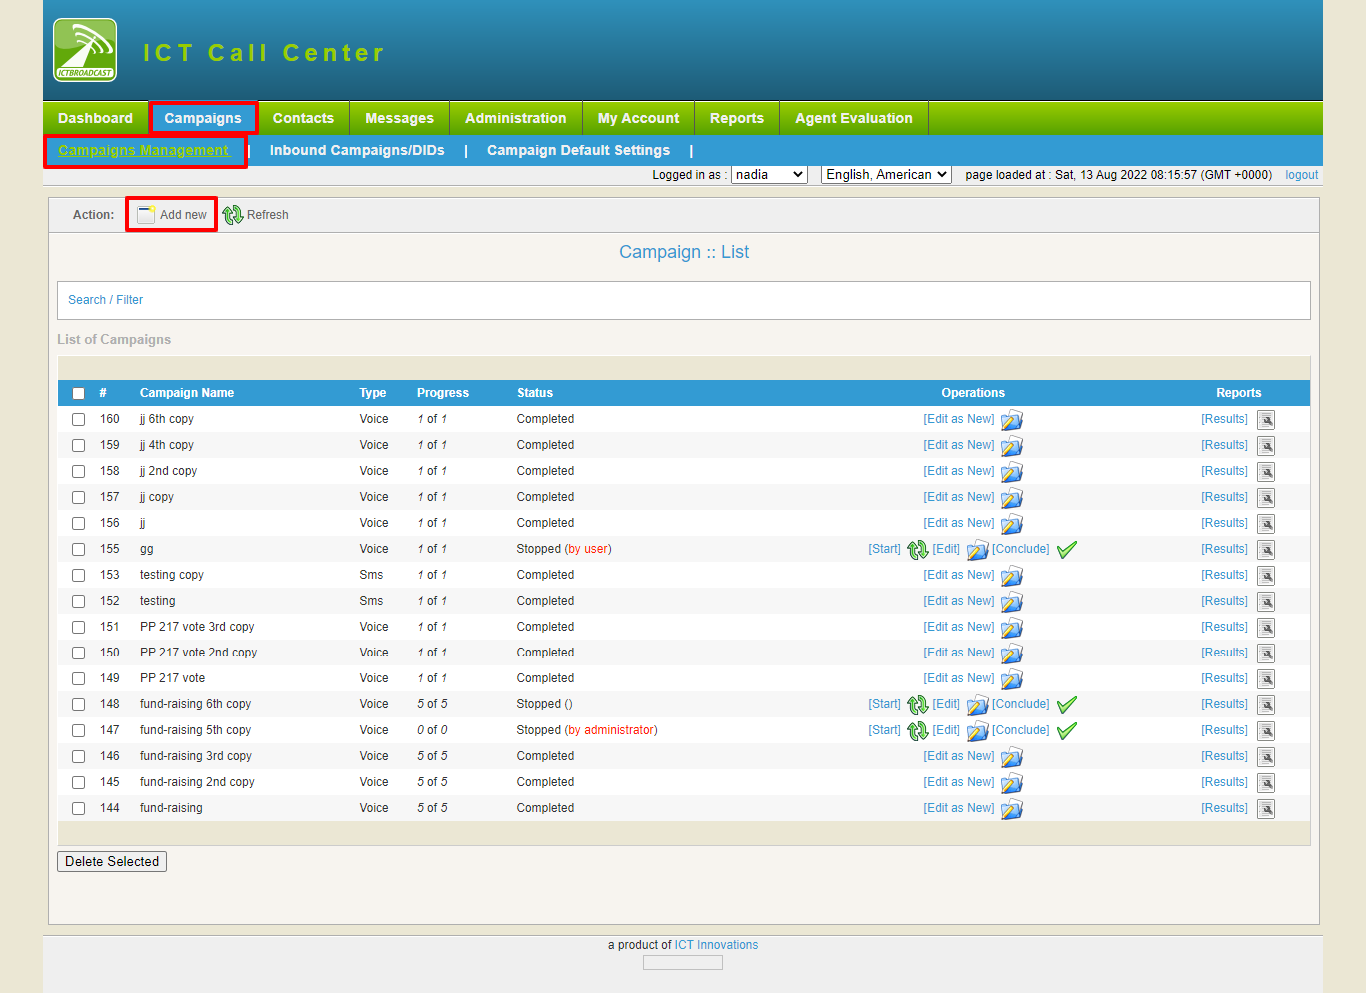
Add new:
Tenant can create a new campaign (see section Add new campaign above).
Operations:
Change/Edit existing campaign parameters before it starts. Start and Stop Campaigns manually.
Monitor Live calls of Campaign Results: Call statistics of completed calls with data that called contact entered.
Delete Selected button: Deletes selected campaigns.
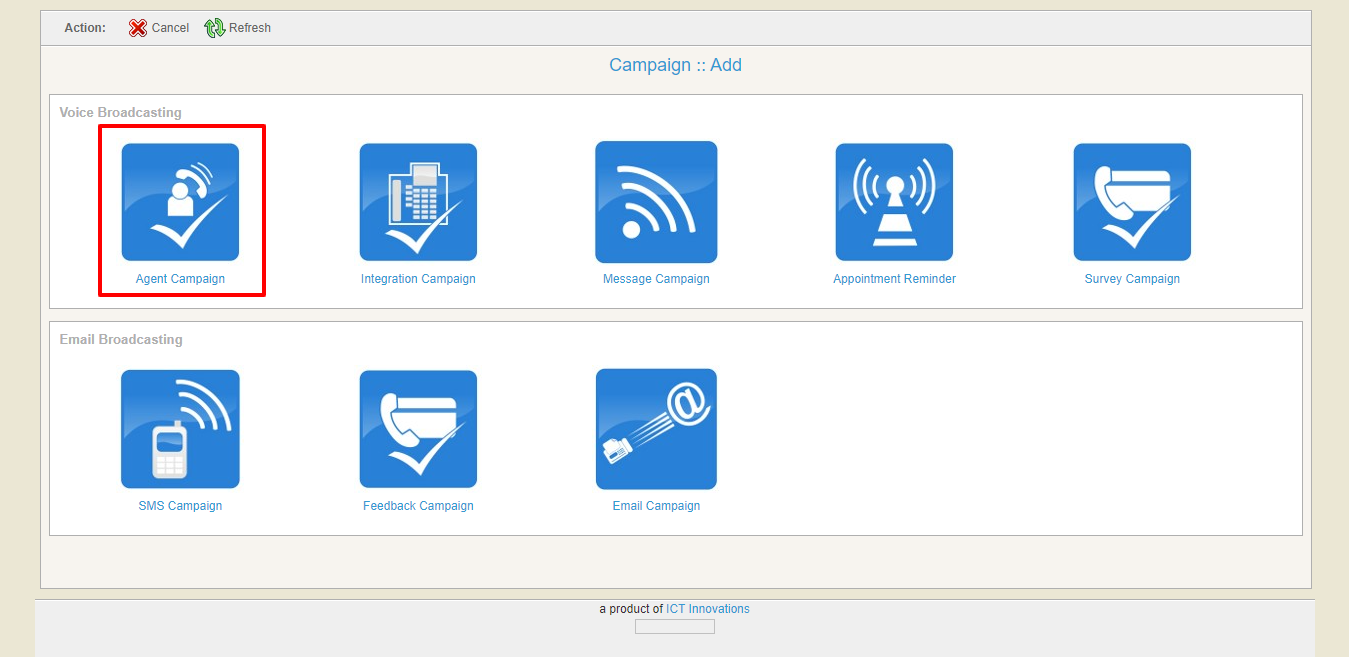
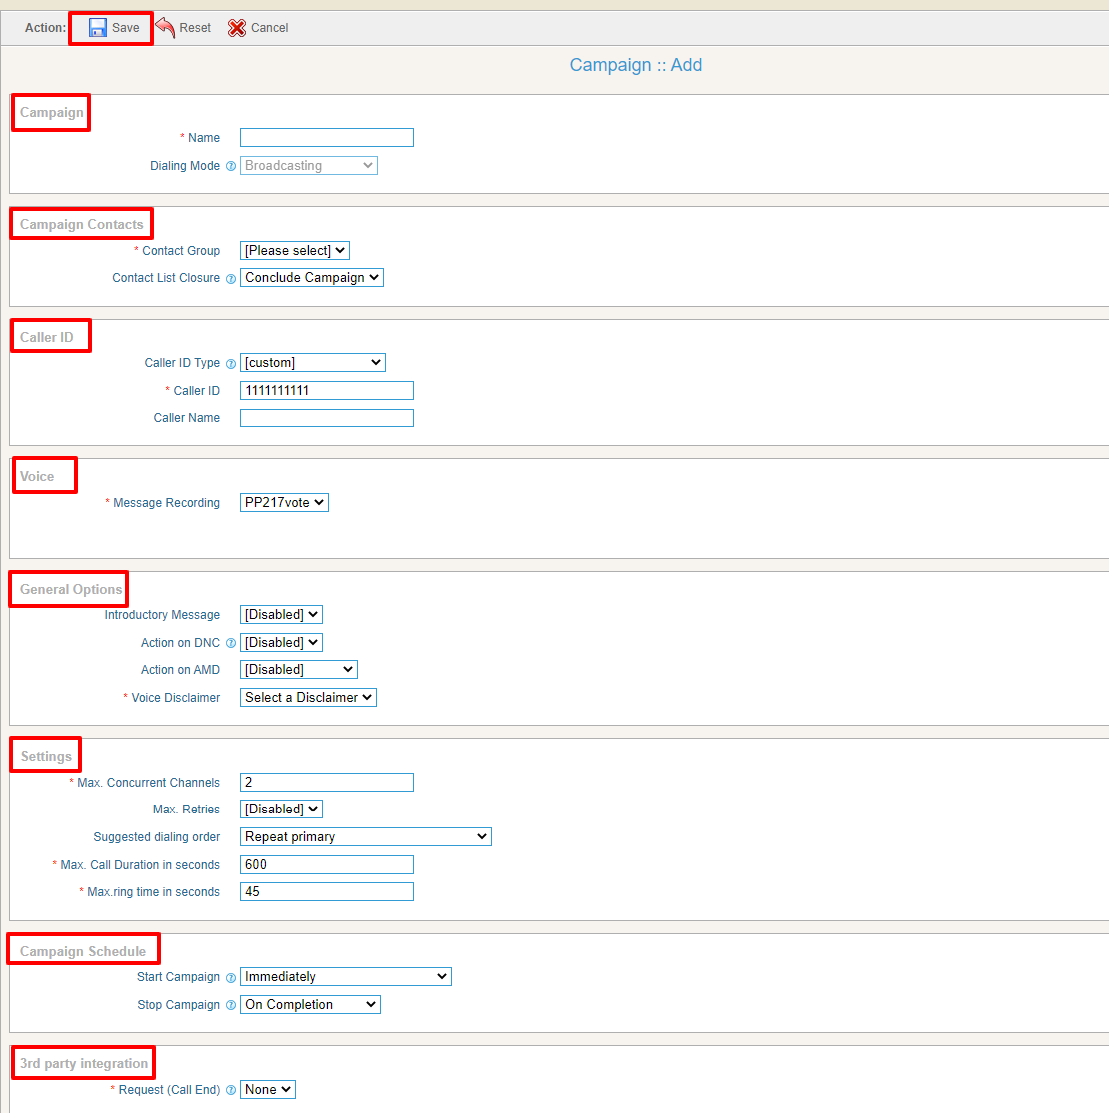
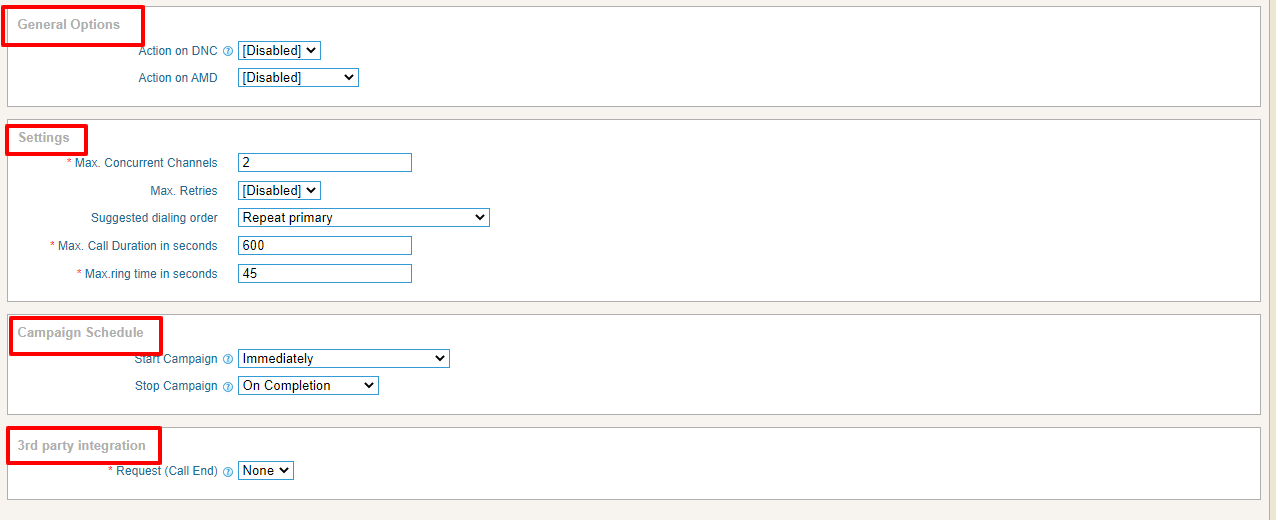
Tenant can access this option from:
1. Click on “Campaign” tab.
2. Click on “Campaign Management,” tab.
3. Click on “Add New.
4. Select the type of campaign (e.g., Agent, IVR and Integration).

We give a detailed overview of each of the campaigns shown in the figure below. This detail will highlight the purpose of the campaign, how to create it, and its important fields.
This type of campaign dial numbers from contact list and on an answer by the recipient, directly forward call to agent/external call center/IVR system. When tenant selects this campaign, it will open a form that lists all the options and settings for creating this campaign.
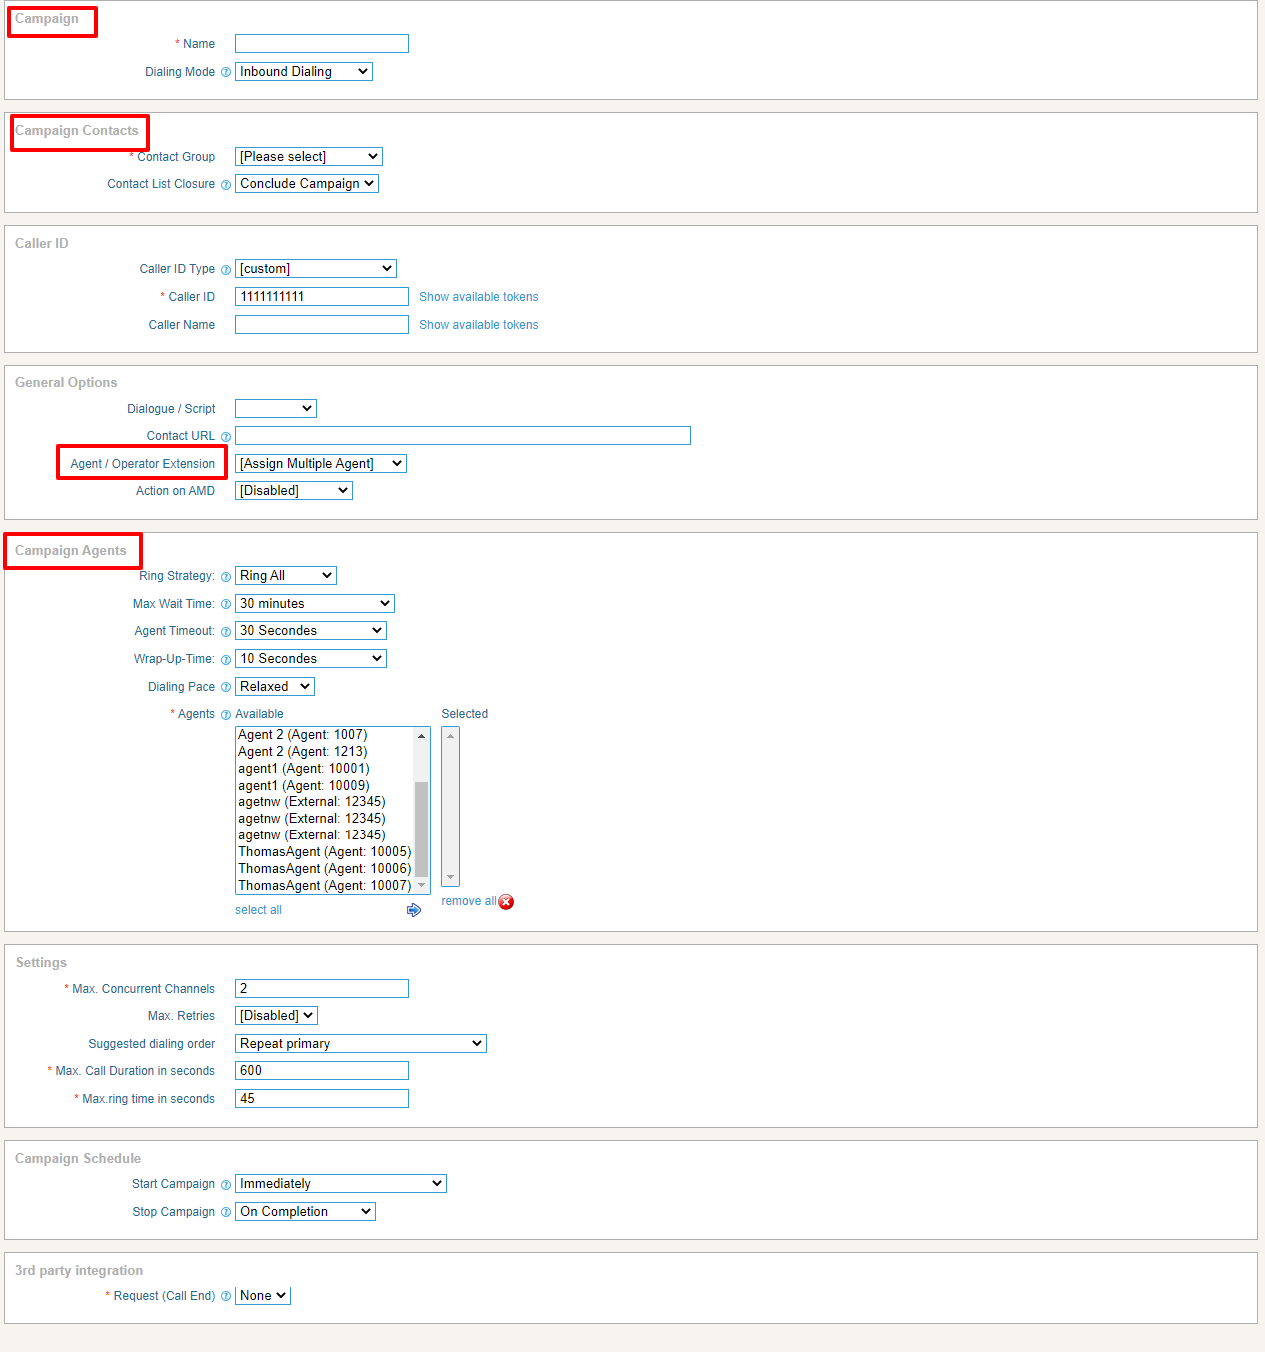
The general parameters that need to fill out for this of campaign are:
Campaign:
Name: Name of the campaign for identification.
Campaign Mode:
When selected to Normal, it stops the campaign after processing all the contacts. When selected to Permanent, it allows the campaign to keep running even after processing all the contacts and waiting for new contact in the background.
Campaign Contacts:
Contact group: Select contact group/list of phone numbers this campaign will dial.
Caller ID:
Caller ID Type: Enter Caller ID type to use with outgoing calls.
Caller ID: Enter Caller ID to use with outgoing calls.
Caller Name: Enter caller’s name to use with outgoing calls.
General Options:
Introductory Message:
When enabled, this field allows the campaign manager to select an introductory message. It will play immediately this introductory message when the recipient receives a call.
DNC (Do Not Call) Action:
DNC could enable and disable. When disabled, no action performs. When enabled, it will set a key “9” for DNC action. This means that when the recipient presses 9 on his phone, his number will delete from the contact list.
AMD (Answering Machine Detection) Action:
When it disables, it ignores the Answering Machine. When hang up selected, it detects AMD if found, then hang up the call otherwise continues normally. Third option is to leave a message. It detects AMD if found, then play a different message and hang up. It has another field for message recorded for an answering machine.
Settings:
Max. Concurrent Channels:
Maximum number of concurrent channels that said campaign will support.
Max retries:
Max number of retries to contact the said contact.
Max call Duration:
Maximum allowed duration for each call. After this duration call will disconnect automatically, if tenant is not sure about the duration of call, let it be the maximum number so that it does not affect call conversation.
Campaign Schedule:
**Start campaign: **
Schedule campaign start it has the following options:
Immediately: Start a campaign immediately just after creation.
On Scheduled Time: Start campaign on selected data and time.
Stop/Pause campaign: Schedule campaign stop time it has the following options:
a) When Done: Stop the campaign when everything is complete.
b) On Scheduled Time: Stop campaign on selected data and time.
3rd Party Integration:
Request Call End: Select the call to be ended.
ii) Voice Integration Campaign:
This campaign allows to create integration. This campaign dials the number of the contact list, on an answer by the recipient, asks a set of questions by playing voice messages and then records their responses (DTMF key or Voice response) from recipient and prepares the report for further analysis.
In an integration campaign, tenant can create choice-based questions that require the call recipient to respond using the key press DTMF function, as well as open-ended questions that require the call recipient to record their message. These recorded voice responses (or feedback) show the list of voice responses in the campaign summary integration report.
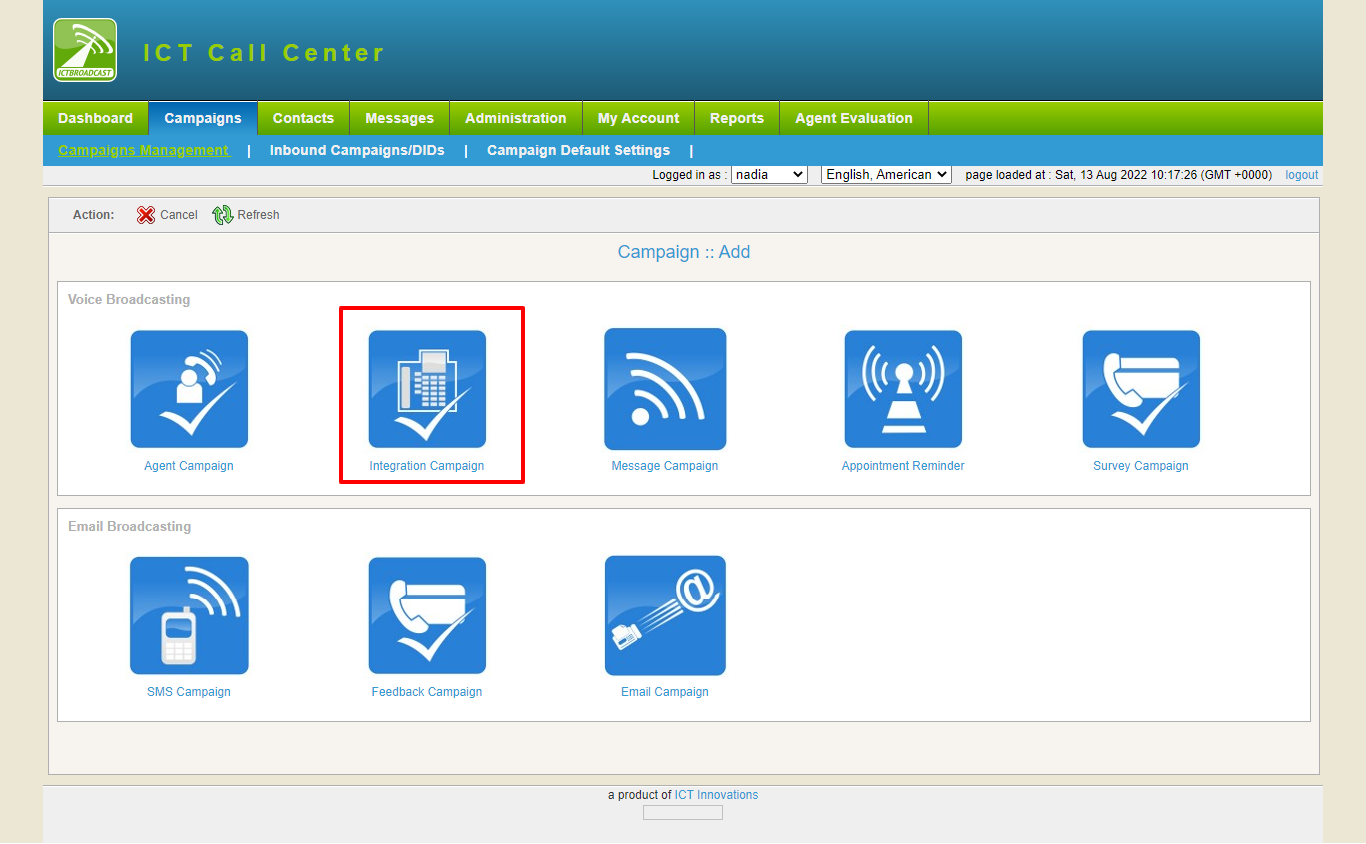
When tenant selects this campaign, it will open a form that lists all the options and settings for creating this campaign.
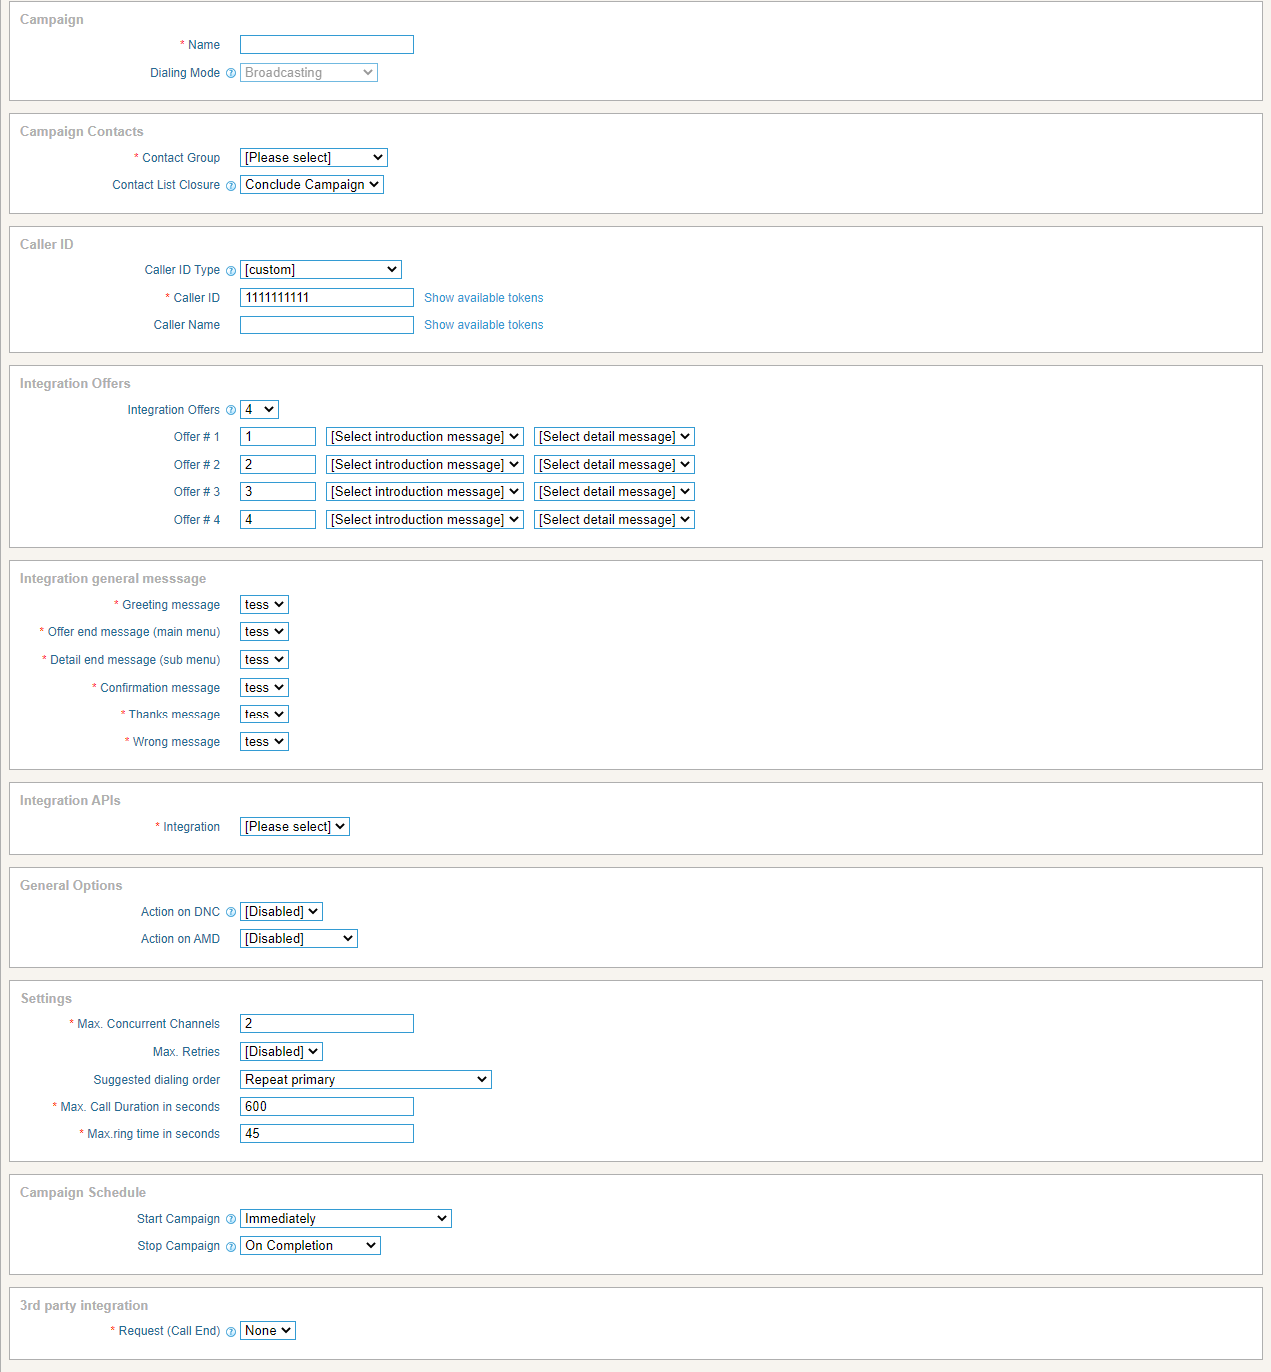
Glossary
Campaign:
Name: Name of the campaign for identification.
Campaign Mode:
When selected to Normal, it stops the campaign after processing all the contacts. When selected to Permanent, it allows the campaign to keep running even after processing all the contacts and waiting for new contact in the background.
Campaign Contacts:
Contact group: Select the contact group/List of phone numbers that this campaign will dial.
Caller ID:
Caller ID Type: Enter Caller ID type to use with outgoing calls.
Caller ID: Enter Caller ID to use with outgoing calls.
Caller Name: Enter caller’s name to use with outgoing calls.
Integration Offers:
This field allows tenant to select number of questions in integration. At a moment, a maximum of 10 questions are support. Once tenant selected the number of questions, it displayed a question field that allows tenant to select a recorded question and then configure desired responses.
Integration general message:
This field allows tenant to select Greeting Message, Offer end message, Detail end message, Confirmation message, Thanks Message and Wrong Message. We select each message according to demand.
Integration APIs: This field allow user to select APIs.
Settings:
Max. Concurrent Channels:
Maximum number of concurrent channels that said campaign will support.
Max retries:
Max number of retries to contact the said contact.
Max call Duration:
Maximum allowed duration for each call. After this duration call will disconnect automatically, if tenant is not sure about the duration of the call, select the maximum number so that it does not affect call conversation.
Campaign Schedule:
**Start campaign: **
Schedule campaign start it has the following options:
Immediately: Start a campaign immediately just after creation.
On Scheduled Time: Start campaign on selected date and time.
Stop/Pause campaign: Schedule campaign stop time it has the following options:
When Done: Stop the campaign when everything is complete.
On Scheduled Time: Stop campaign on selected date and time.
3rd Party Integration:
Request Call End: Select the call to end.
Click on “Save” button on top to start the campaign.
This campaign broadcasts a voice message. This type of campaigns dials numbers from contact list, on an answer by the recipient, plays recorded voice message and hangs up. If tenant select “Message Campaign” from the figure above. This will open a form that lists all the options and settings for creating this campaign.
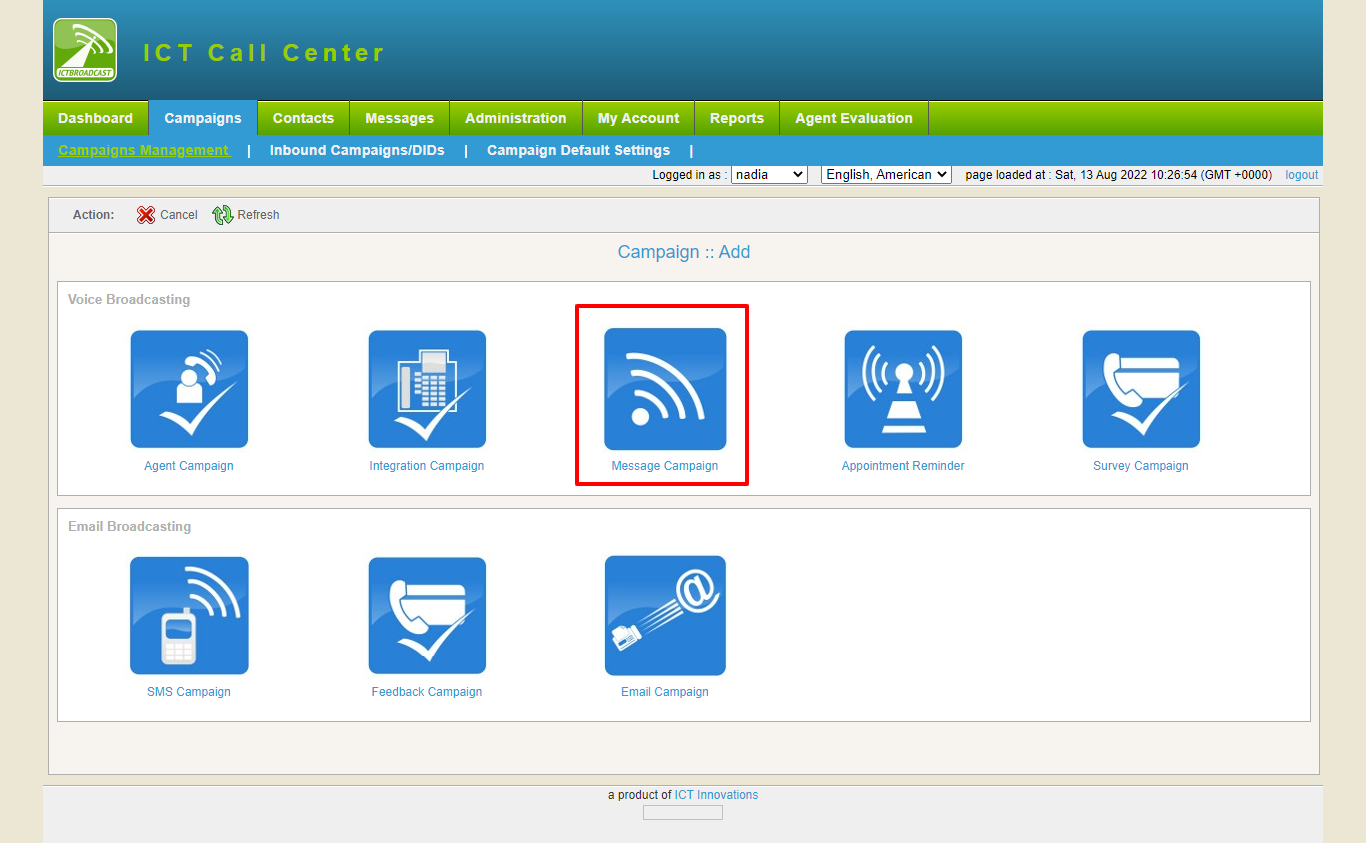
The general parameters that tenant need to fill out for any type of campaign are:
Glossary
Campaign:
Name : Name of the campaign for identification.
Campaign Mode:
When selected to Normal, it stops the campaign after processing all the contacts. When selected to Permanent, it allows the campaign to keep running even after processing all the contacts and waiting for new contact in the background.
Campaign contacts:
Contact group: Select contact group/List of phone numbers this campaign will dial.
Caller ID:
Caller ID Type: Enter Caller ID type to use with outgoing calls.
Caller ID: Enter Caller ID to use with outgoing calls.
Caller Name: Enter caller’s name to use with outgoing calls.
Voice Message: Select from a list of already created / recorded messages.
General Options:
Introductory Message:
When enabled, this field allows the campaign manager to select an introductory message. It will play immediately this introductory message when the recipient receives a call.
DNC (Do Not Call) Action:
DNC could enable and disable. When disabled, no action performs. When enabled, it will set a key “9” for DNC action. This means that when the recipient presses 9 on his phone, his number will delete from the contact list.
AMD (Answering Machine Detection) Action:
When it disables, it ignores the Answering Machine. When hang up selected, it detects AMD if found, then hang up the call otherwise continue normally. Third option is to leave a message. It detects AMD if found, then play a different message and hang up. It has another field for message recorded for an answering machine.
Settings:
Max. Concurrent Channels:
Maximum number of concurrent channels that said campaign will support.
Max retries:
Max number of retries to contact the said contact.
Max call Duration:
Maximum allowed duration for each call. After this duration call will be disconnect automatically, if tenant is not sure about the duration of the call, select the maximum number so that it does not affect call conversation.
Campaign Schedule:
**Start campaign: **
Schedule campaign start it has the following options:
Immediately: Start a campaign immediately just after creation.
On Scheduled Time: Start campaign on selected data and time.
Stop/Pause campaign: Schedule campaign stop time it has the following options
When Done: Stop the campaign when everything is complete.
On Scheduled Time: Stop campaign on selected data and time.
3rd Party Integration:
Request Call End: Select the call to end.
Click on “Save” button on top to start the campaign.
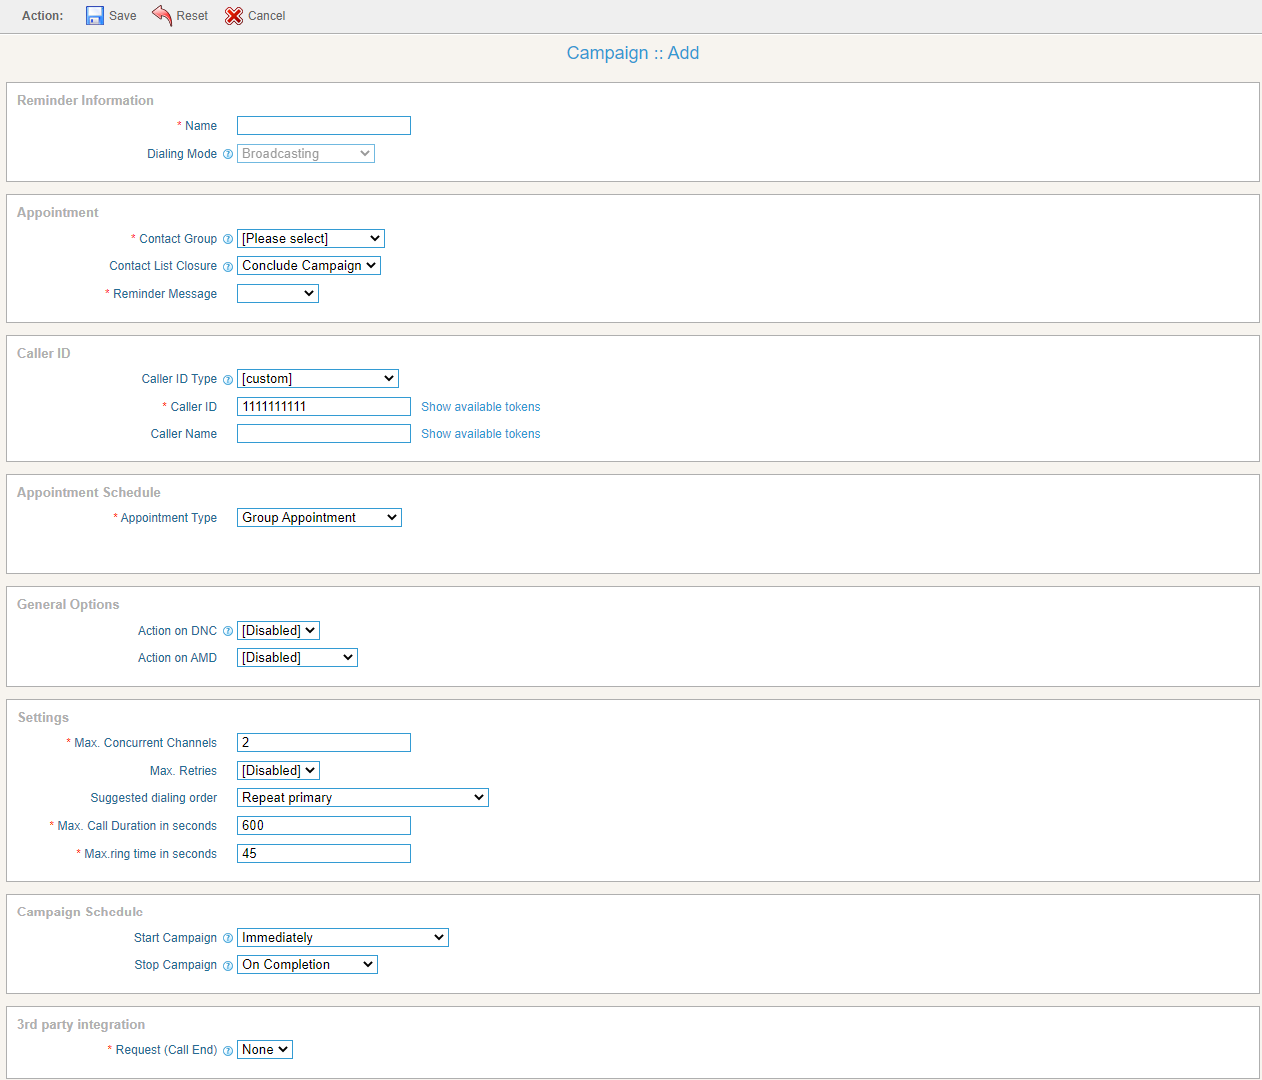
iv) Appointment Reminder Campaign:
This campaign places a reminder of calls to all the contacts in a group. This campaign requires that every contact should have scheduled appointment start time and appointment end time in any of the custom fields in contact form. We will place all calls before appointment start time. Campaign administrator will set ‘reminder call time’ in the campaign creation form that will specify how many hours before the appointment starts it will place the call. There is also a ‘reminder expiry time’ field in the campaign creation form that makes sure it should place no calls after the expiry time. When tenant selects this campaign, it will open a form that lists all the options and settings for creating this campaign.
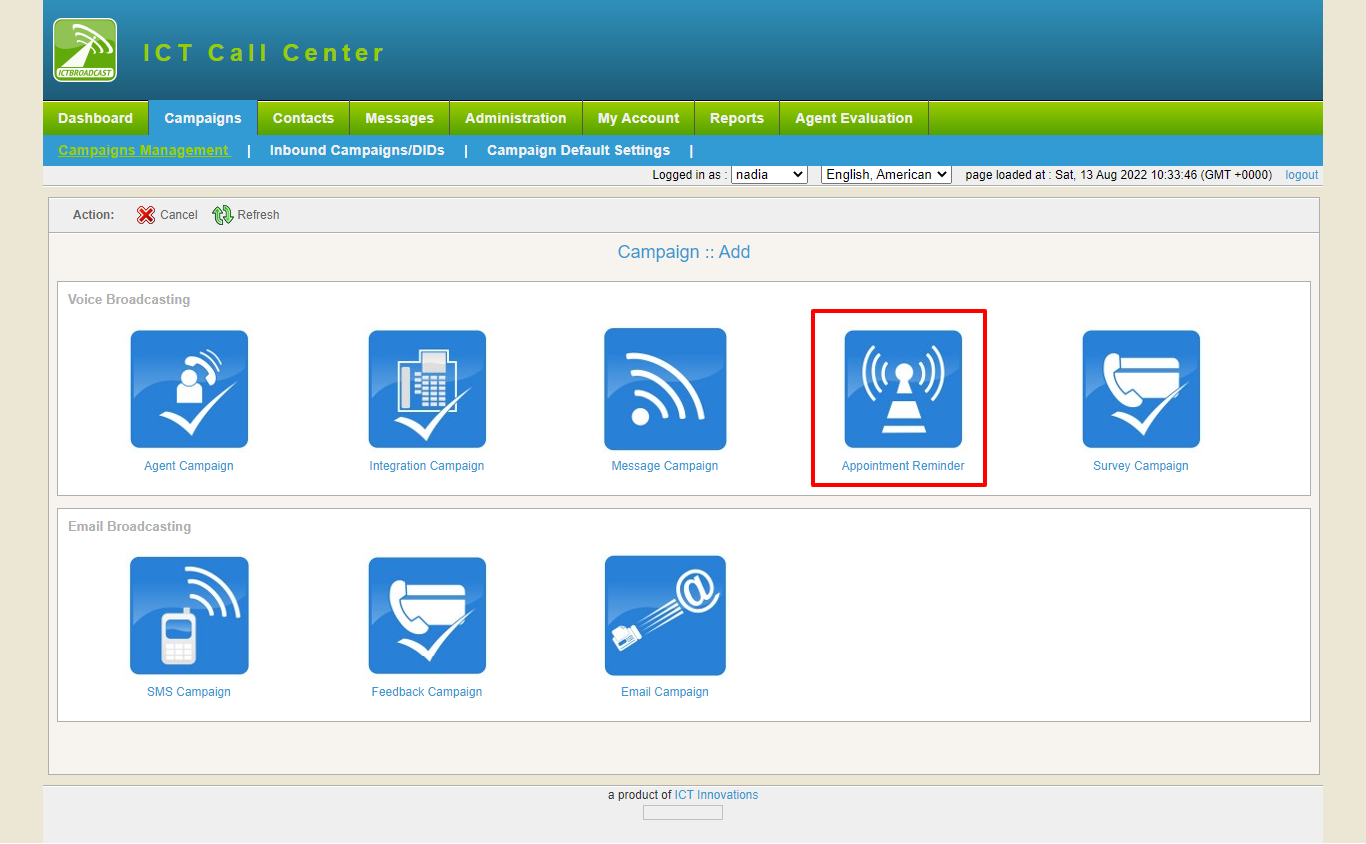
Steps to create Appointment Reminder Campaign:
1. Navigate to Campaign => Campaign Management => Add new Appointment Reminder.
2. Fill the campaign form with required fields like:
a) Campaign Name
b) Contact Group
c) Reminder Message
Appointment Type:
Appointment type can be an individual or group individual reminder. In individual reminder, every contact that is dial may have different appointment schedule time. Examples of individual appointments are doctor’s appointment or lawyer’s appointment, where each patient/client has different timings for the meeting. Administrator of the campaign will select where the appointments store for each contact by selecting the value in ‘Appointment Start Field’. Then the tenant will select how many hours before the appointment time it should place a reminder call. Reminder expiry field will ensure that it should place no call after the expiry time. Campaign schedule will also apply on the calls to ensure legal time calling.
Group Reminder:
In group reminder, a group of people will dial according to the campaign schedule time. Examples of group appointments are training attendees or class/school students where all the members of training or class students have time for a training session/class. Administrator of the campaign will himself manage how many days/hours before it should run the appointment campaign. In group appointments, campaign scheduling time will apply for dialing contacts.
Glossary
Reminder information:
Name: Select the name of the contacts to whom had to send reminder message.
Appointment:
Contact Group: Select contact group/List of phone numbers this campaign will dial.
Reminder Message: Select from a list of already created IVR Messages.
Caller ID:
Caller ID: Enter Caller ID to use with outgoing calls.
Caller Name: Enter caller name to use with outgoing calls Appointment Schedule:
Appointment Type: Select the type as “Group Appointment” or the “Individual Appointment”.
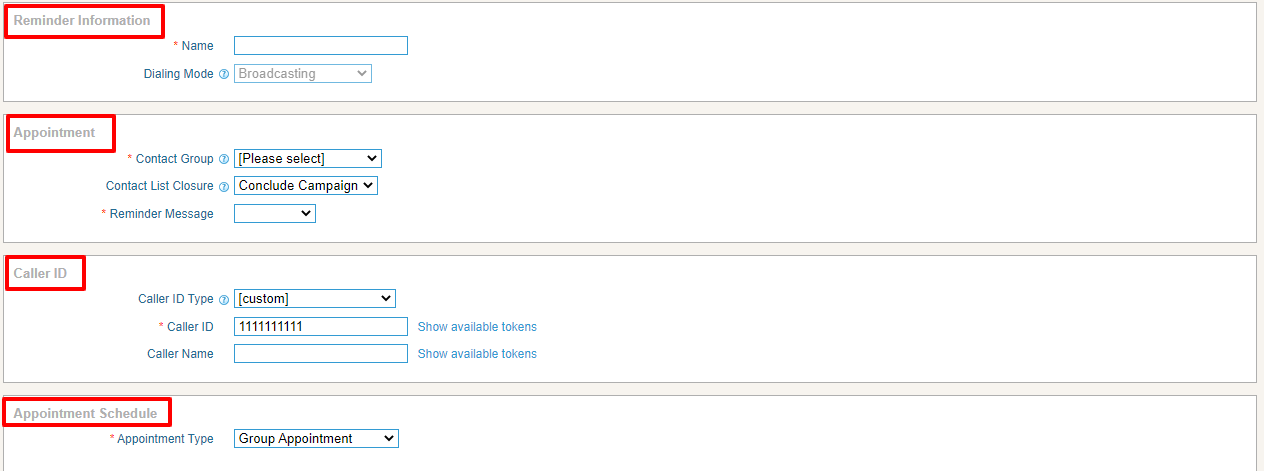
General Options:
DNC Action:
DNC could enable and disable. When disabled, no action performs. When enabled, it will set a key “9” for DNC action. This means that when the recipient presses 9 on his phone, it will delete his number from the contact list.
AMD (Answering Machine Detection) Action:
When AMD disabled, it ignores the Answering Machine. When hang up selected, it detects AMD if found, then hang up the call otherwise continue normally. Third option is to leave a message. It detects AMD if found, then play a different message and hang up. It has another field for message recorded for an answering machine.
Settings:
Max. Concurrent Channels:
Maximum number of concurrent channels that said the campaign will support.
Max retries: Max number of retries to contact the said contact.
Max call Duration: Maximum allowed duration for each call. After this duration the call will disconnected automatically, if user is not sure about the duration of call, select the maximum number so that it does not affect call conversation.
Campaign Schedule:
**Start campaign: **
Schedule campaign start it has following options:
a) Immediately: Start a campaign immediately just after creation.
b) On Scheduled Time: Start campaign on selected data and time.
Stop/Pause campaign: Schedule campaign stop time it has following options:
When Done: Stop the campaign when everything is complete.
On Scheduled Time: Stop campaign on selected date and time.
3rd Party Integration:
Request Call End: Select the call to end.
Click on “Save” button on top to start the campaign.
This campaign allows to create surveys and polls. This campaign dials the number of contact list, on an answer by the recipient, asks a set of questions by playing voice messages and then records their responses (DTMF key or Voice response) from recipient and prepares the report for further analysis. In a survey campaign, a tenant can create choice-based questions that require the call recipient to respond using the key press DTMF function, as well as open-ended questions that require the call recipient to record their message. These recorded voice responses (or feedback) show in a list of voice responses in the campaign summary survey report. When tenant selects this campaign, it will open a form that lists all the options and settings for creating this campaign.
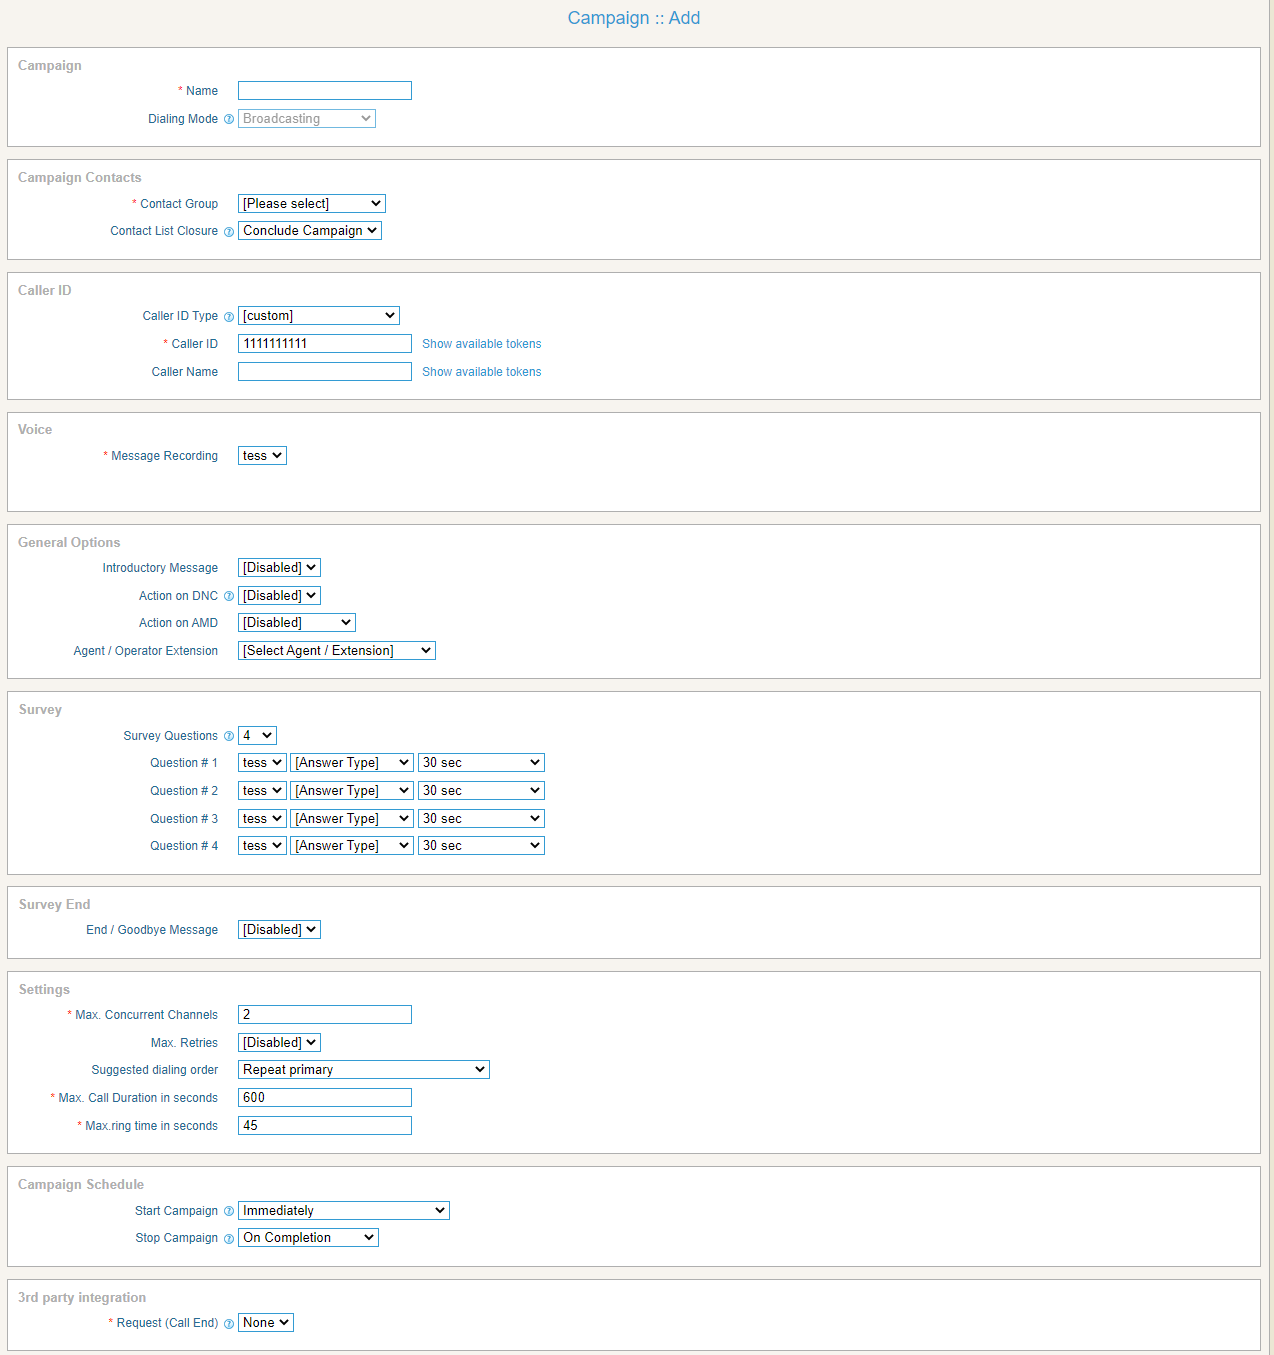
Glossary
Campaign:
Campaign Name: Name of the campaign for identification.
Campaign Mode:
When selected to Normal, it stops the campaign after processing all the contacts. When selected to Permanent, it allows the campaign to keep running even after processing all the contacts and waiting for new contact in the background. Campaign Contacts Select contact group/List of phone numbers this campaign will dial.
Caller ID:
Caller ID: Enter Caller ID to use with outgoing calls.
Caller Name: Enter caller’s name to use with outgoing calls.
Voice Message: Select from a list of already created / recorded messages.
General options:
Introductory Message:
When enabled, this field allows the campaign manager to select an introductory message. It will play immediately this introductory message when the recipient receives a call.
DNC (Do Not Call) Action:
DNC could enable and disable. When disabled, no action performs. When enabled, it will set a key “9” for DNC action. This means that when the recipient presses 9 on his phone, it will delete the number from the contact list.
AMD (Answering Machine Detection) Action:
When AMD disabled, it ignores the Answering Machine. When hang up selected, it detects AMD if found, then hang up the call otherwise continues normally. Third option is to leave a message. It detects AMD if found, then play a different message and hang up. It has another field for message recorded for an answering machine.
Survey Questions:
This field allows tenant to select number of questions in the survey. At a moment, it will support a maximum of 4 questions. Once the user selected the number of questions, it displayed a question field that allows the user to select a recorded question and then configure the desired responses.
Settings:
Max. Concurrent Channels:
Maximum number of concurrent channels that said campaign will support.
Max retries:
Max number of retries to contact the said contact.
Max call Duration:
Maximum allowed duration for each call. After this duration the call will disconnected automatically, if user is not sure about the duration of call, select the maximum number so that it does not affect call conversation.
Campaign Schedule:
Start campaign: Schedule campaign start it has following options:
Immediately: Start a campaign immediately just after creation.
On Scheduled Time: Start campaign on selected data and time.
Stop/Pause campaign: Schedule campaign stop time it has following options:
When Done: Stop the campaign when everything is complete.
On Scheduled Time: Stop campaign on selected date and time.
3rd Party Integration:
Request Call End: Select the call to end.
Click on “Save” button on top to start the campaign.
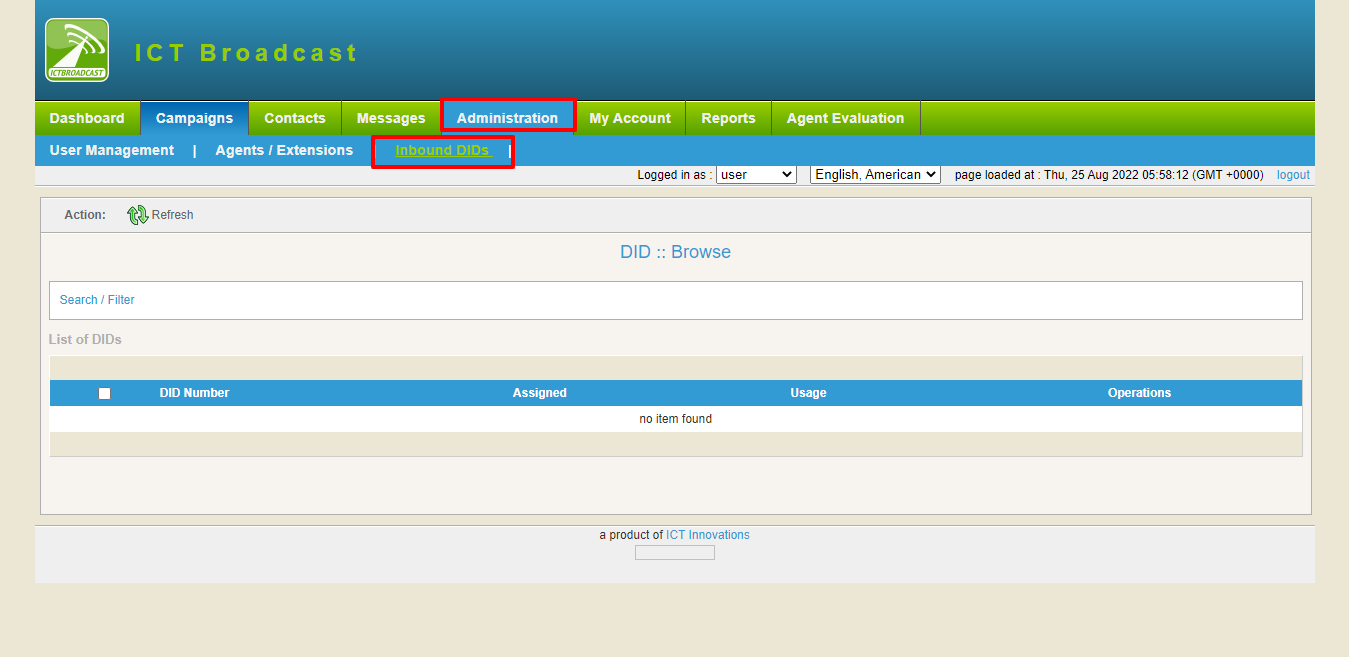
II) Inbound Campaigns/ DIDs:
Like user, tenant did not have authority to create inbound campaigns/ DIDs. Only admin can create it because he has all the privileges.
Go to administration from the main menu, select Inbound DIDs. It will show an interface as shown below figure, user just monitor it nor adds or writes something in it.
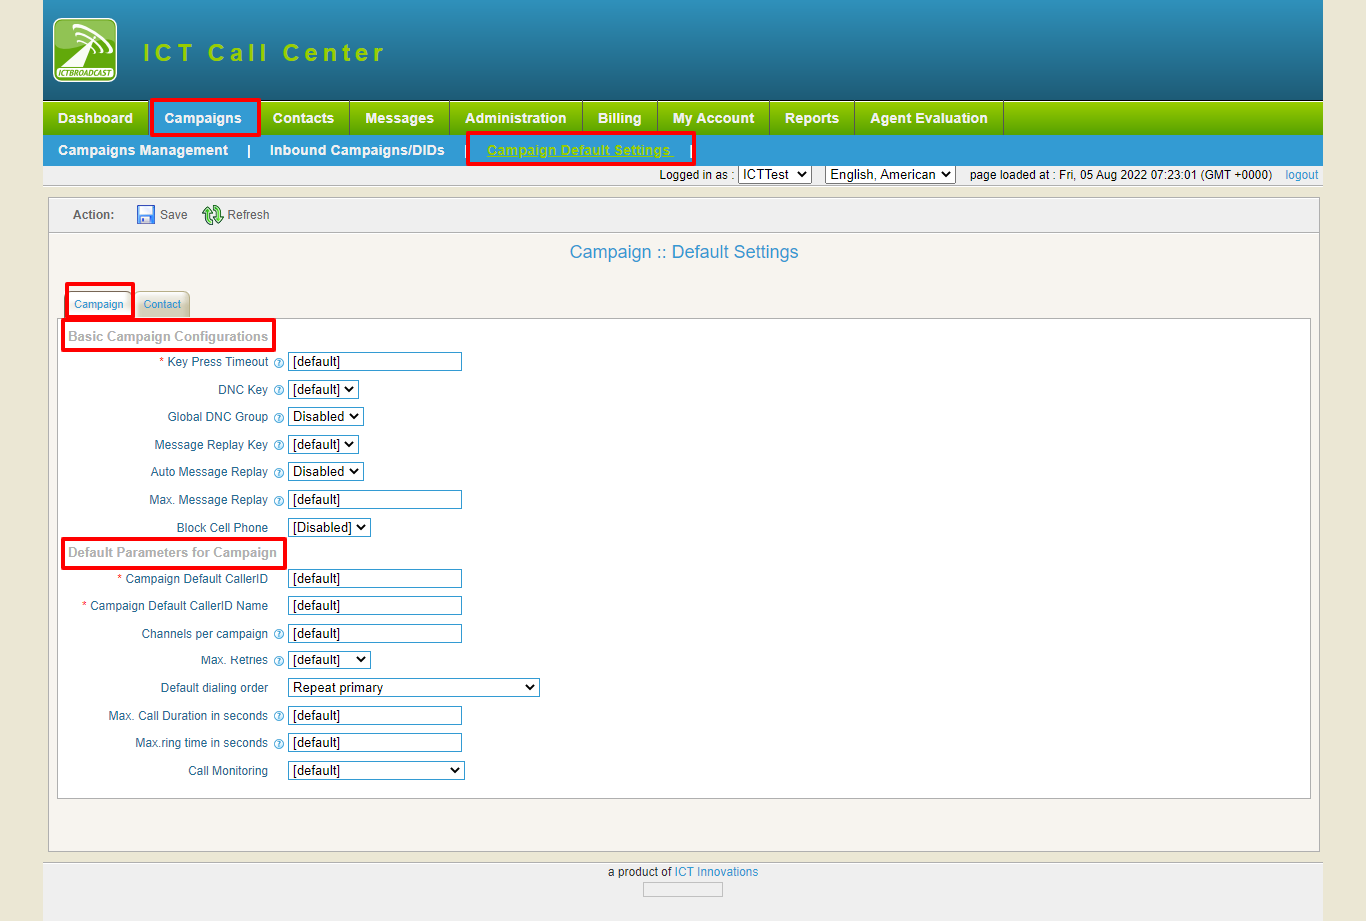
III) Campaign Default Settings – top
Go to Campaigns from the main menu, select campaign default settings from the sub-menu.
It shows the interface as shown in the below figure. All the default setting of campaigns reset from here:
ICTBroadcast allows tenants to manage contacts. Contacts can be grouped into a contact group. Contacts are telephone numbers to be dialed. A contact group can have telephone numbers of multiple destinations/countries. The tenant can also manage regions, governments, and destinations for call termination to a particular group or contact.
Contact group acts as a container for contacts of a particular domain. Campaigns in ICTbroadcast also dial contacts from a particular contact group selected at the time of campaign creation.
The following figure shows the required fields for creating a contact group in the system.
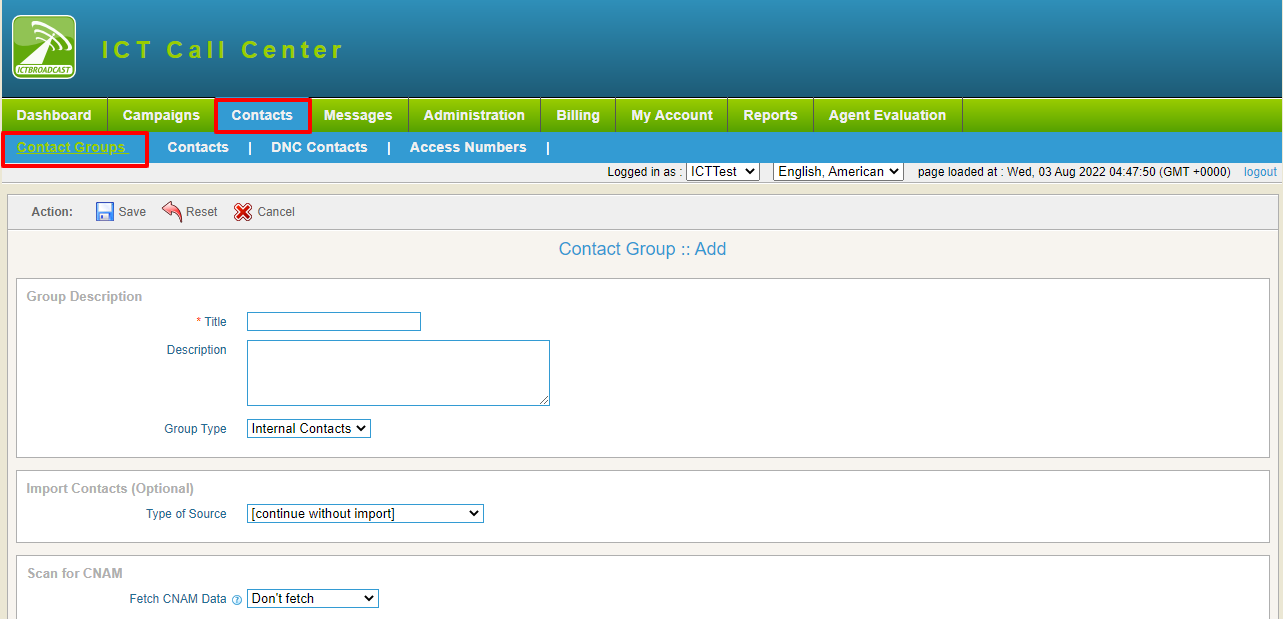
How to create a contact group?
-
Navigate To Contacts => Contact Groups => Add New

-
Enter Contact Group Description and Click Save.
-
The next step is to fill contacts in a contact group.
Glossary
Group Description:
Title: The title allows users to distinguish between different contact groups.
Description: Description allows further elaborate contact groups if the title lacks meaning.
Import contacts (Optional):
Type of source: Select the type of source from the options given.
A contact is a phone number or other personal information.
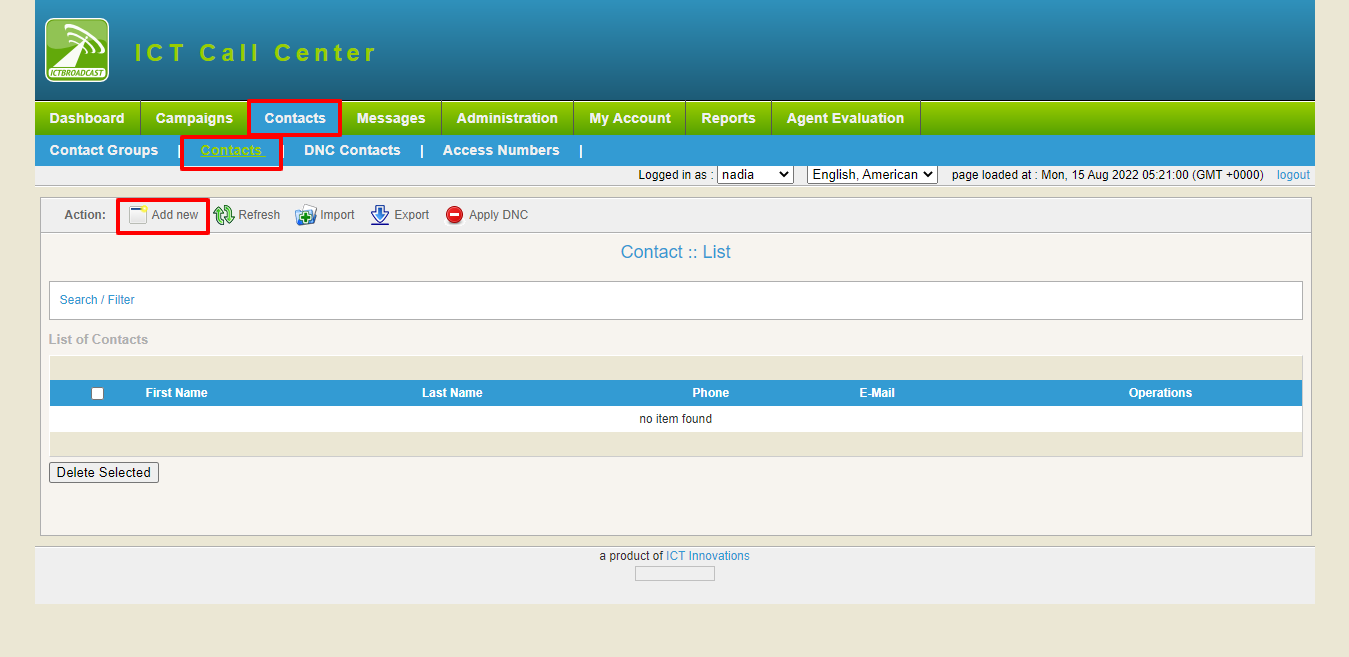
How to fill contacts in a contact group?
-
Navigate to contacts => contacts

-
There are two different ways to add a contact.
*** Add New Contact***
For bulk import contact:
-
Click Save.
Glossary
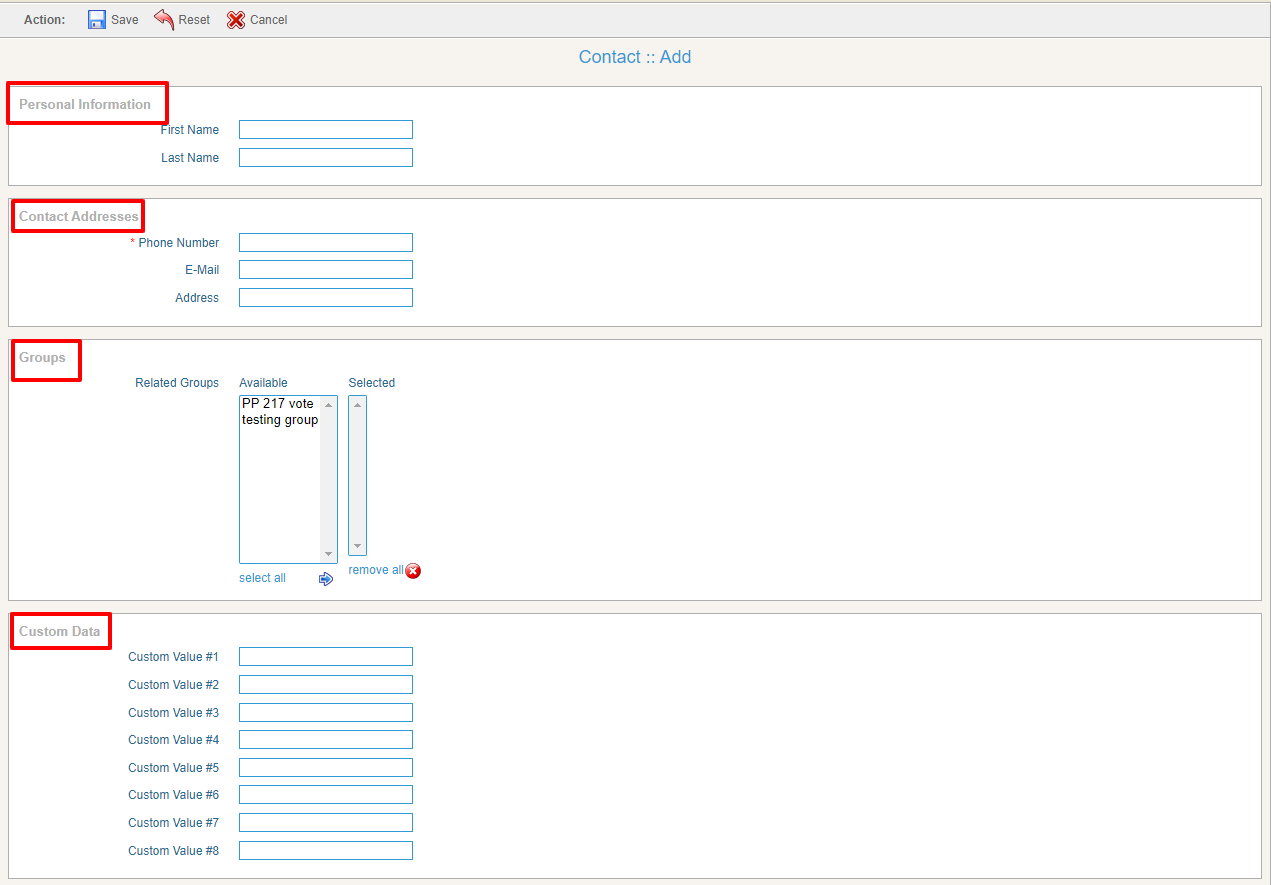
Add new:
Allows tenants to enter a contact in a particular contact group by clicking on add new button.
Personal information:
Type the “First Name” and “Last Name” of the contact to be added.
Contact Addresses:
Type the contact “Phone number,” “Email,” and “Address.”
Groups:
Select the group from the already Available group in the list.
Custom Data:
Type the custom data.
Comments/Remarks:
Type the words in the Description.
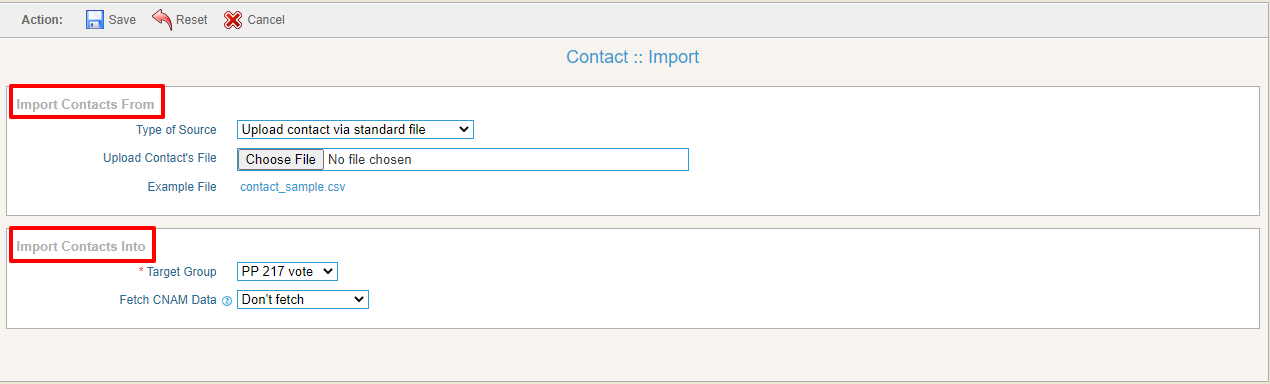
Import:
Import Contacts From:
This option enables tenants to import contact lists from external text or CSV files by clicking on the “import” button. The format of the external file needs to be in CSV (comma separated values) format as shown below:
923330000000, First Name, Last name, email@domain.com, address, custom 1, custom 2, custom 3, custom 4, custom 5, custom 6, custom 7, custom 8, 923331111111, First Name, Last Name, other@domain.com, address, custom 1, custom 2, custom 3, custom 4, custom 5, custom 6, custom 7, custom 8 …
Import Contact Info: Select the Target Group.
The first field is the phone number which is mandatory, while the other fields are optional. This means users can create a contact list simply using the following format:
923300000000 923331111111 …
Find Duplicate:
This option enables a tenant to find duplicate contacts.
Find Invalid:
This option enables a tenant to find invalid contacts from the list. Weak contacts will be defined as contacts that do not match with pre-selected destinations of the contact group.
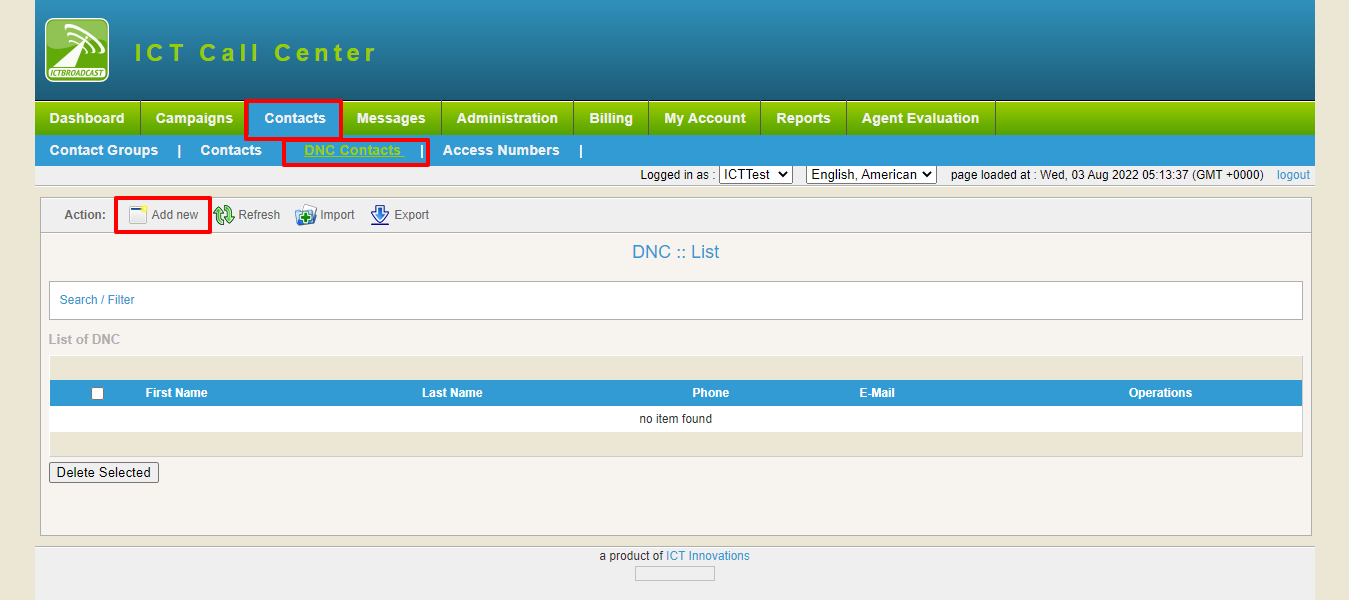
DNC Contacts are the contacts that tenant does not want to call. The tenant can apply this DNC list to the original contact list and filter out and eliminate those contacts from the contact list that are present in the DNC list.
DNC Group: Select the DNC group.
Personal Information:
Type the “First Name” and the “Last Name.”
DNC Address:
Type “Phone number”, “Email”, and “Address”.
Comments/Remarks:
Type comments in the description box.
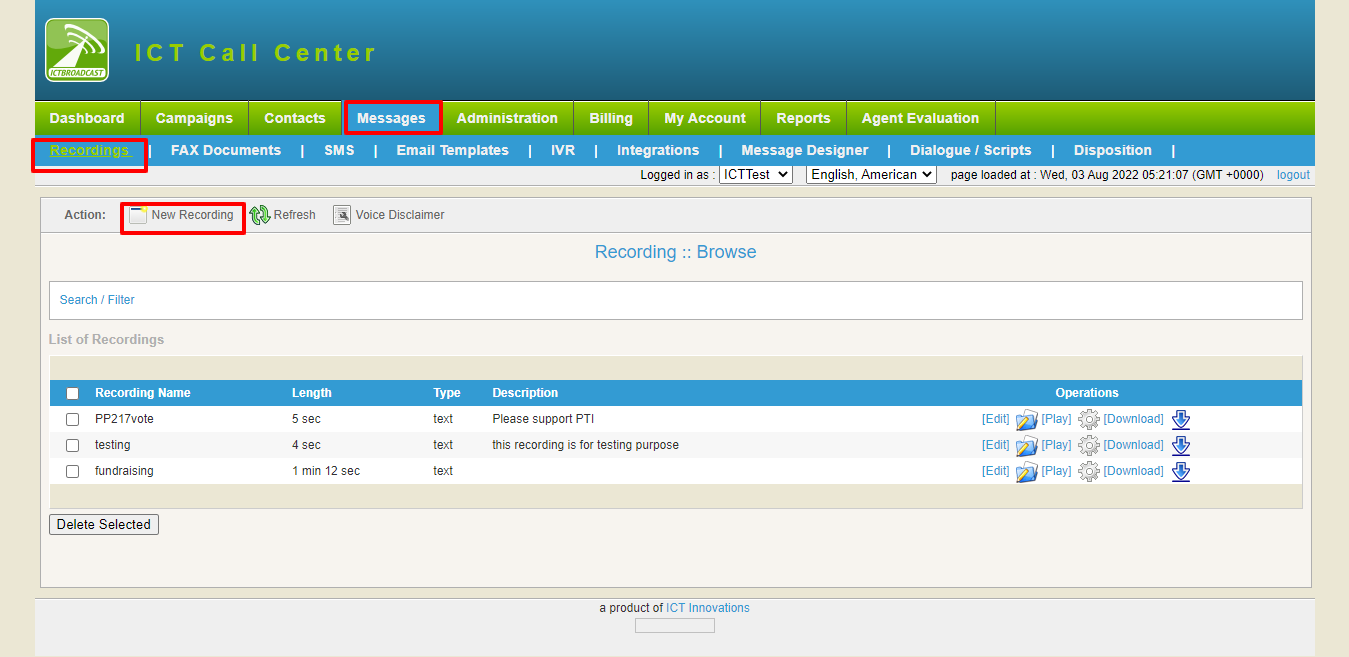
This is very important area of ICTbroadcast. It allows tenant to manage campaigns, agents, contacts, reports, IVRs, recordings. All these options are required when tenant need to create a campaign. In other words, whenever tenant want to create a campaign of his/her choice, tenant first need to come to Messages menu to upload some recordings.
This is an area where tenant will upload recordings. These recordings could be messages, survey questions, introductory message etc. If tenant don’t have recordings. Don’t worry, system also provides tenant with TTS (text-to-speech) feature. Select recording type to Text and write text that tenant wants to play. System will create its recording and that message will be played. System also provides tenant with a feature to play the sound that tenant uploaded or written text.
-
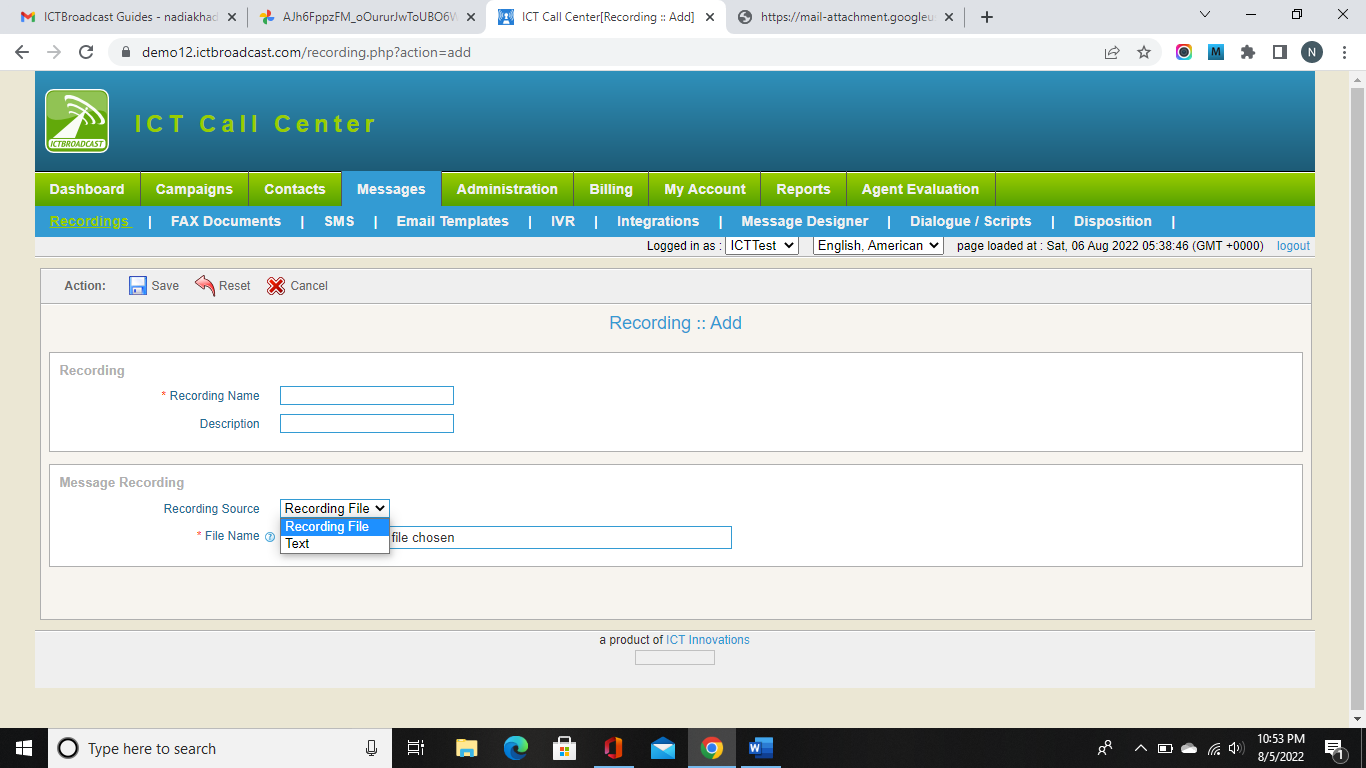
Preparing Voice Recording:
The required format of the sound file needs to 8 kHz sampling rate, 16 bits mono, and the supported type is a wav file. The tenant can use one of the following methods to create 8 Khz 16-bit mono Wav files.
a) Microsoft Windows built-in recording tool “Sound Recorder.”
1. Click on the “start” button on the windows operating system.
2. Click on “All Programs.”
3. Click on “Accessories.”
4. Click on “Entertainment.”
5. Click on “Sound Recorder.”
6. Record your voice through the mic using the start and stop buttons.
7. Click on the File menu.
8. Click on “Save as.”
9. Enter the proper file name.
10. Select “Save as type” as a wav file.
11. Click the “Change” button to change the format to 8khz 16-bit mono.
12. Upload the saved file to ICTbroadcast as a new recording.
b. TTS (Text-to-speech) programs:
Open-source solutions like speak, flite, and festival and commercial solutions like cepstral, speech, and voice forge. This feature has been added to the new version of ICTbroadcast using the festival TTS (Text-to-Speech) program. Now tenant just writes text; the system will create its audio.
c. Open-source software:
Open-source software like audacity for audio recording and editing.
d. Professional voiceovers from professionals from providers like voice123.
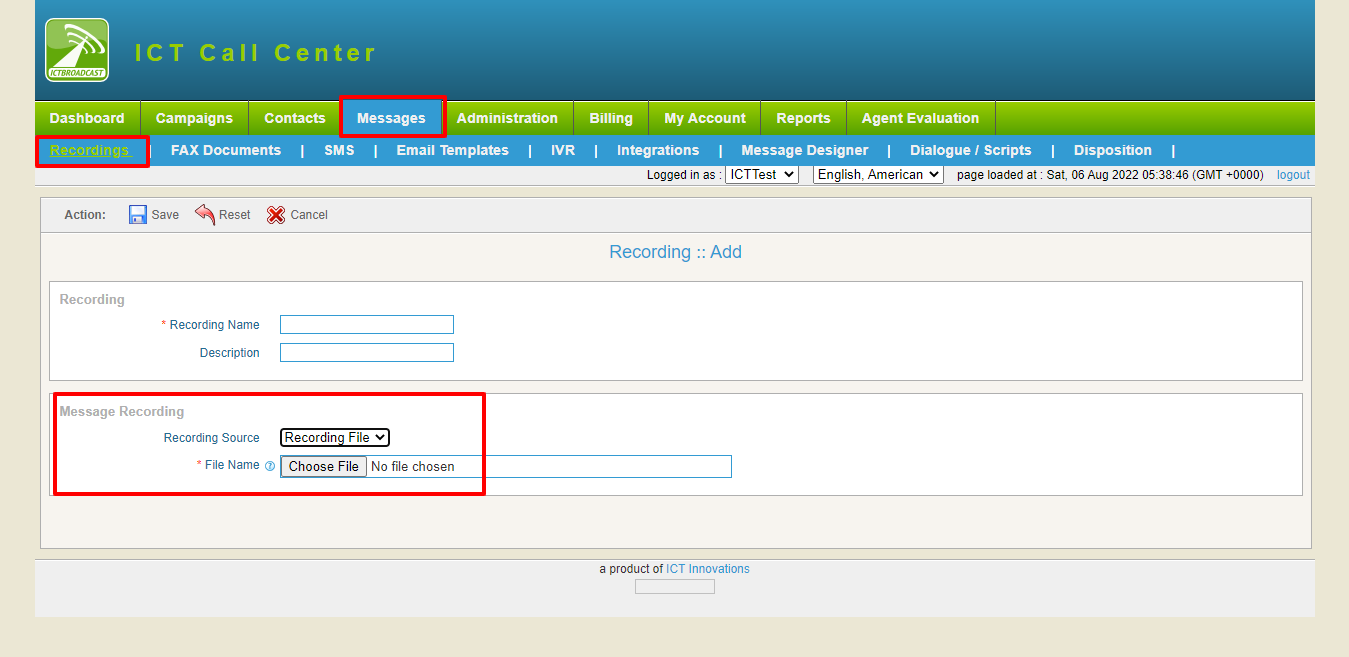
Steps to Create Recordings:
1. Messages => Recordings => Add New.
2. Select the recording source.
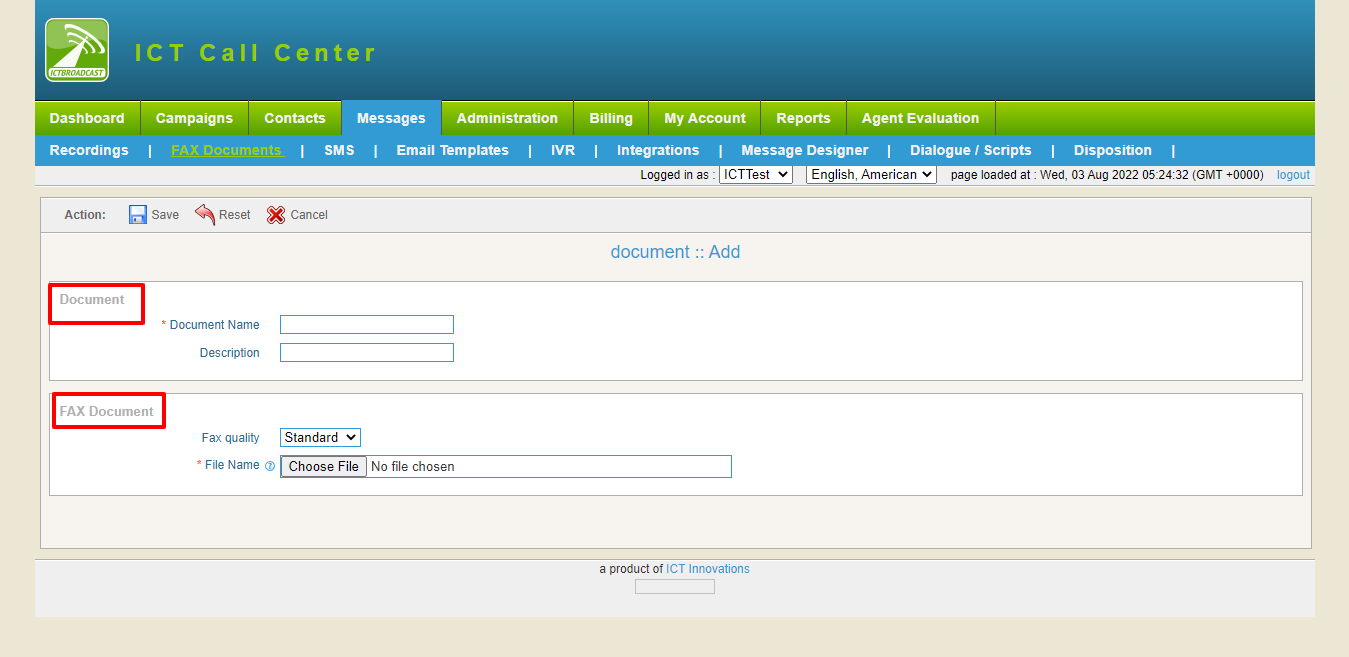
ii) Fax Documents – top
This is an area where tenants will manage fax documents. The tenant can also preview fax documents once they are uploaded.
Steps to create Fax Document:
-
Navigate To Messages => Fax Document => Add New.
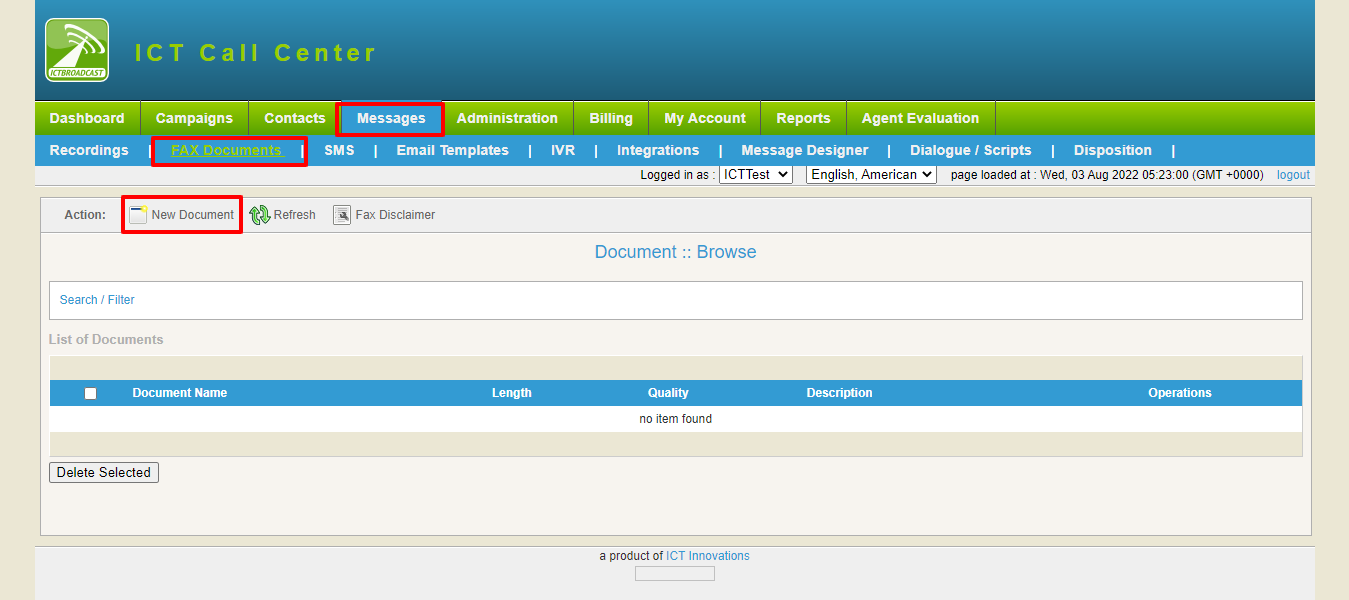
2. Enter the Document name and description.
3. Fax document is to select “Fax Quality” and choose file of fax document (pdf, tiff).
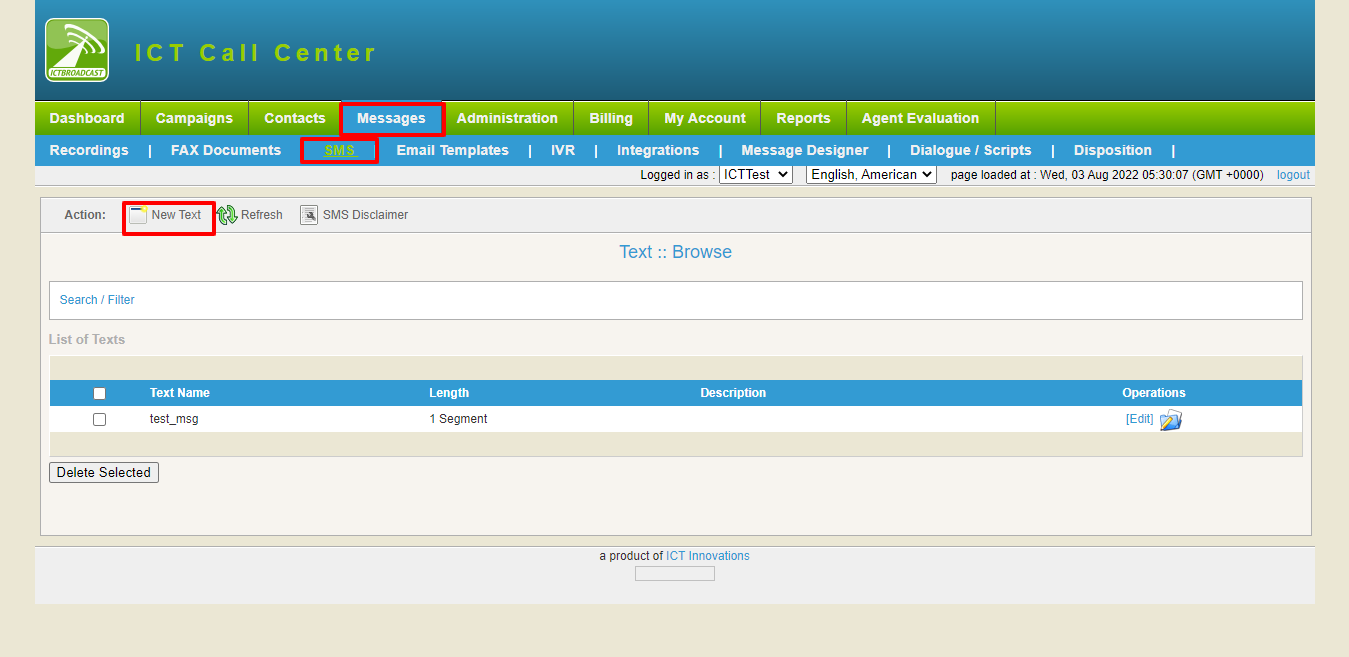
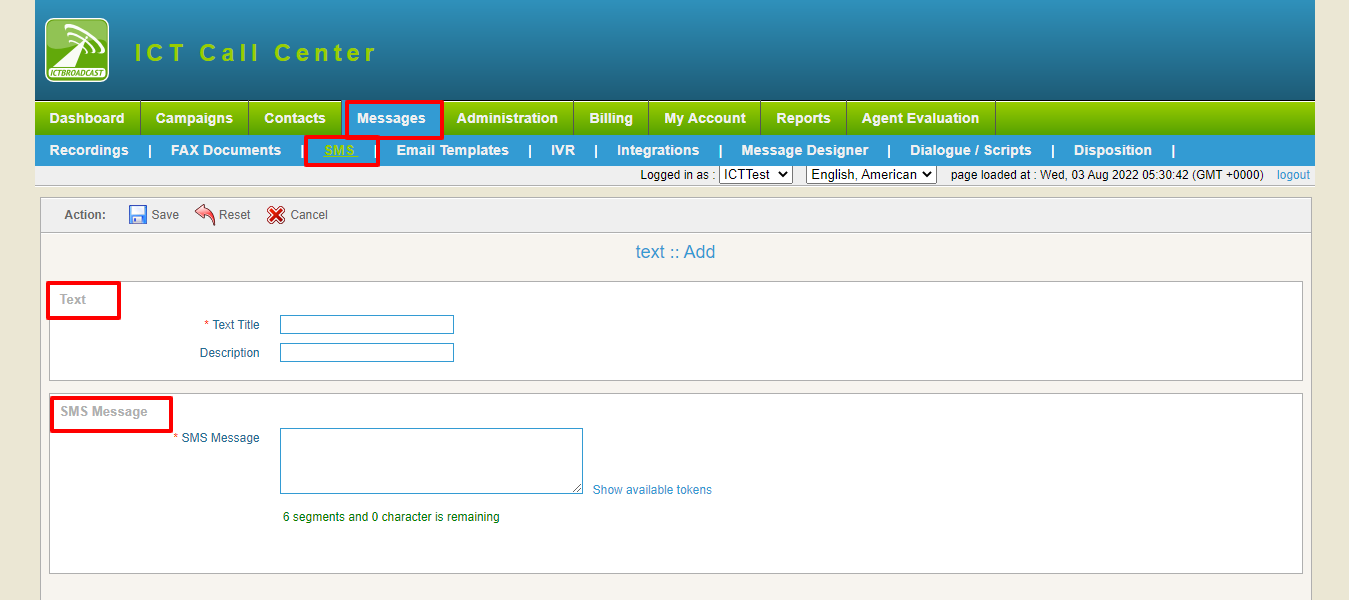
This is an area where the tenant manages SMS messages.
The following form is simple and requires a Text Title for the message, description, and any SMS message the tenant wants to broadcast.
Using Tokens in SMS Messages:
In SMS, tenants can use tokens while creating an SMS. Tokens are useful when customer-specific information is required. For example, using the customer’s name, address, or email address in the SMS. The following pattern is allowed for using tokens:
[Contact: first_name]
Whenever the above pattern is used, the contact’s first name will be replaced at this place. Similarly, you can use [contact: last name], [contact: custom1], [contact: custom2], [contact: email] etc.
You can use all the fields of ICTbroadcast contact as tokens. Following is a list of Tokens that can be used in SMS Messages:
[campaign: caller id]
[campaign: callerid_name]
[campaign: name]
[call: contact]
[call: status]
[call: error]
[contact: first name]
[contact: last name]
[Contact: phone]
[Contact: email]
[Contact: address]
[Contact: custom1]
[Contact: custom2]
[Contact: custom3]
[Contact: custom4]
[Contact: custom5]
[Contact: custom6]
[Contact: custom7]
[Contact: custom8]
Steps to create SMS Messages:
1.Navigate to Messages => SMS => Add New.
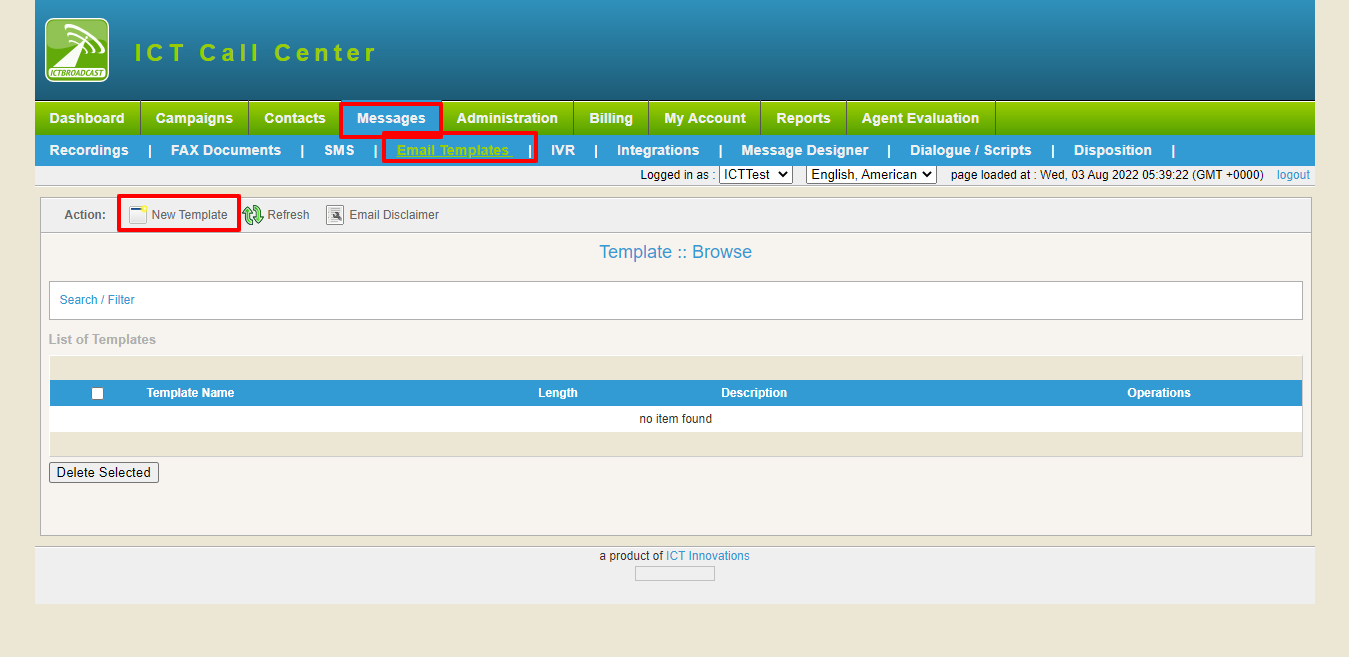
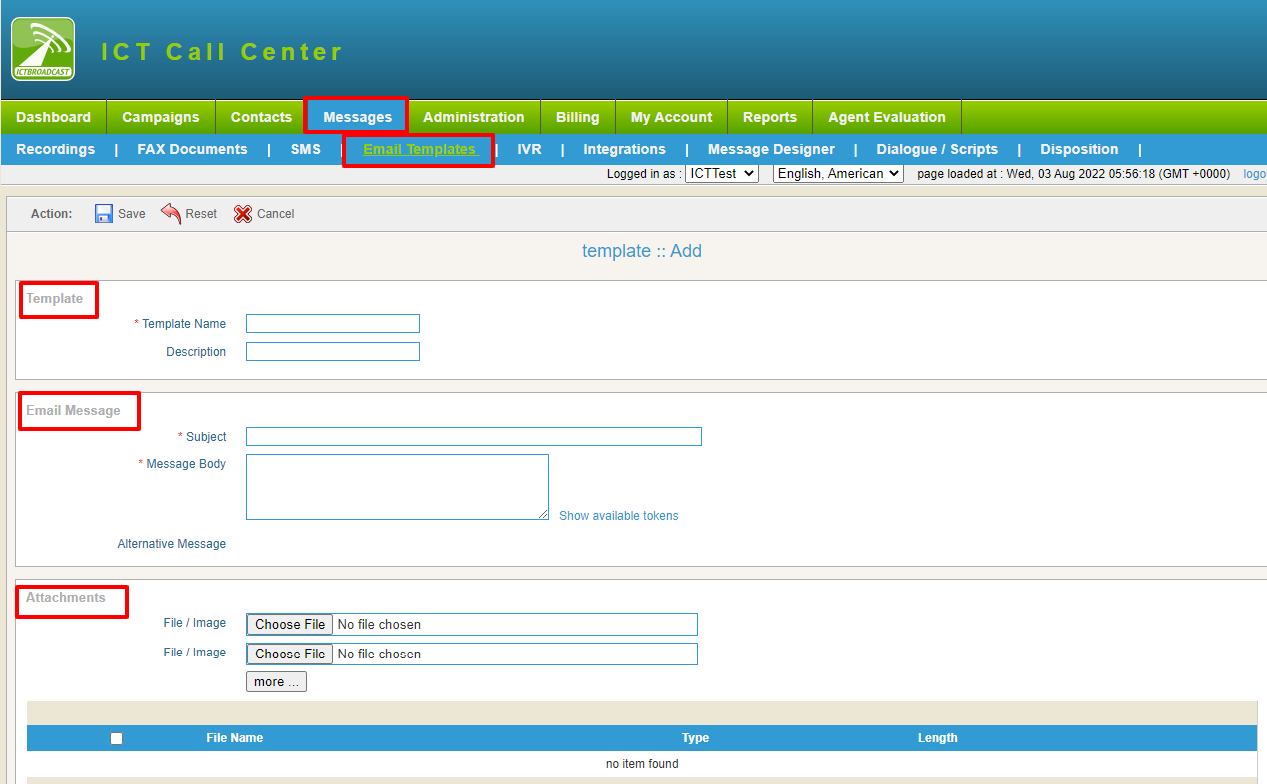
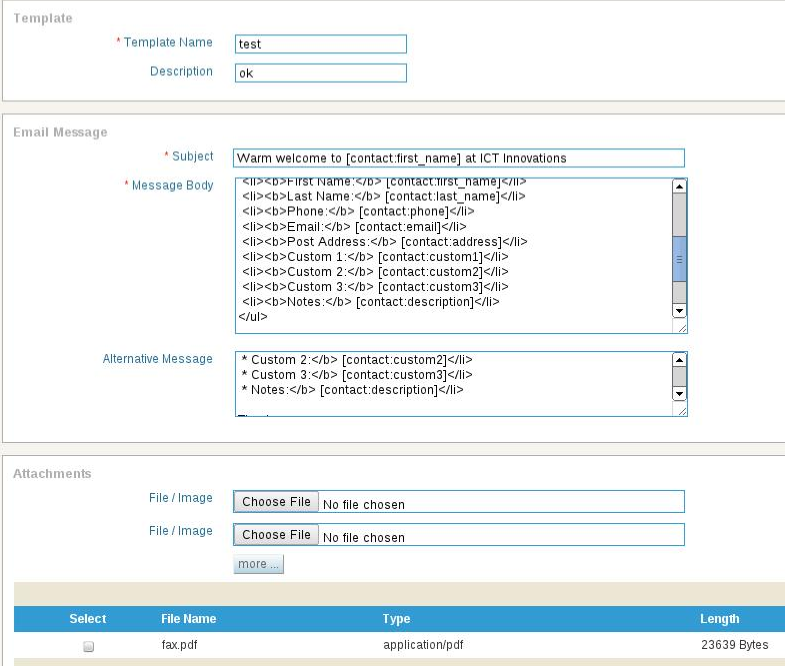
Here tenants can create various email templates for email broadcasting campaigns. An email template is a sample email text where the tenant can provide the subject of the email, email body, alternate email body (optional, if the receiver doesn’t have HTML support), file attachments, use custom tokens in place of the receiver’s name, email and contact information, etc. Once the email template is complete, the tenant can use it to send it to its contact list.
Template name:
Name of the template as it appears in campaign form.
Description:
Description of the template (optional).
Subject:
The tenant wanted to send the subject line to its contact list.
Message Body: Actual message (email body) to send.
Alternate Message: Alternate message without any HTML tags (optional).
File/Image:
Any number of attachment files to send with email. To attach a file, select it from choosing file field and click the save button at the top of the page. To remove an attached file, check the select box against it and click save at the top of the page.
Using Tokens in Email Templates:
Tokens are helpful when customer-specific information is required.
The following pattern is allowed for using tokens in email templates.
[contact: first name]
Whenever the above pattern is used, it means the contact’s first name will be replaced at this place.
Following is a list of Tokens that can be used in Email Templates.
[campaign: caller id]
[campaign: callerid_name]
[campaign: name]
[call: contact]
[call: status]
[call: error]
[contact: first name]
[contact: last name]
[Contact: phone]
[Contact: email]
[Contact: address]
[Contact: custom1]
[Contact: custom2]
[Contact: custom3]
[Contact: custom4]
[Contact: custom5]
[Contact: custom6]
[Contact: custom7]
[Contact: custom8]
Plus, two extra tokens that can only be used in email templates are:
[url_confirm_yes]
[url_confirm_no]
Steps to create Email Templates:
1.Navigate to Messages => Email Template => New template.
v)IVR (Interactive Voice Response):
IVR stands for Interactive Voice Response. It allows the system to read custom information using text-to-speech or recorded messages and to detect keypad inputs. IVR can be used to build approaches such as virtual receptionists, custom appointment reminders, and advanced telephone surveys.
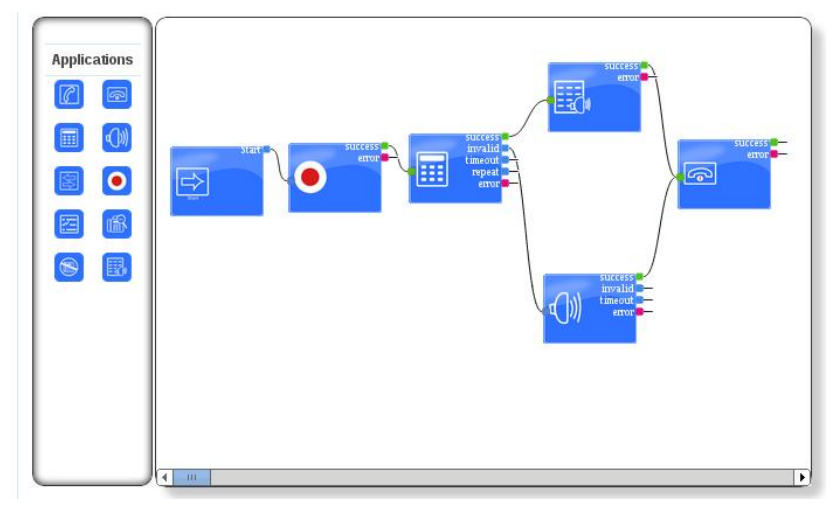
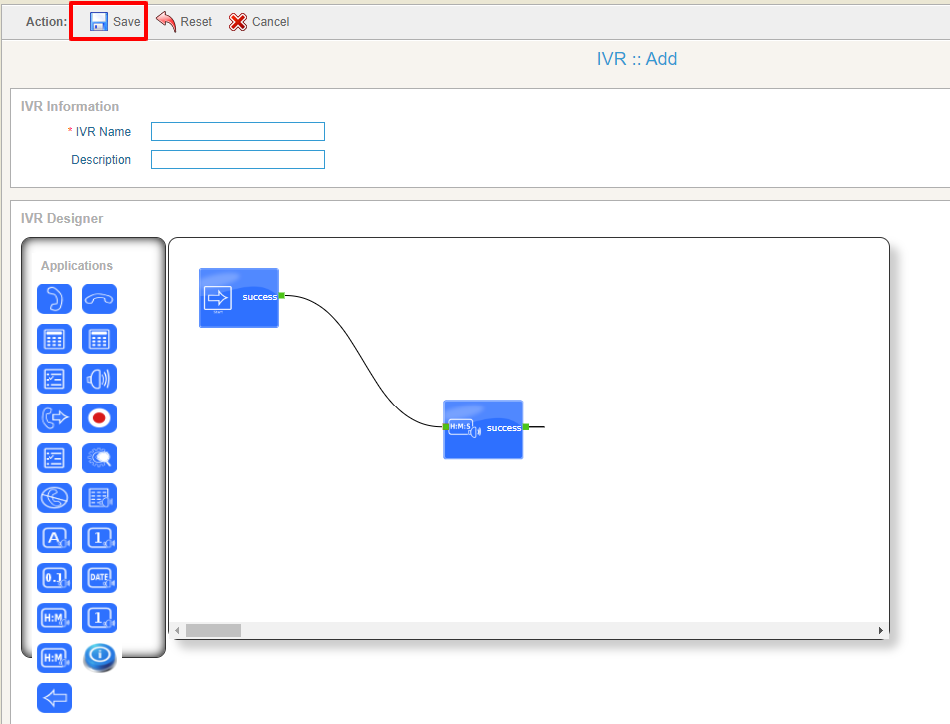
a) Introduction to IVR Designer:
IVR Designer allows you to create advanced telephony systems with a simple drag-and-drop interface. The tenant can pick any application from the toolbar area, drag it to the main drawing area and drop it. This will create that application at the dropped location. Its drag-and-drop interface makes it easy for tenants to create voice response applications in a web browser. IVR Designer’s toolbar contains the applications to develop an IVR. Following is a brief description of each of that applications.
Using Tokens in IVR Applications:
Tokens are variables that replace their value dynamically while the campaign is run. Tokens have a predefined way to use them. Some IVR applications allow you to enter or select tokens. IVR designer allows a specific pattern for using tokens which are described below:
[Contact: first_name]
The contact’s first name will be played whenever the above pattern is used. Similarly, you can use [contact: last name], [contact: custom1], [contact: custom2], [contact: email] etc.
You can use all the fields of ICTbroadcast contact as tokens. Currently, TTS, Say Alpha, Say Digit, Say Number, Say Date, and Say Time applications support using tokens.
Following is a list of Tokens that can be used in IVR Applications:
[campaign: caller id]
[campaign: callerid_name]
[campaign: name]
[call: contact]
[call: status]
[call: error]
[Contact: first_name]
[Contact: last_name]
[Contact: phone]
[Contact: email]
[Contact: address]
[Contact: custom1]
[Contact: custom2]
[Contact: custom3]
[Contact: custom4]
[Contact: custom5]
[Contact: custom6]
[Contact: custom7]
[Contact: custom8]
Description IVR Applications:
Call Answer:
Call answer applications answers an incoming call.

Call Hang up:
Hang up application forces a call to be disconnected.

Get Input:
Get any input requests from your IVR

Condition:
Apply condition for test whether the first name and last name are matched or not.

Time Condition:
Apply Time conditions for the test.

Play Audio:
Plays a sound file. You can use a sound file from the Recording section in the Messages area.

Call Transfer:
The Transfer application connects the active call to a specified phone number of an agent. This number is referred to as the Extension number in ICTbroadcast.

Call Record:
The Record application can either create a recording, which starts with a beep and ends with the user pressing pound, or it can record the remainder of the call.

Options Menu:
Options Menus are used to gather keypad input from the user. Each menu node requires at least one “Play” node to present options to the user and one or more “Key Press” nodes to handle the incoming vital presses.

Answering Machine Detection (AMD):
It detects after answering a call whether it is Human or Machine. Then based on this decision, the user can perform any action.

Do Not Call (DNC):
DNC Application adds a number to the DNC list.

Text-To-Speech (TTS):
TTS application allows users to enter the text that will be played as sound.

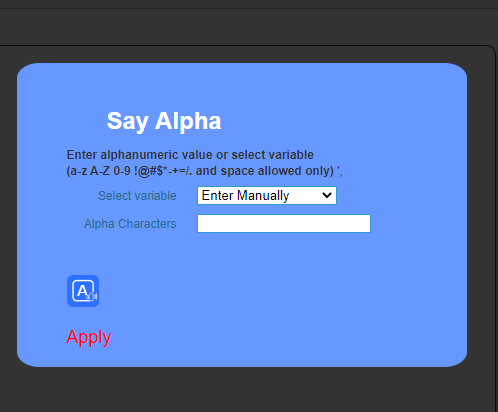
Say Alpha:
Say Alpha application allows you to enter an alphanumeric value or select some variable and then play that value.

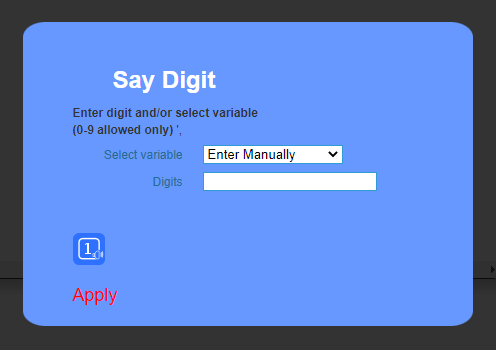
Say Digit:
Say Digit application allows you to enter digits or select some variable and then play that value.

Say Number:
Say Number application allows you to enter some number or select some variable and then play that value.

Say Date:
Say Date application allows you to enter a date or select some variable and then play that value.

Say Time:
Say Time application allows you to enter time or select some variable and then play that value.

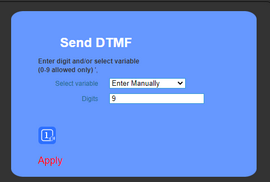
DTMF:
DTMF stands for dual-tone multi-frequency generated tone or sounds when any key is pressed.
![]()
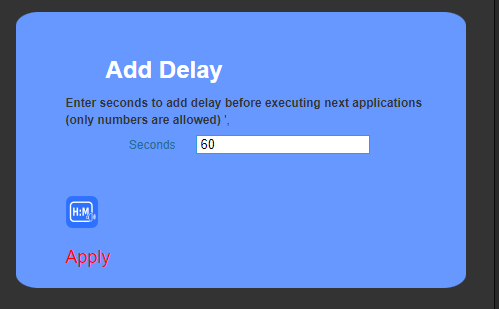
Add Delay:
Enter seconds to add a delay before executing the subsequent applications (only numbers are allowed).

Set Caller ID:
As the name suggests, this application sets caller id for outbound calls. You can also use caller id when a call is transferred. However, make sure that the caller id application should be placed before the transfer application.

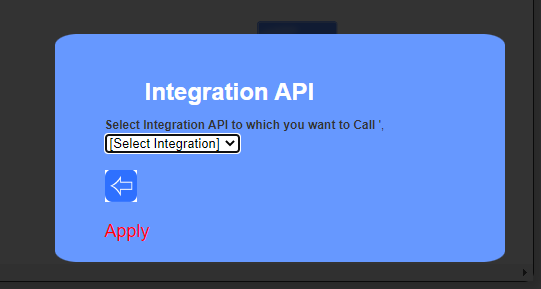
Integrating API:
Select Integration API from the drop-down list which you want to Call.
![]()
ii) Creating IVR Applications:
In this section, working examples demonstrate how IVR designers and IVR applications can be used to create various IVRs. These IVRs can then be attached to a campaign for broadcasting.
Glossary
IVR Application:
A unique IVR element within IVR Designer contains a specific function. E.g., Play Audio plays were recorded. Call Hang-up will disconnect the call.
IVR (IVRs): A complete IVR that contains one or more IVR Applications (elements) linked together. It is saved as a record, can be edited later, and is available to be attached to a campaign.
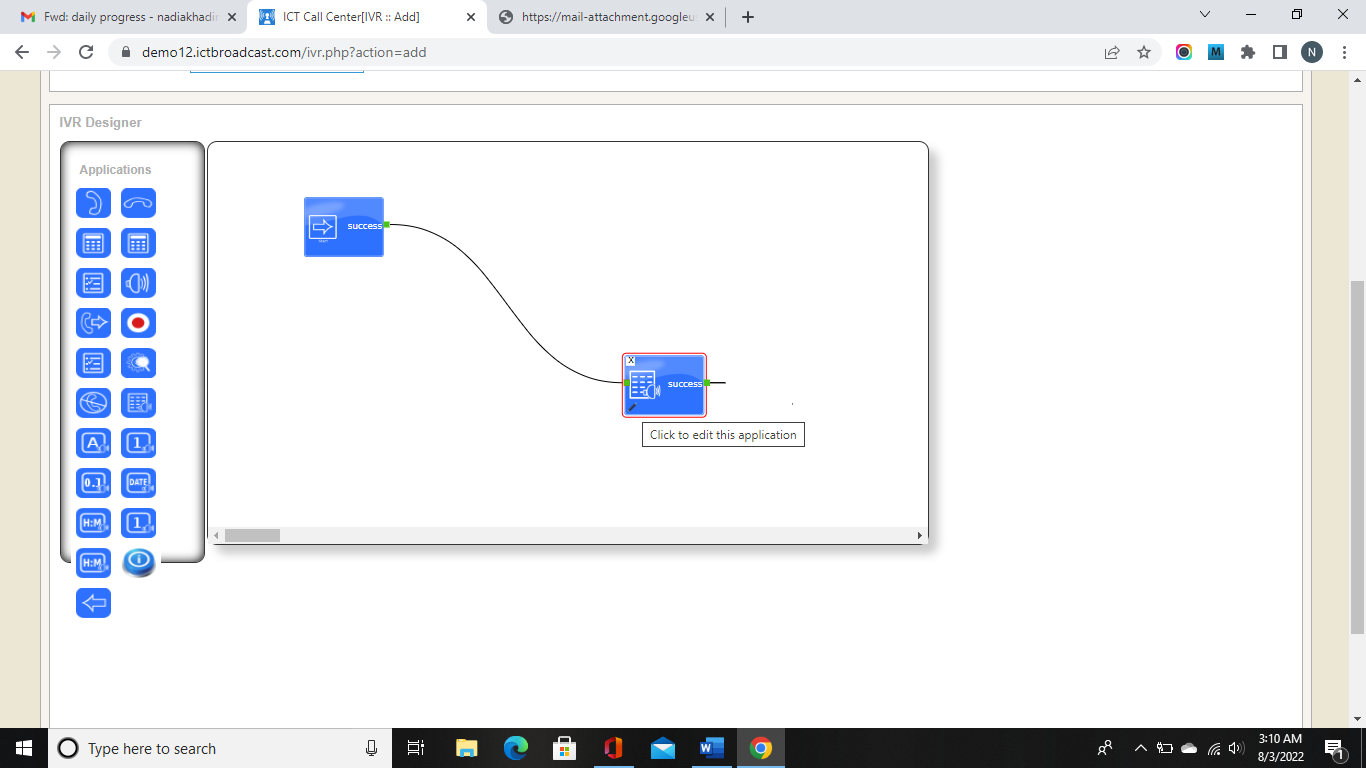
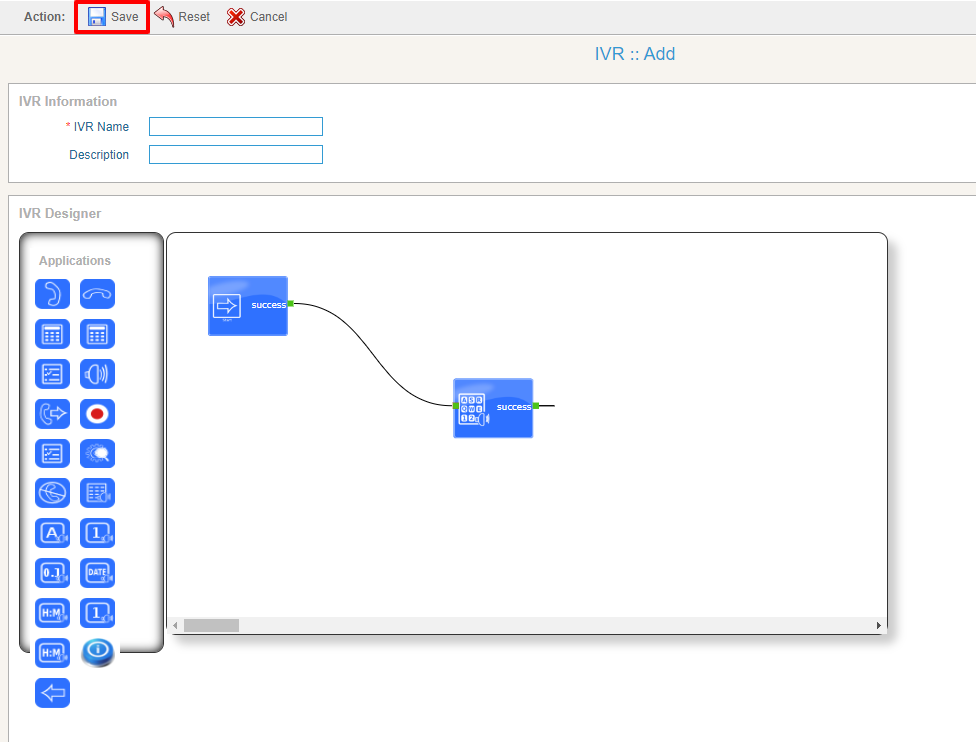
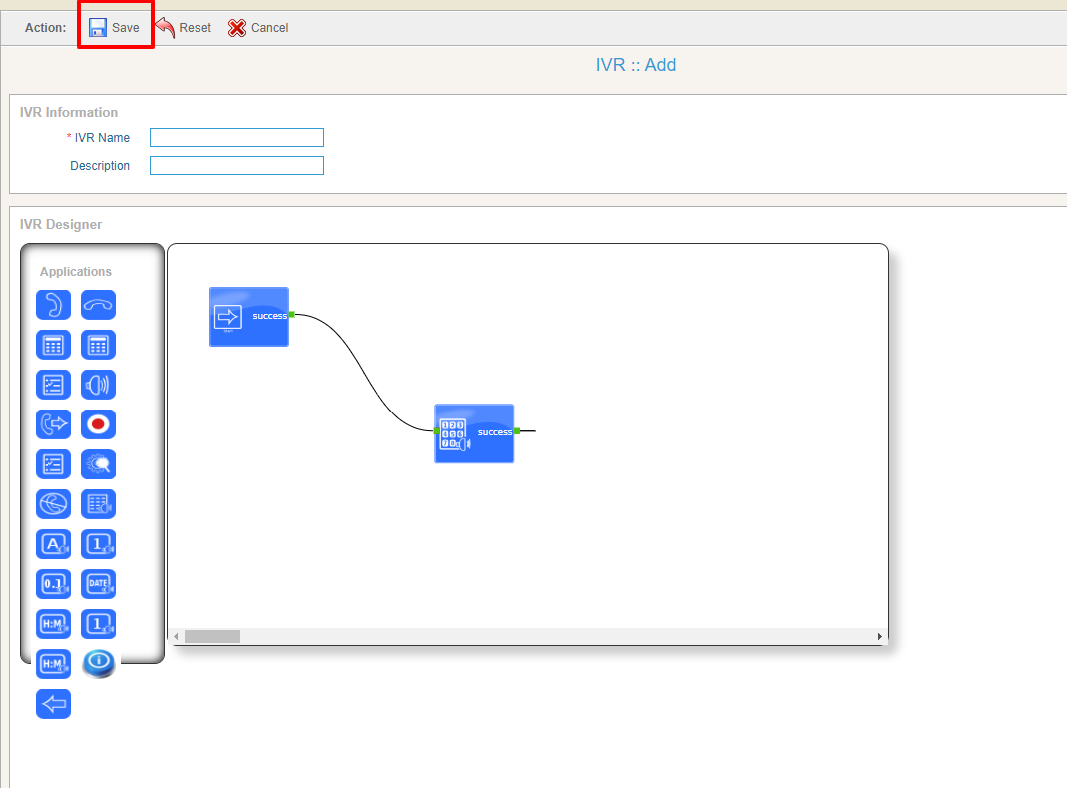
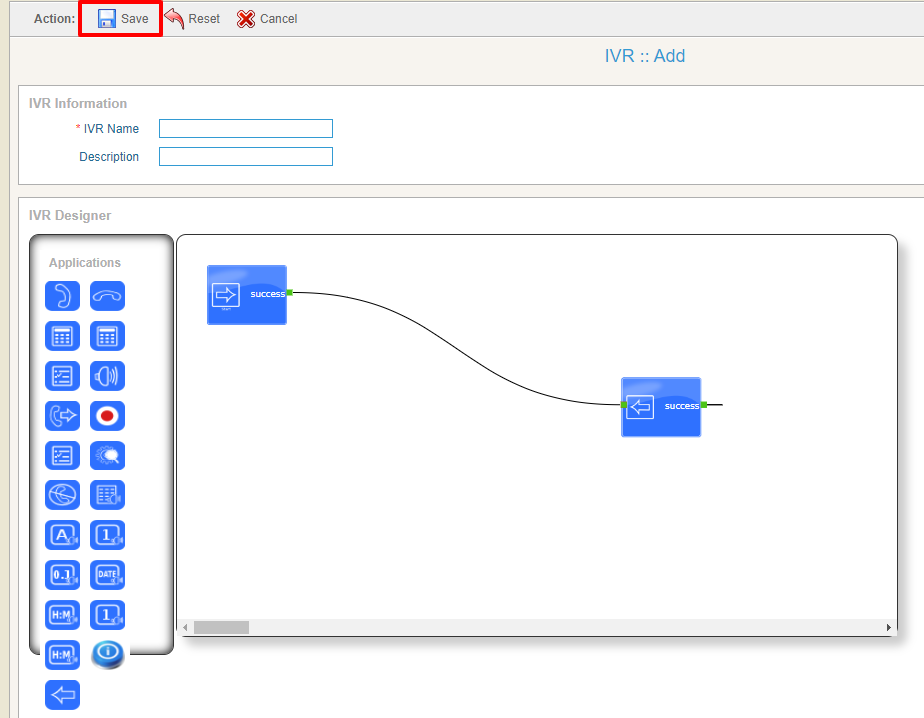
How to Create IVR Through Web-based Designer?
-
Navigate to Messages => IVR => New IVR. 2. Set IVR Name.
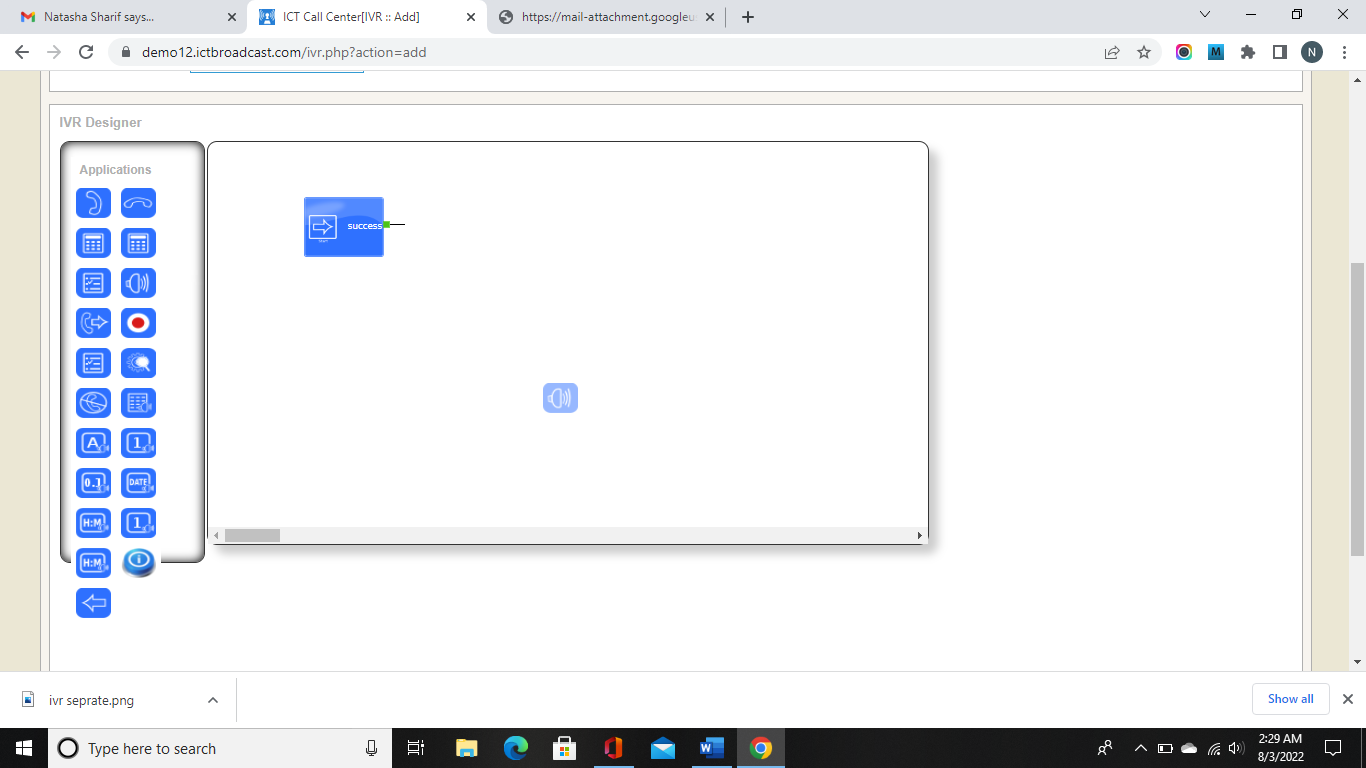
-
Drag and Drop Applications from the toolbar area to the drawing area.
-
To Link one Application to another, move the pointer to a small rectangle at the top left of the Application. Then, press and hold down the button on the mouse.
-
Drag and drop it over other Applications by releasing the button.
-
To Remove the link, Select the destination pointer of the link the user wanted to remove. Drag it to the source Application and drop it over the source Application.
-
To set Application settings, click on the small pencil at the bottom left of the Application.
-
This will open a popup window. Every Application has different parameter settings. In the example below, the TTS application properties popup is shown.

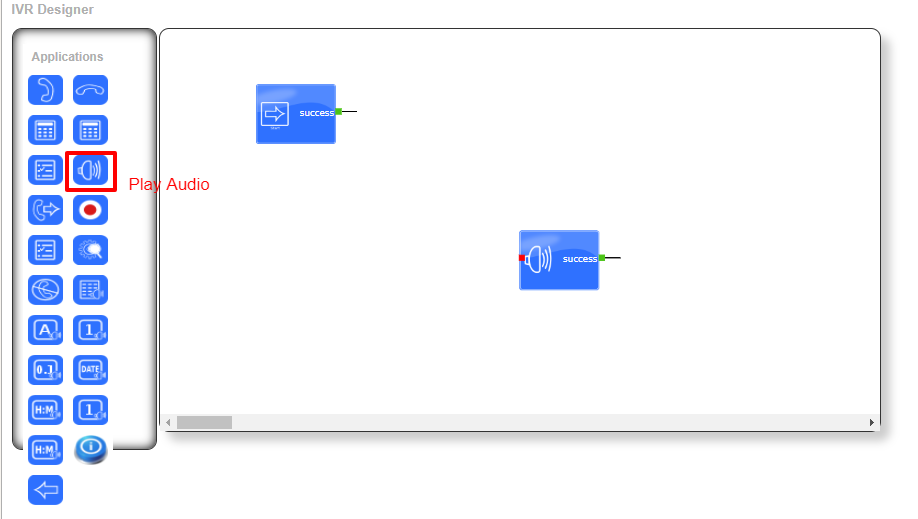
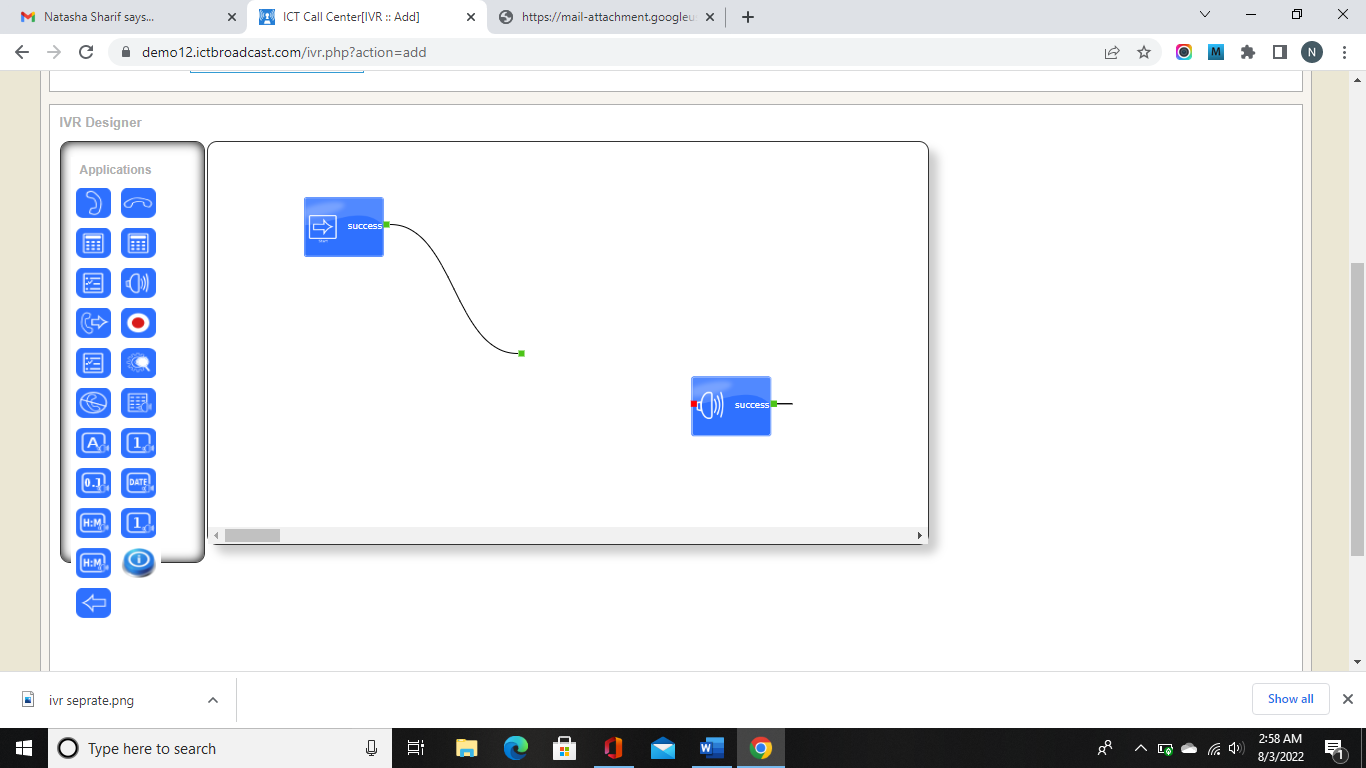
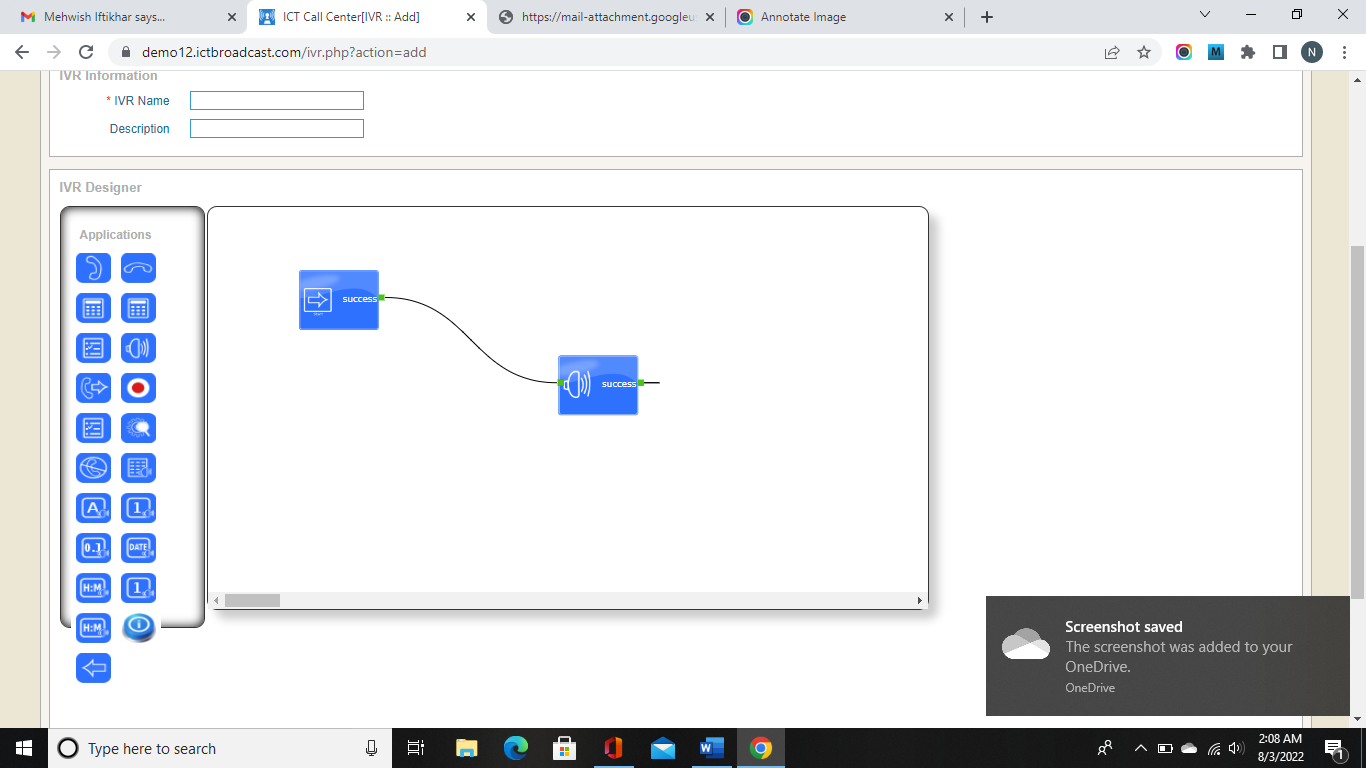
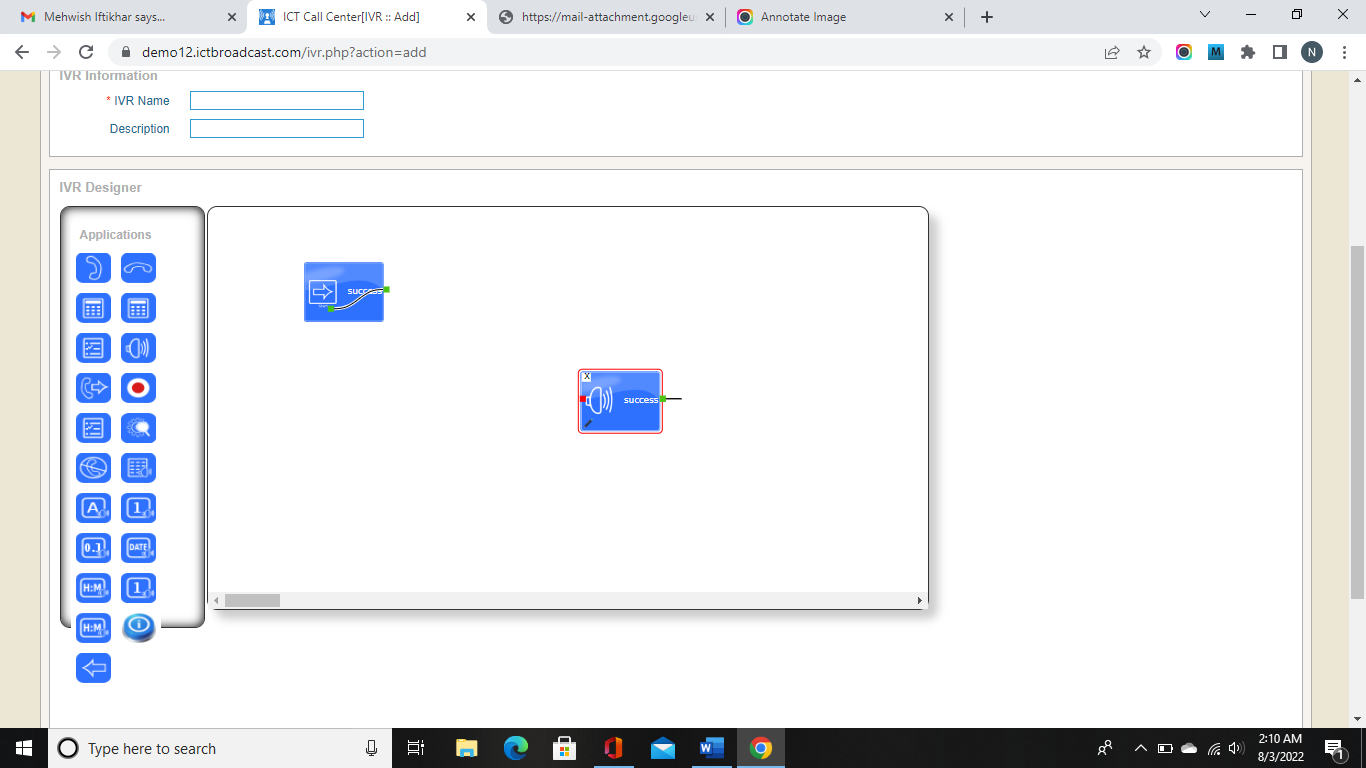
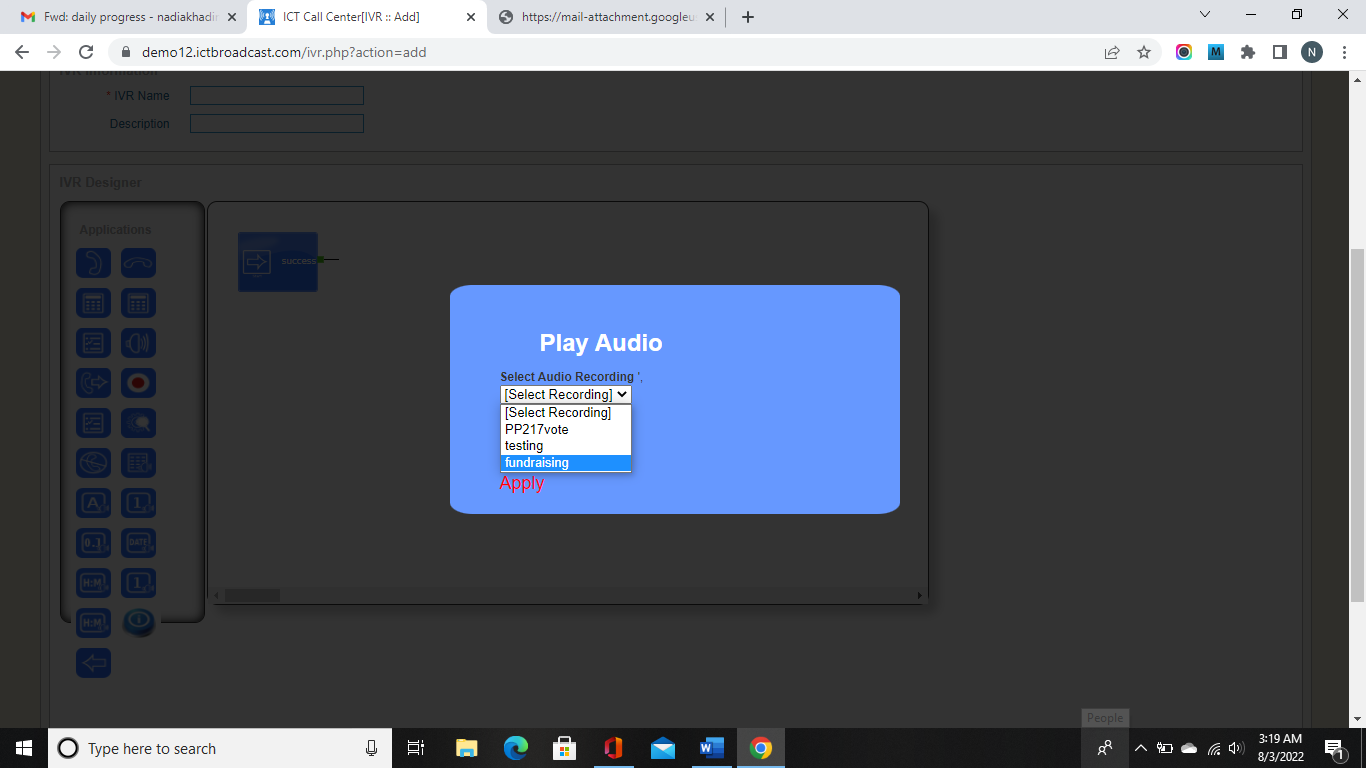
How to use Play Audio Application in IVR?
1. Create New IVR => Drag and Drop Play Audio Application to Drawing Area.
2. From the popup window of Play Audio Applications.
Select the required recording from the drop-down menu and Click Apply to save.
-
Link the start Application with the Play Audio Application by dragging and dropping the “Start Application” link on the “Play Audio Application.” Click the Save button on the page menu to save this IVR.

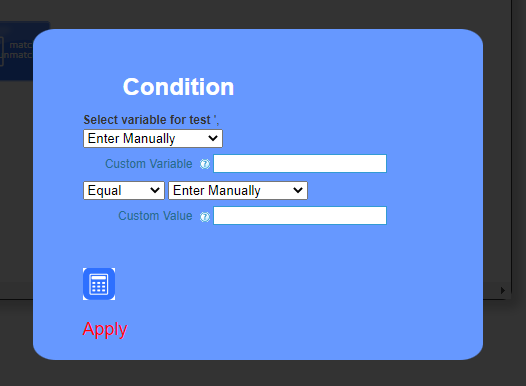
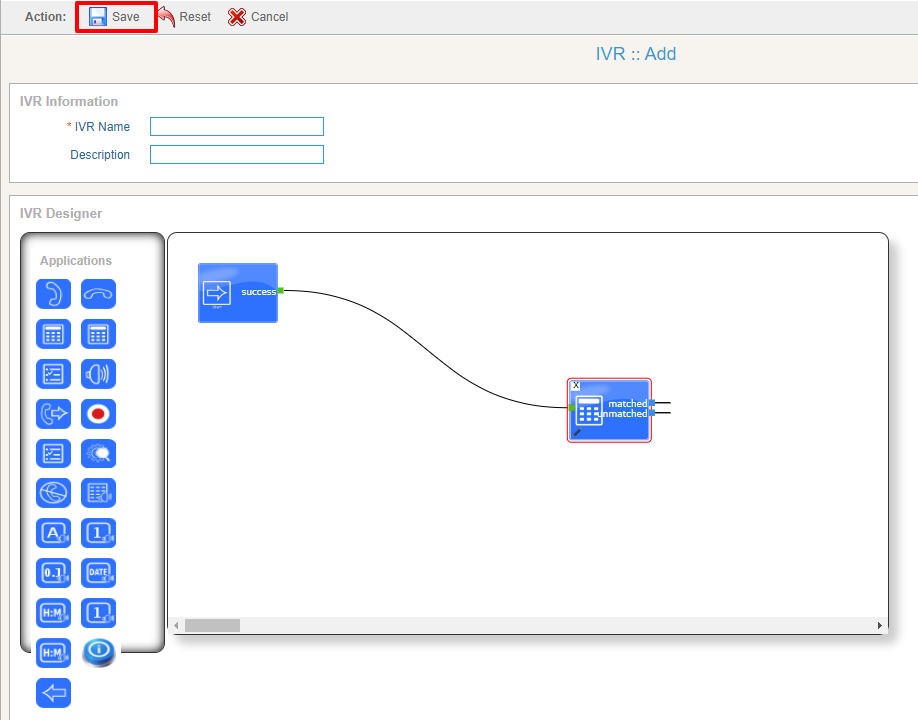
How to use Condition Application in IVR?
1. Create New IVR => Drag and Drop Condition Application to Drawing Area.
2. From the popup window of Condition Applications.
3. Select the required variable for the test from the drop-down menu and Click Apply to save.
-
Link start Application with the Condition Application by dragging and dropping the “Start Application” link on the “Condition Application”.
-
Click the Save button on the page menu to save this IVR.
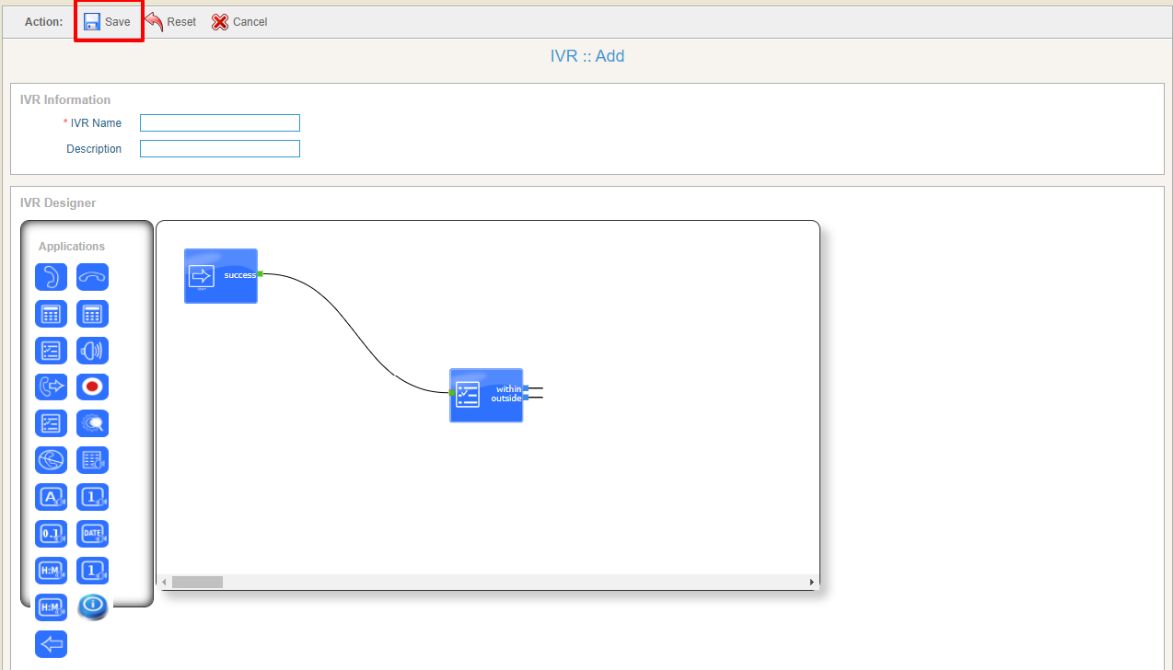
How to use Time Condition Application in IVR?
1. Create New IVR => Drag and Drop Time Condition Application to Drawing Area.
2. From the popup window of Time Condition Applications.
3. Select the required variable for the test from the drop-down menu and Click Apply to save.
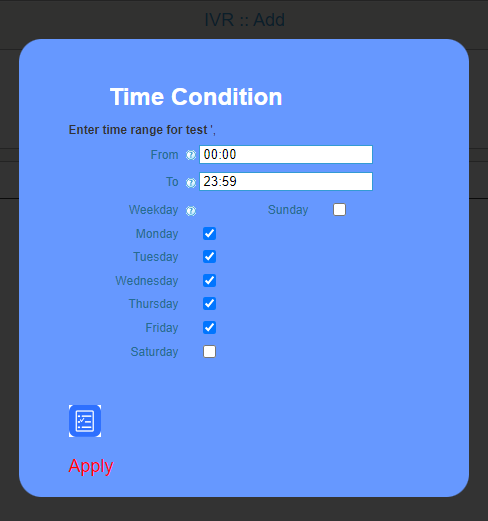
-
Link start Application with the Time Condition Application by dragging and dropping the “Start Application” link on the “Time Condition Application.”
-
Click the Save button on the page menu to save this IVR.
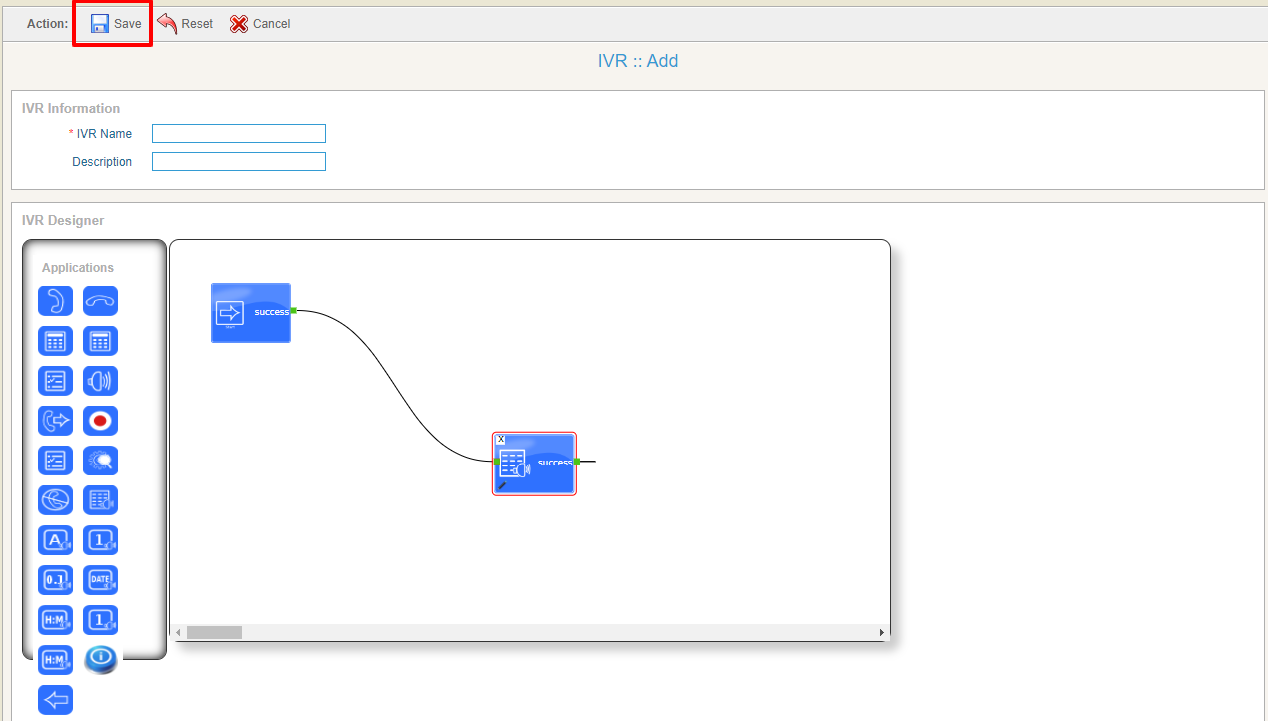
How to use Text to Speech (TTS) Application in IVR?
1. Create New IVR => Drag and drop TTS Application to Drawing Area.
2. In the popup window, write the text the tenant wants to play, and click Apply to save.
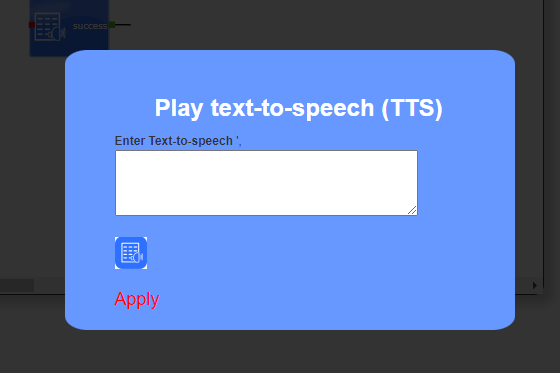
-
Link start Application with the TTS Application by dragging and dropping the “Start Application” link on the “TTS Application.” Click the Save button on the page menu to save this IVR.
How to use Say Alpha Application in IVR:
1. Create New IVR => Drag and drop Say Alpha Application to Drawing Area.
2. From the popup window, the tenant can select predefined variables whose value will be played by this application. The tenant can also select custom from the dropdown menu. This will allow the tenant to write alphanumeric values in the text box.
-
Link start Application with the Say Alpha:
Application by dragging and dropping the “Start Application” link on the “Say Alpha Application.” Click the Save button on the page menu to save this IVR.
How to use Say Digit Application in IVR?
1. Create New IVR => Drag and drop Say Digit Application to Drawing Area.
2. From the popup window, the tenant can select predefined variables whose value will be played by this application. The tenant can also select the custom option from the dropdown menu. This will allow the tenant to write only digits (0 – 9) in the text box.
Click Apply to save.
-
Link start Application with the Say Digit Application by dragging and dropping the “Start Application” link on the “Say Digit Application.” Click the Save button on the page menu to save this IVR.
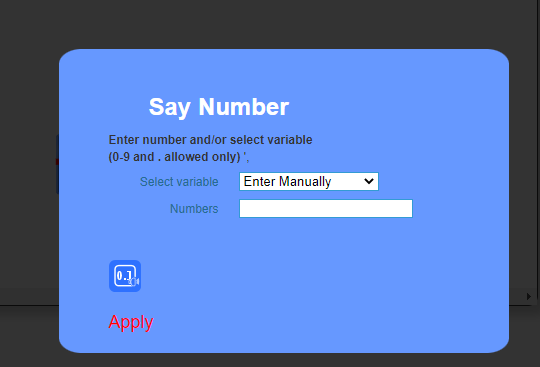
How to use Say Number Application in IVR?
1. Create New IVR => Drag and drop Say Number Application to Drawing Area.
2. From the popup window, the tenant can select predefined variables whose value will be played by this application. The tenant can also select custom from the dropdown menu. This will allow the user to write only numbers (0 – 9 and “. “) in the text box.
Click Apply to save.
-
Link start Application with the Say Number Application by dragging and dropping the “Start Application” link on the “Say Number Application.”
Click the Save button on the page menu to save this IVR.

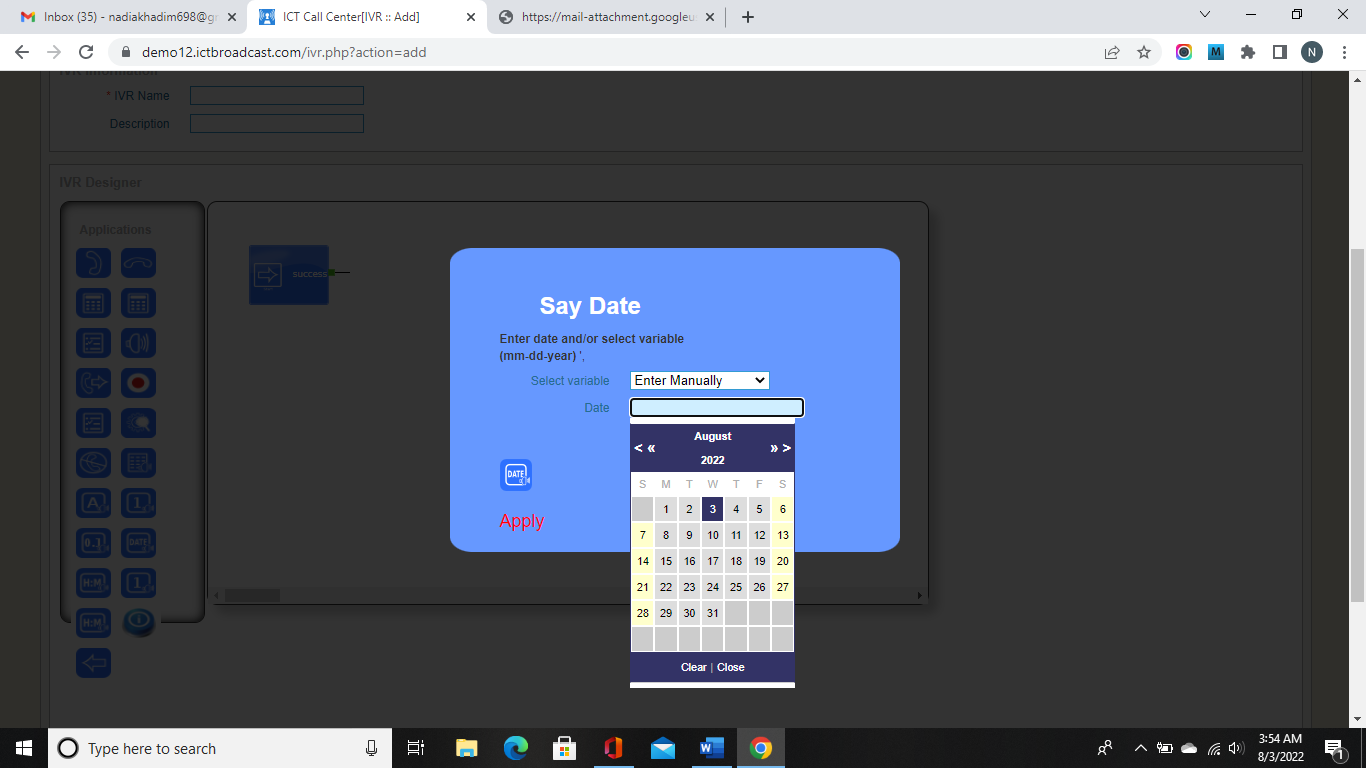
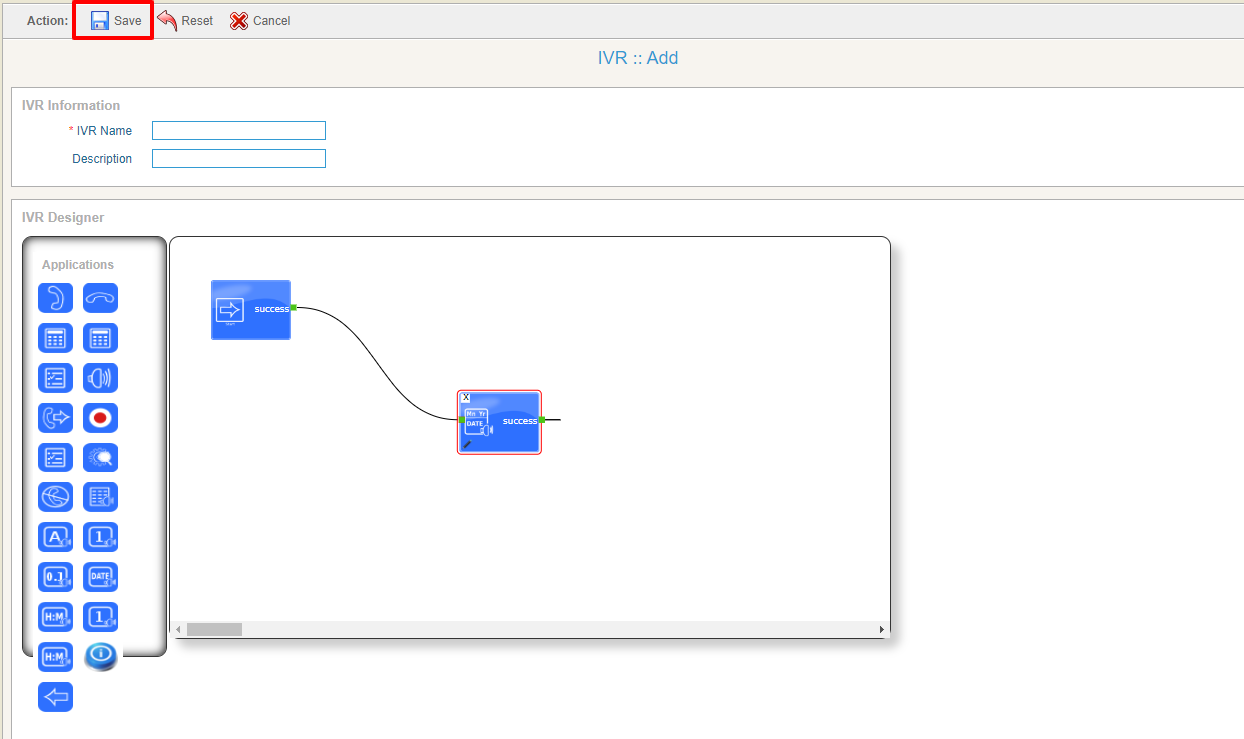
How to use the Say Date Application in IVR?
1. Create New IVR => Drag and drop Say Date Application to Drawing Area.
2. From the popup window, the tenant can select predefined variables whose value will be played by this application. The tenant can also select custom from the dropdown menu. This will allow the tenant to Select the time (mm: dd: yy) from the given field below.
Click Apply to save.
-
Link start Application with the Say Date Application by dragging and dropping the “Start Application” link on the “Say Date Application.” Then, click the Save button on the page menu to save this IVR.
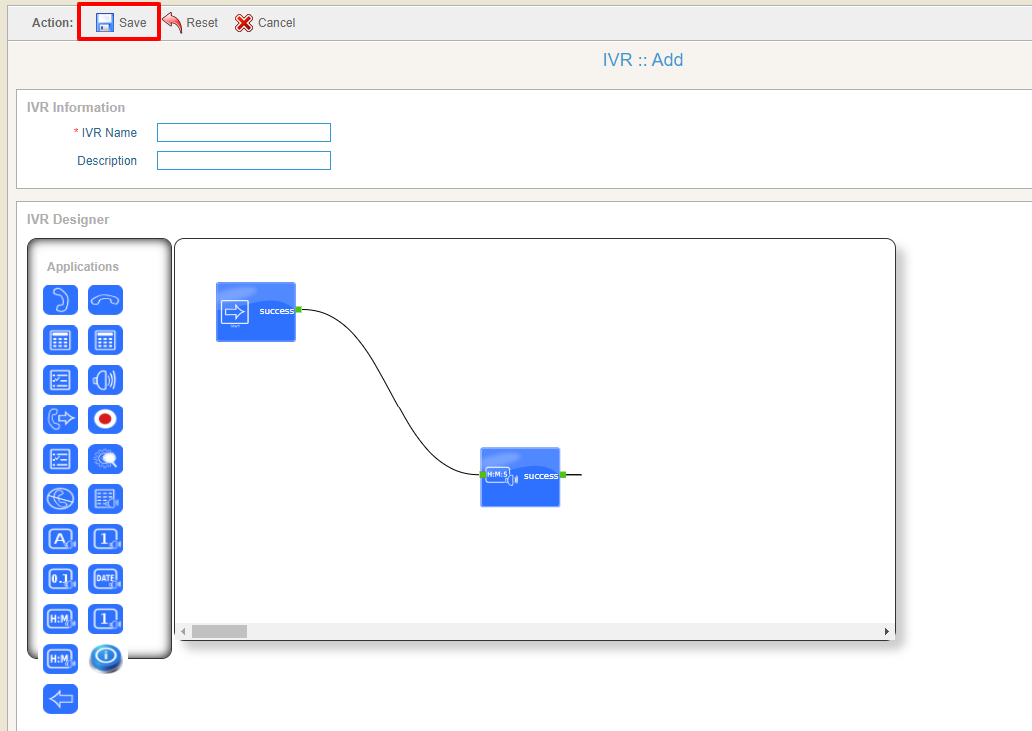
How to use Say Time Application in IVR:
1. Create New IVR => Drag and drop Say Time Application to Drawing Area.
2. From the popup window, the tenant can select predefined variables whose value will be played by this application. The tenant can also select custom from the dropdown menu. For example, this will allow the tenant to Select time (Hour: Minute) from the field below.
Click Apply to save.

-
Link start Application with the Say Time Application by dragging and dropping the “Start Application” link on the “Say Time Application.”
-
Click the Save button on the page menu to save this IVR.
How to use DTMF Application in IVR?
1. Create New IVR => Drag and drop DTMF Application to Drawing Area.
2. In the popup window, write the key you want to set and click Apply to save.
-
Link start Application with the Time Condition Application by dragging and dropping the “Start Application” link on the “Time Condition Application.”
-
Click the Save button on the page menu to save this IVR.

How to use Add Delay Application in IVR?
1. Create New IVR => Drag and Add Delay Application to Drawing Area.
2. In the popup window, write the seconds you want to set and click apply to save.
-
Link start Application with the Add Delay Application by dragging and dropping the “Start Application” link on the “Add Delay Application.”
-
Click the Save button on the page menu to save this IVR.
How to use Integrating API Application in IVR:
1. Create New IVR => Drag and drop Integrating API Application to Drawing Area.
2. In the popup window, Select the required integration from the drop-down list and click Apply to save.
-
Link start Application with the Application by dragging and dropping the “Start Application” link on the “Add Delay Application.”
-
Click the Save button on the page menu to save this IVR.
ICTbroadcast allows creation Integration. When the tenant dials the number from the contact list, on the answer by the recipient, asks a set of questions by playing voice messages and then records their responses (DTMF key or Voice response) from the recipient and prepares a report for further analysis.
In integration, tenants can create choice-based questions that require the call recipient to respond using the critical press DTMF function and open-ended questions that need the call recipient to record their message. These recorded voice responses (or feedback) are shown in the integration report’s list of voice responses. When the tenant selects it, it will open a form that lists all the options and settings, like integration name, type description, and operations.
For Creating New Integration:
Go to messages from the main menu and integrations from the sub-menu.
Go to the new integration button and press it.
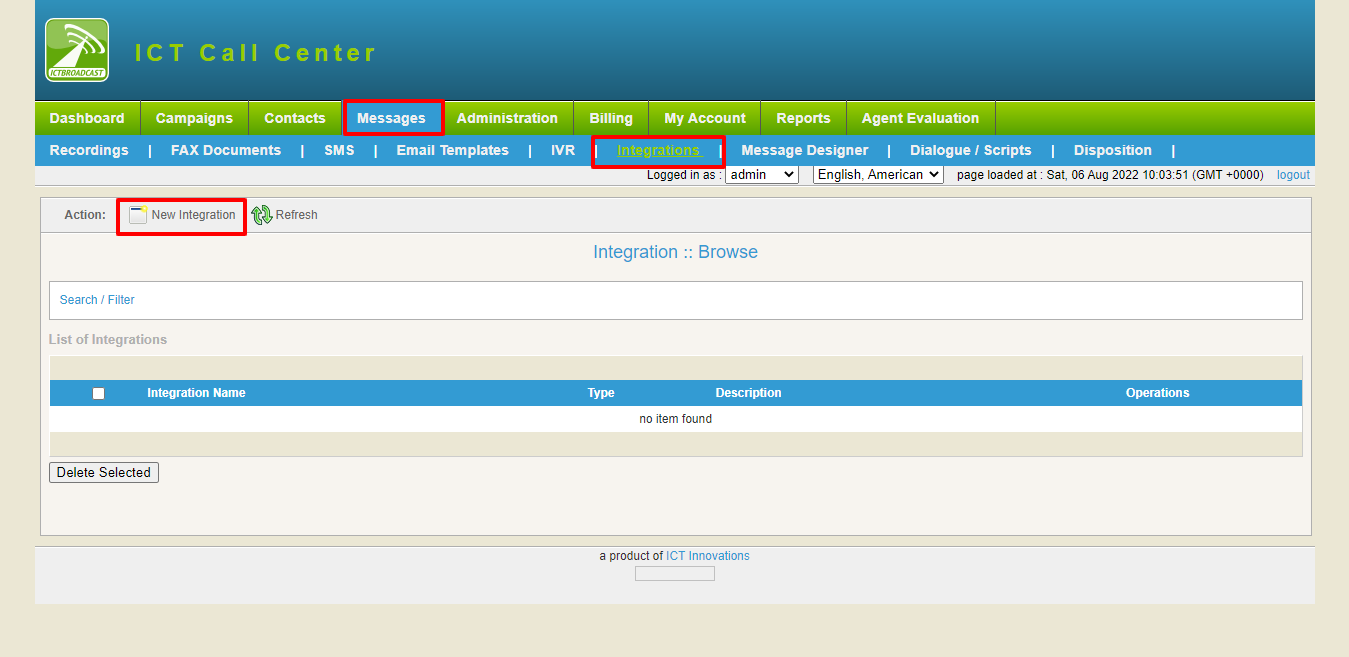
It will show a form as shown in the below figure.
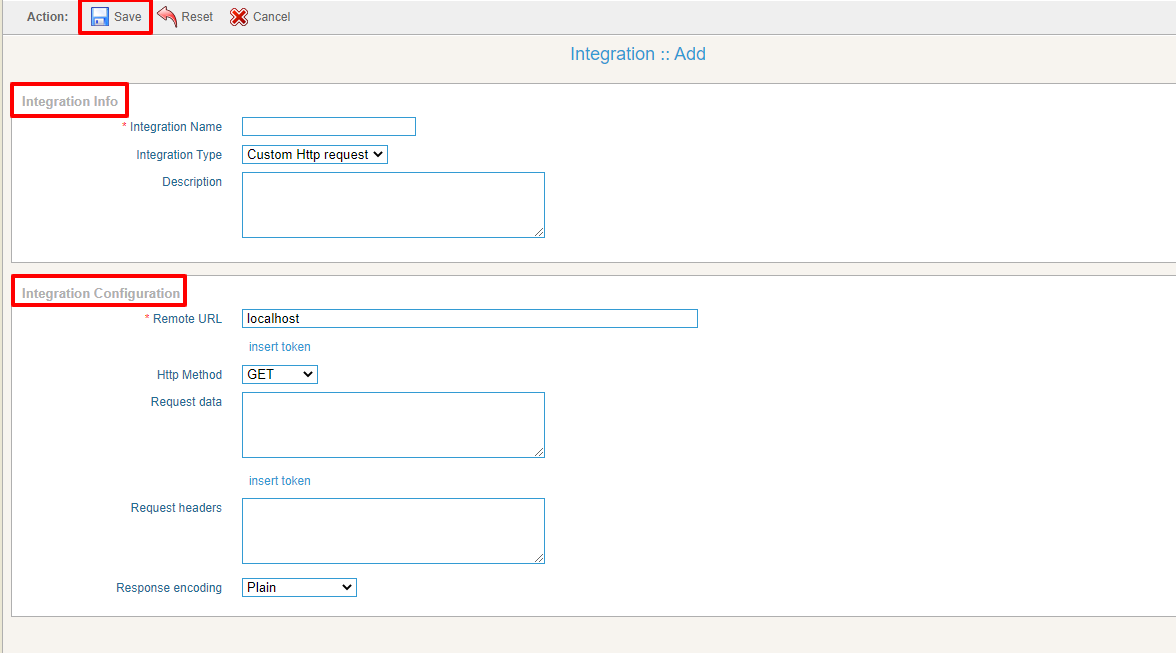
Fill the form with required fields like:
-
Integration Info:
Write Integration Name in the field box.
Select the integration group from the drop-down list.
Finally, write a description in the description box.
-
Integration Configuration:
Write the remote URL in the field box.
Select the HTTP method by drop-down list.
Write data requests in the filed box.
Write headers request on the field box.
Select encoding by drop-down list.
Click on the save button to save it.
ICTbroadcast provides a message designer option. It has many applications like Play audio, TTS, Says alpha, Says digit, Says a number, Says date, Says time, and Confirm Reminder, same as IVR.
For Creating New IVR Message:
Go to messages from the main menu, then select message designer from the sub-menu.
It will show a list of IVR messages with different names and descriptions.
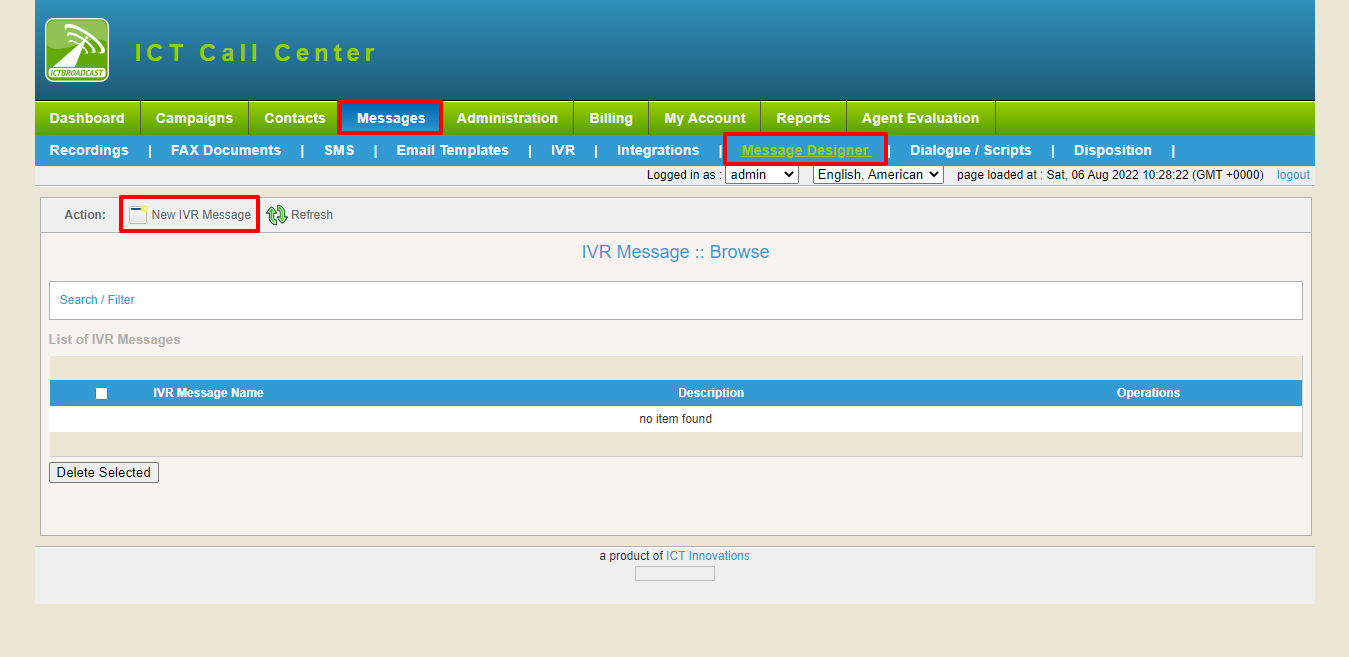
New IVR Message:
Click on New IVR Message; it will show an interface as shown in the below figure:

Fill in the required fields like:
Information:
Write the message name in the Fithen, writers.
Write some description about it.
New Application:
Select the application from the drop-down list which is required.
Click on the save button to save it.
ICTbroadcast provides a dialogue/Scripts option. Here you can write dialogue or scripts.
Go to messages from the main menu => Press Dialogue/Scripts from the sub-menu.
It will open an interface as shown in the below figure:
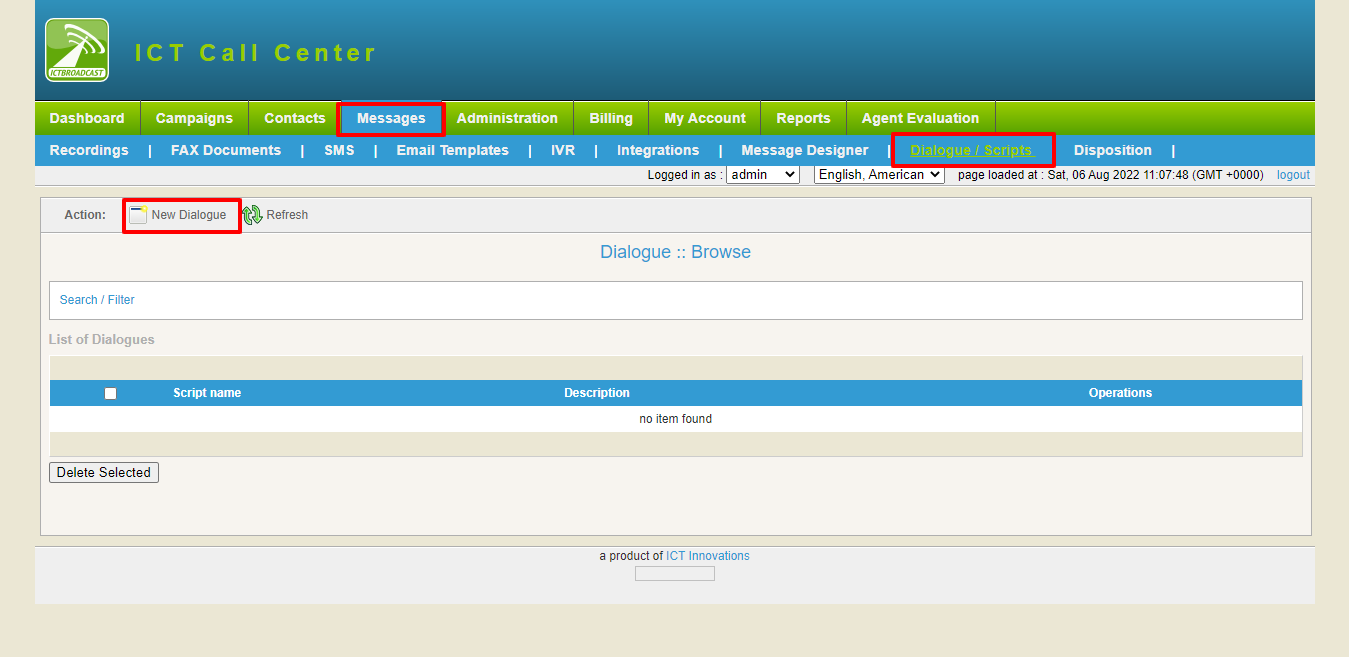
For writing New Dialogue/ Scripts:
Click on New Dialogue Button. It will show a form with some fields like:
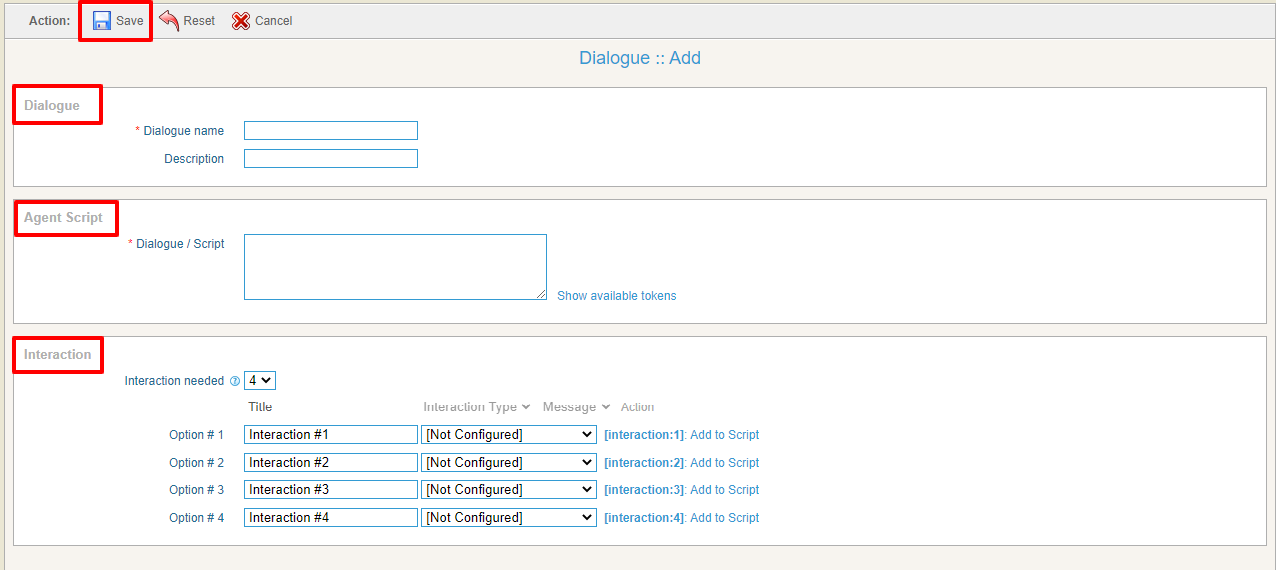
Dialogue:
Write the dialogue name in the field box.
Write some descriptions in the field box.
Agent Script:
Write dialogue/ script in the required box.
Interaction:
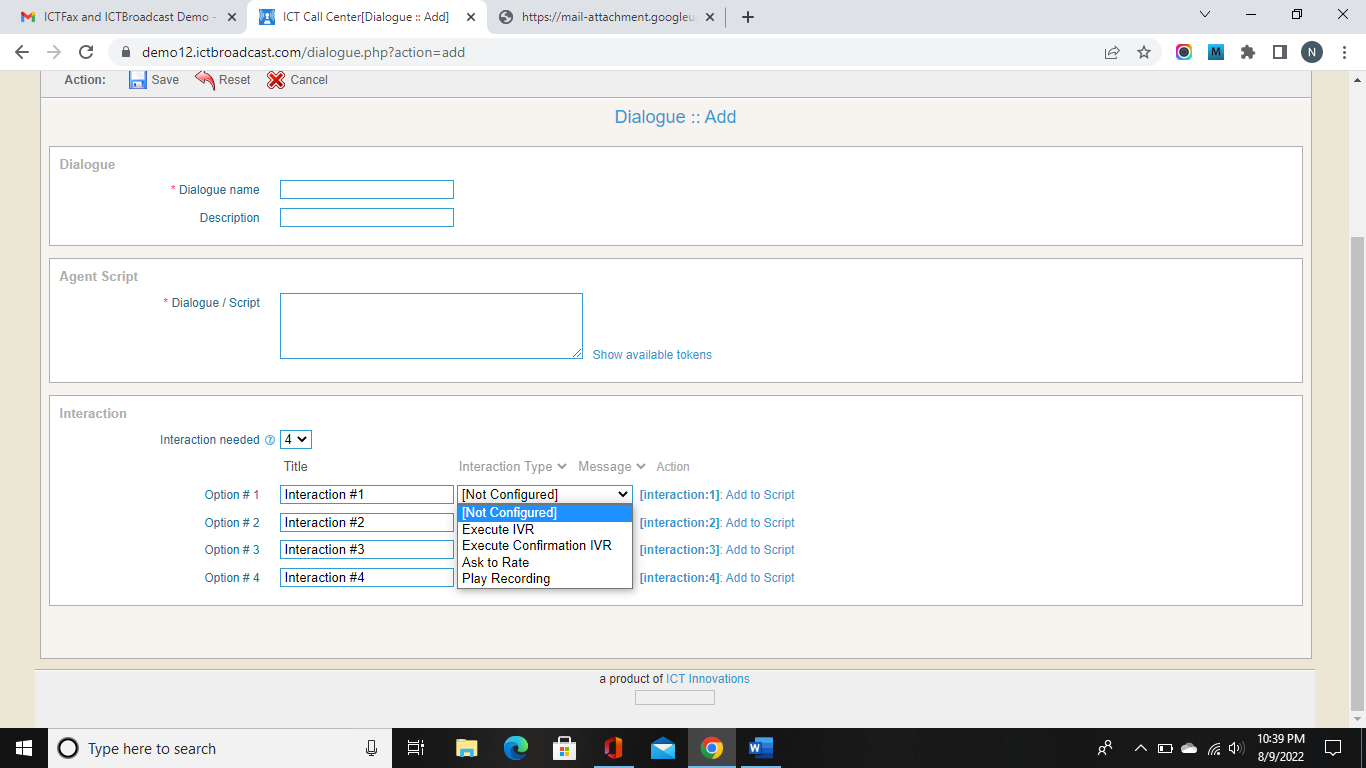
Select needed interaction in the drop-down list.
For example, select option 1, write Interacchoose1, and select integration type from the drop-down list.
Click on [Interaction #]: Add to script,
[Interaction #2], [Interaction #3], [Interaction # 4],
If you want to add any of them to the agent script box.
Click on the save button to save it.
Disposition enters after any call completion. ICTBroadcast provides an option to reschedule call times. In case of the recipient does not take a call/busy, Agent can reschedule the call from the disposition.
Go to messages from the main menu, then select disposition from the sub-menu.
It will open an interface, as shown in the below figure.
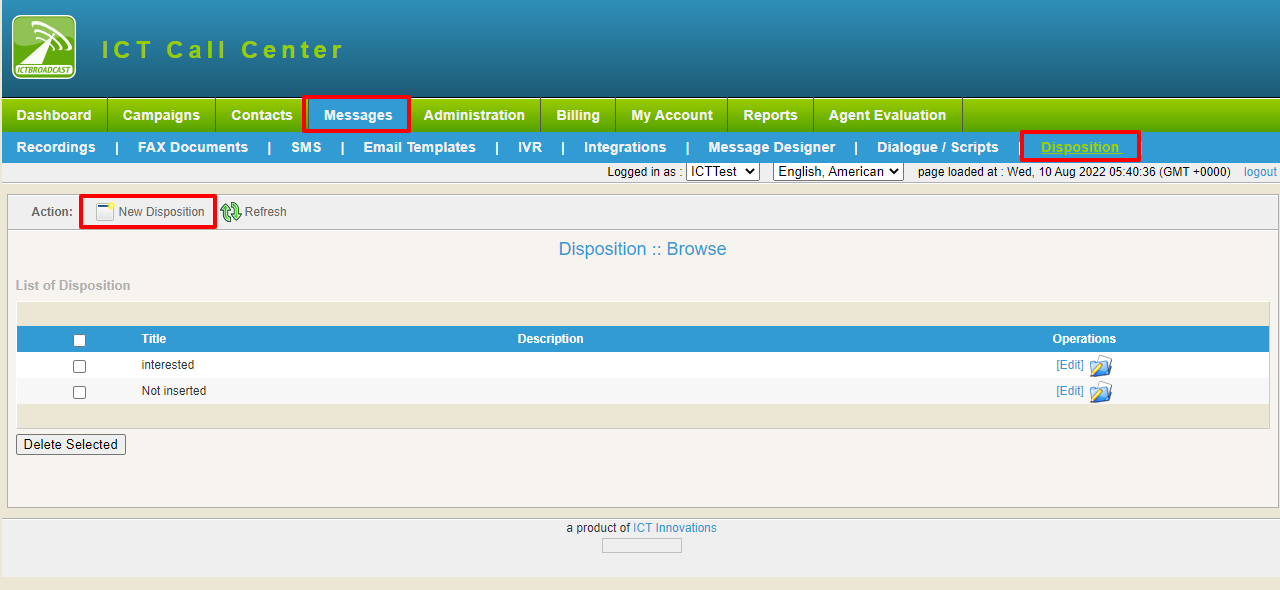 For creating New Disposition:
Click on the new Disposition button, and it will show a form as shown in the below figure:
Fill the state with the required field:
Disposition:
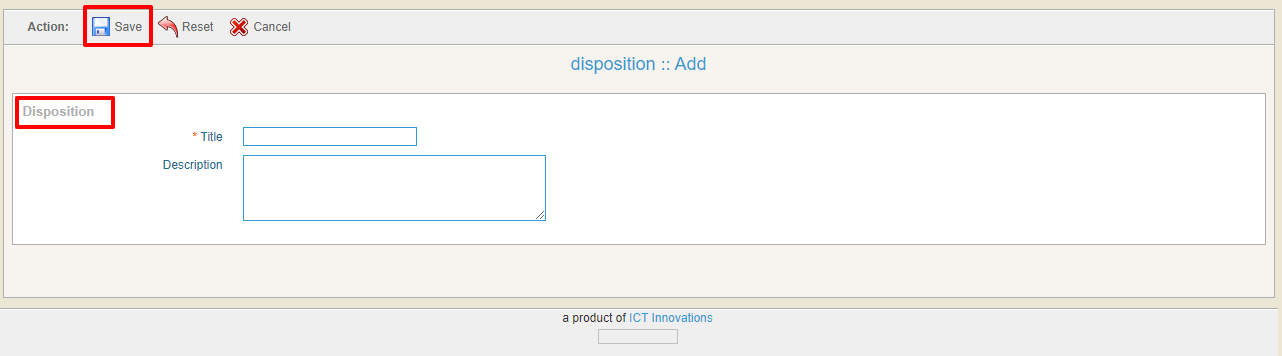
Write the title in the required box.
Write some description about it.
Click on the save button to save it.
ICTbroadcast Service Provider edition has four essential user roles, i.e., Administrator, Client, User, and agent. The administrator has all the privileges, whereas the user, client, and agent have some restrictions, including user management, trunks management, Extensions, DIDs, regions, countries and destination management, etc.
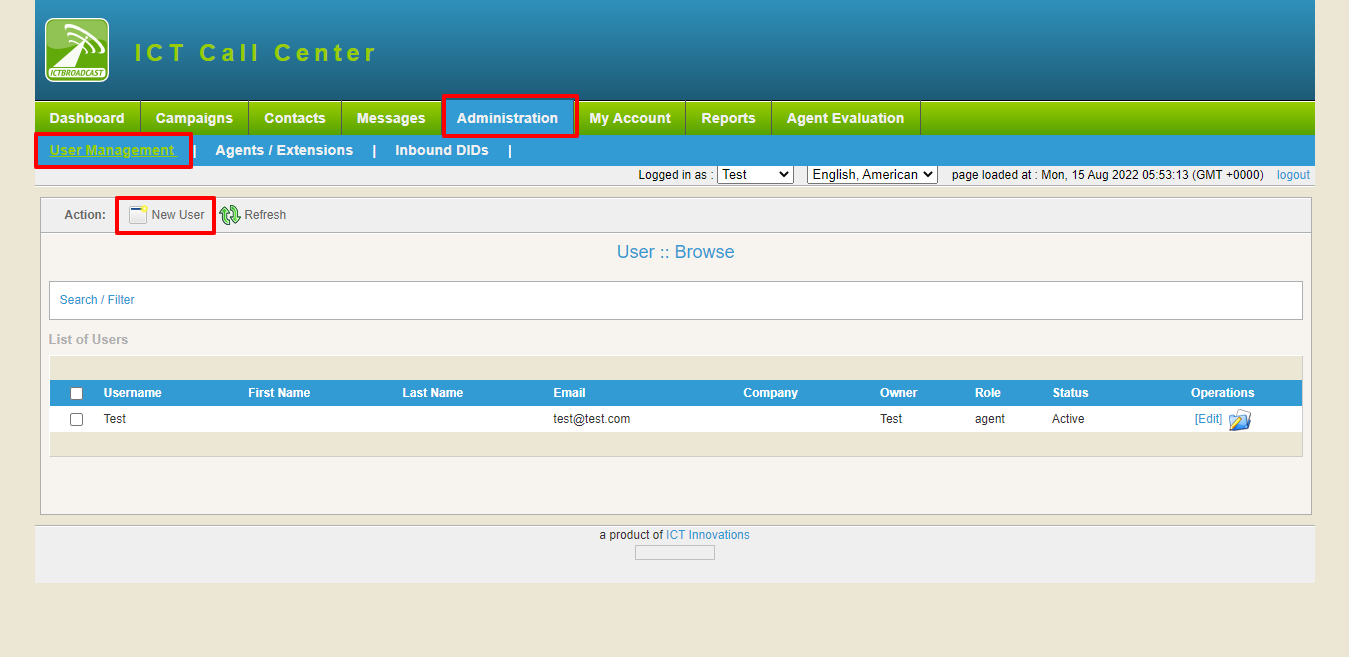
The following form shows the User Management area for tenants. Here tenants can create and manage more users.
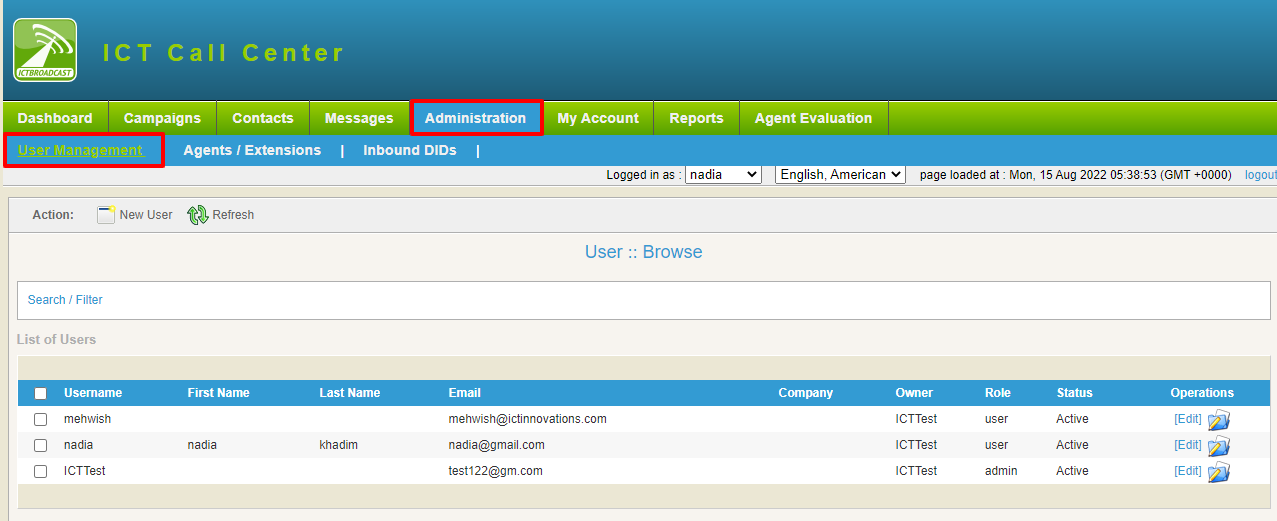
Add User:
To add a new user, go to Administration from the main menu, and click on User Management from the sub-menu.
Then click on new user, and it will open a form shown in the figure below.
Fill the form with the required fields:

i)User:
Write the user name in the field box.
ii)Password:
Write the password in the field box.
Rewrite password.
iii) Personal contact info:
Write personal information in the field’s boxes.
Type “E-mail.”
Type “First Name”
Type “Last Name”
Type “Phone Number”
Type “Address”
Select “Country” from the drop-down list.
iv) Local setting:
Select the time zone from the drop-down list.
Choose Language and theme from the drop-down list.
Click on the save button to save the user.
Agent/Extensions form did not allow the tenant as the user is restricted to add extensions and to enter extension name, password, SIP or IAX protocol, and forwarding because the tenant did not have authority to edit or write something in it. He just checks and monitors it.
This setting is required for Agent Campaigns or Interactive Campaigns. The tenant cannot forward any extension to an external call center or IVR System.

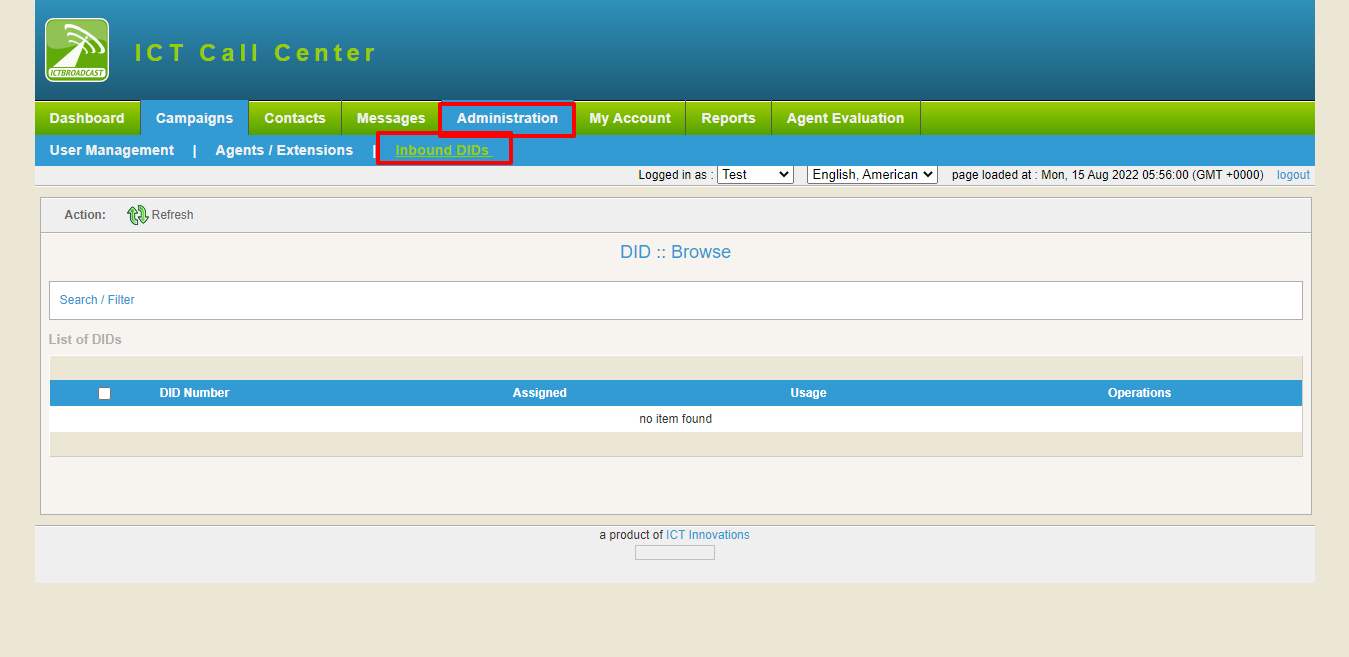
DID number is the number the caller will dial, and the system will receive that call.
The following form did not allow the tenant to enter DID number, its description, and the DID application that is selected to “Assigned to “because the tenant did not have the authority to edit or write something in it, he just checked and monitored it.
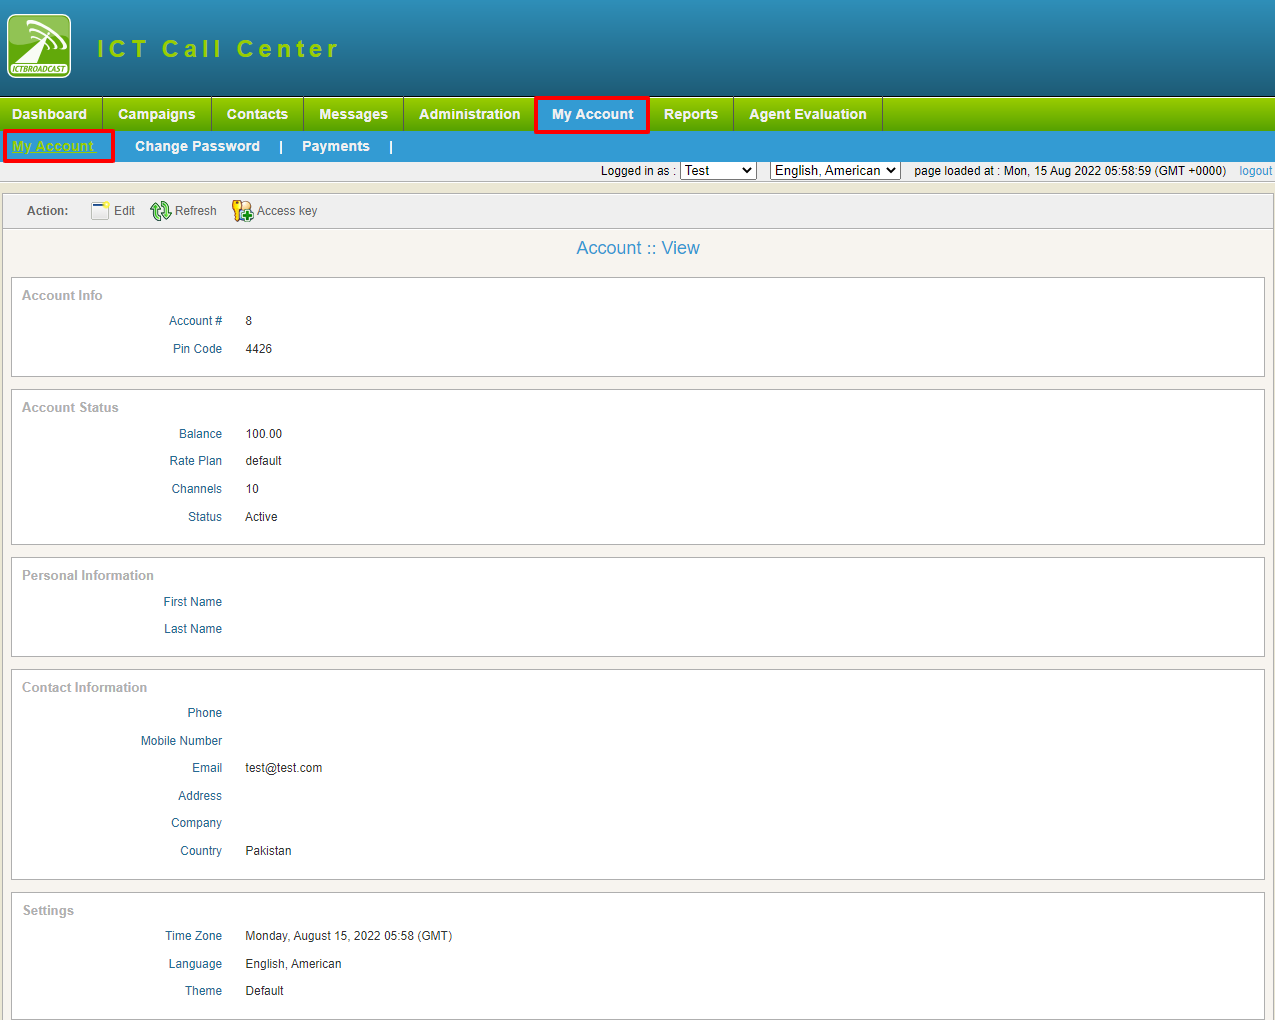
This form provides account info, account status, personal information, contact information, and time zone settings.
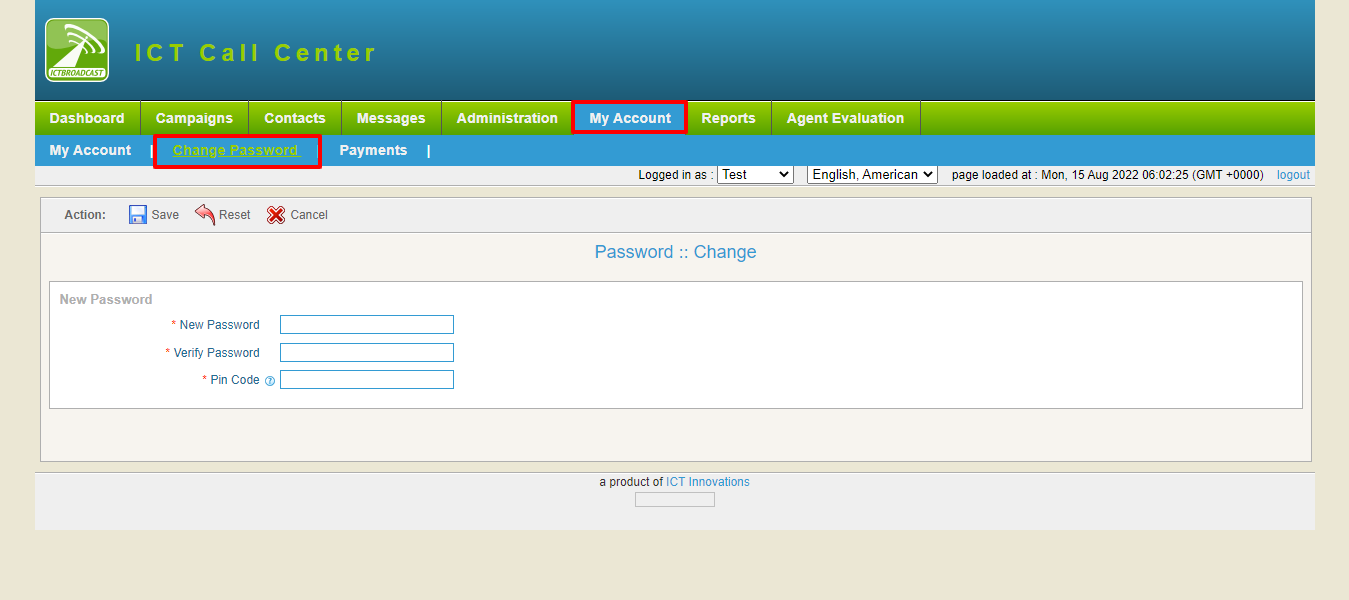
The tenant can change the passwords in the My Accounts => Change Password form, as shown below.
Pin code is required for phone call authentication like voice, Recording via call.
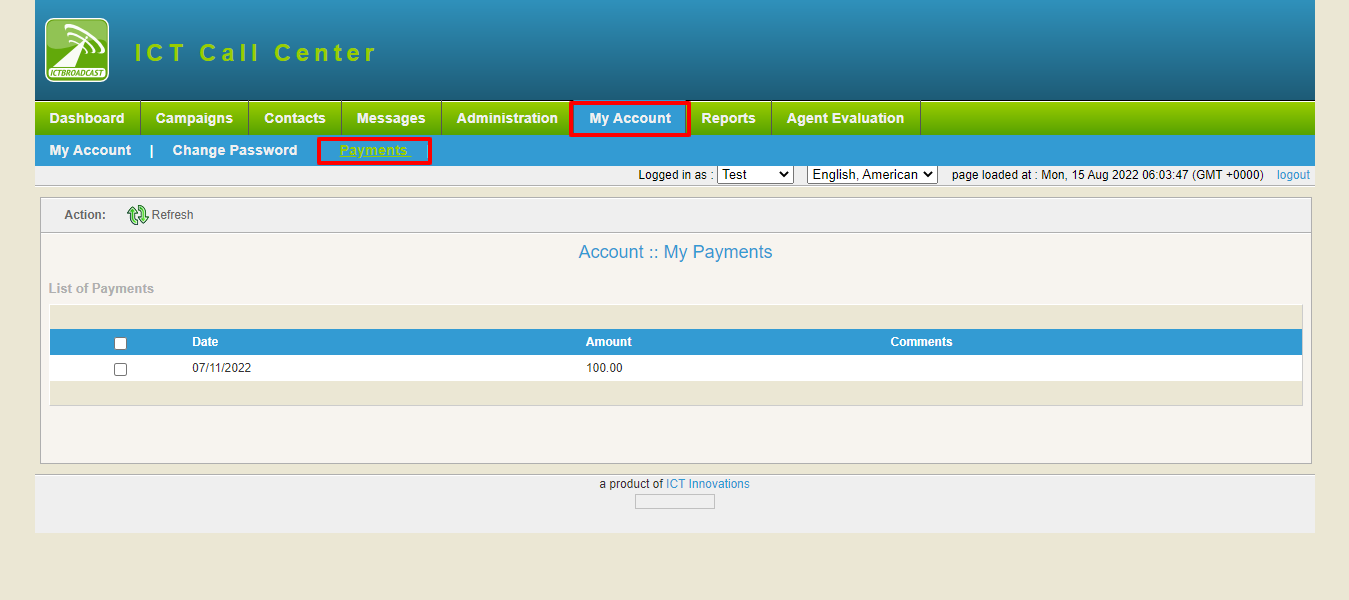
Tenant updates the payment list of Accounts. The tenant did not have the authority to edit or write something in it. He just checked and monitored it.
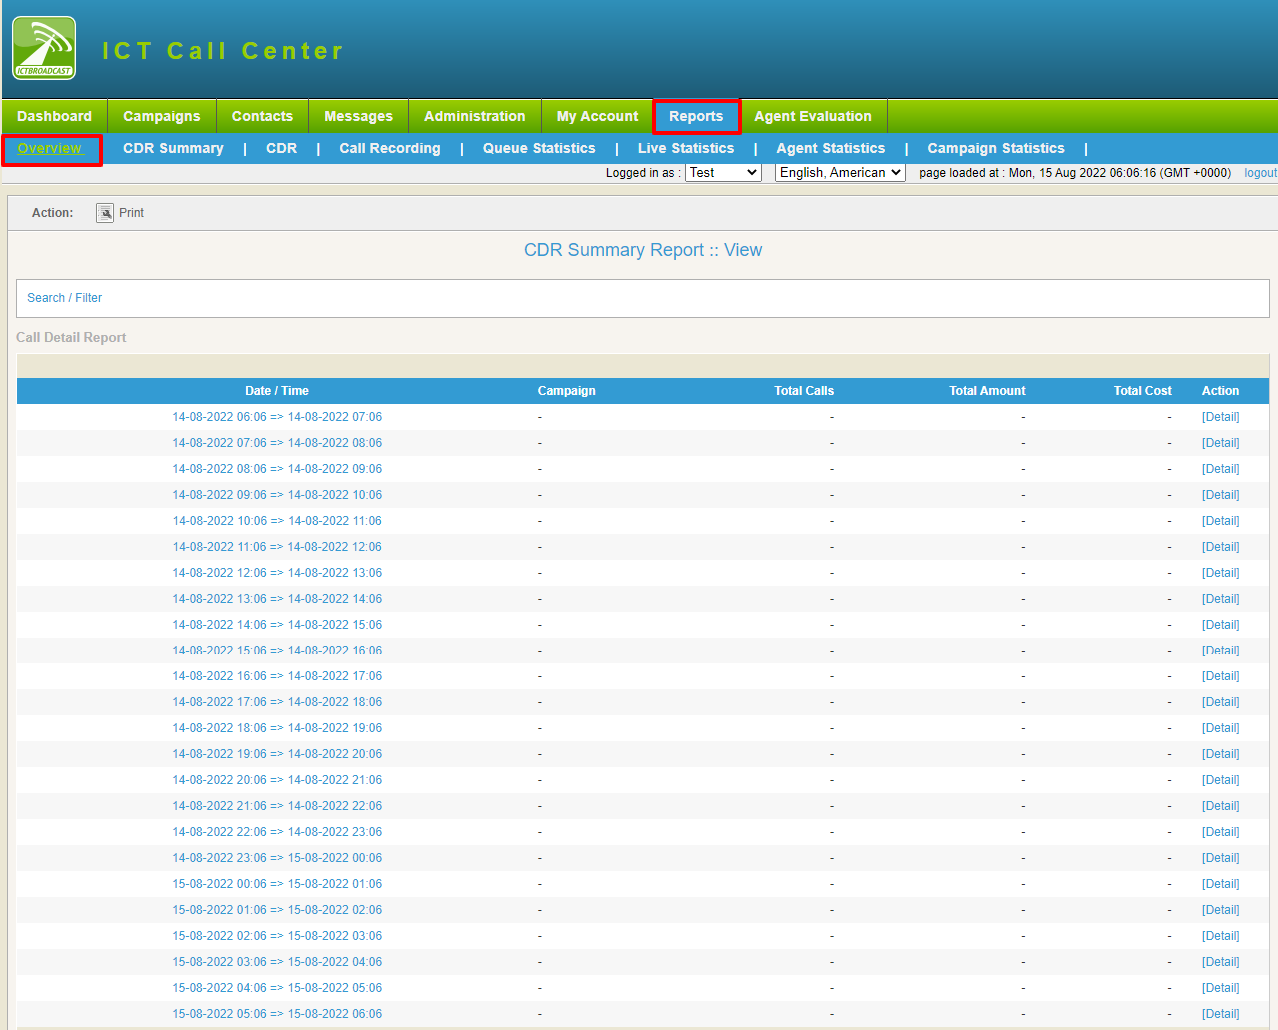
Here you can take all the overviews about campaigns, date and time, total calls, total cost, and total amount.
Go to Reports from the main menu, and click on overview from the sub-menu.
It will show a list as shown in the below figure:
CDR (Call detail Report) Summary presents the summary of each call placed on every campaign. Call Detail Report (CDR) gives you all the details about every call made during your campaign, how long it lasted, and how much it cost.
CDR lists show the list of the successful calls made. However, if you want to analyze and find how many calls were answered and how many calls failed, then you’ll see Campaign Statistics.
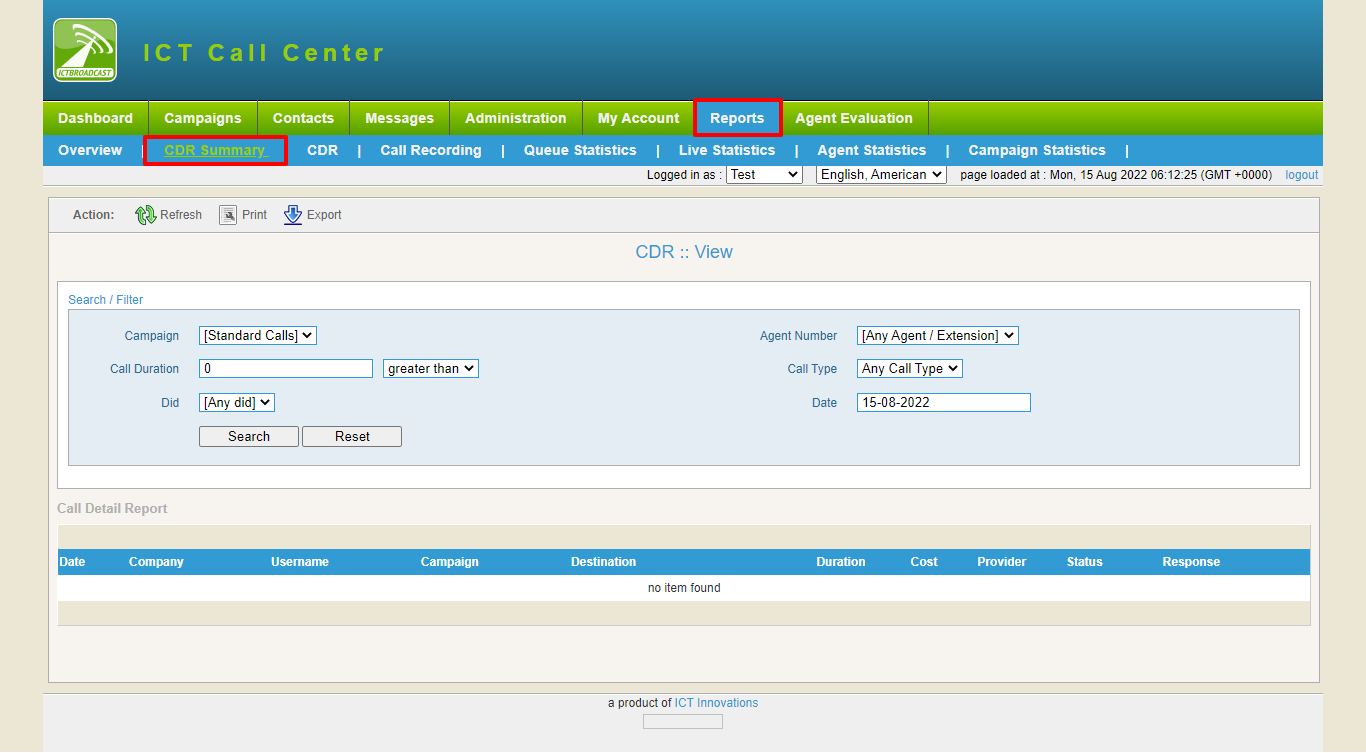
CDR Summary provides tenants with a chart view of campaign status. For example, it shows the Answered calls, Not Answered calls, Failed, Not Called, congestion, etc. You can print and export it also.
Go to Reports from the main menu, and click on CDR Summary from the sub-menu.
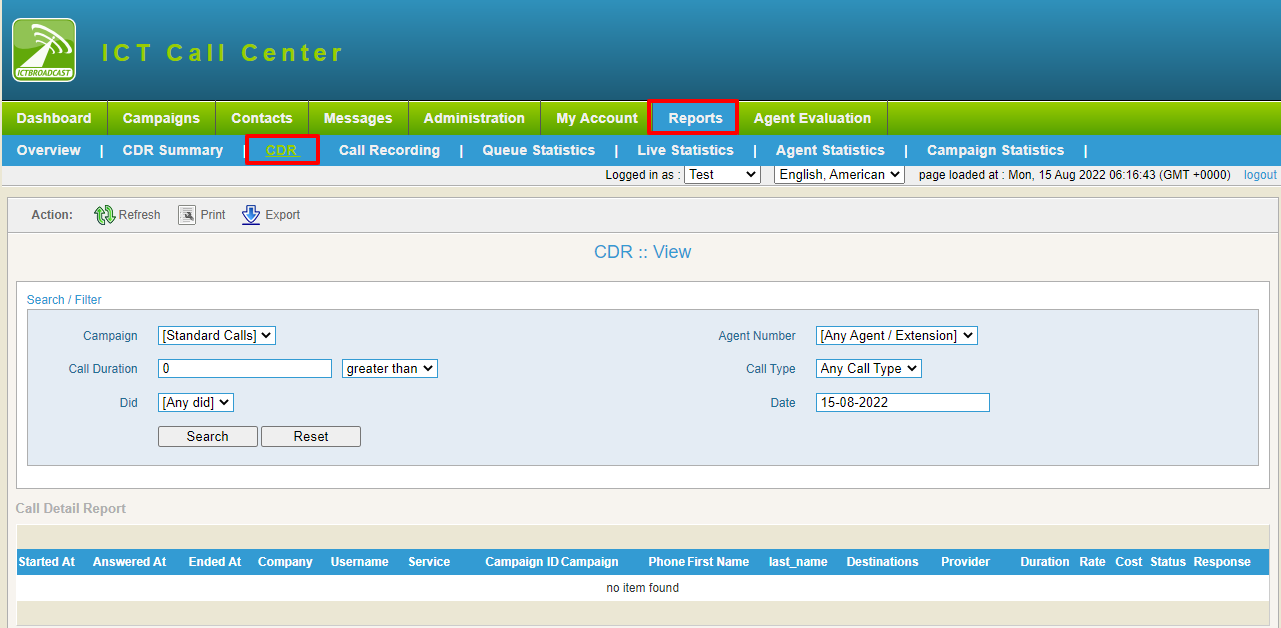
iii) CDR (Call Detail Reports):
Call Detail Report (CDR) gives all the details about every call placed by a campaign, how long it lasted, and how much it cost. CDR lists are the successful calls made.
Go to Reports from the main menu. Then, click on CDR from the sub-menu.
It will show an interface as shown in the below figure:
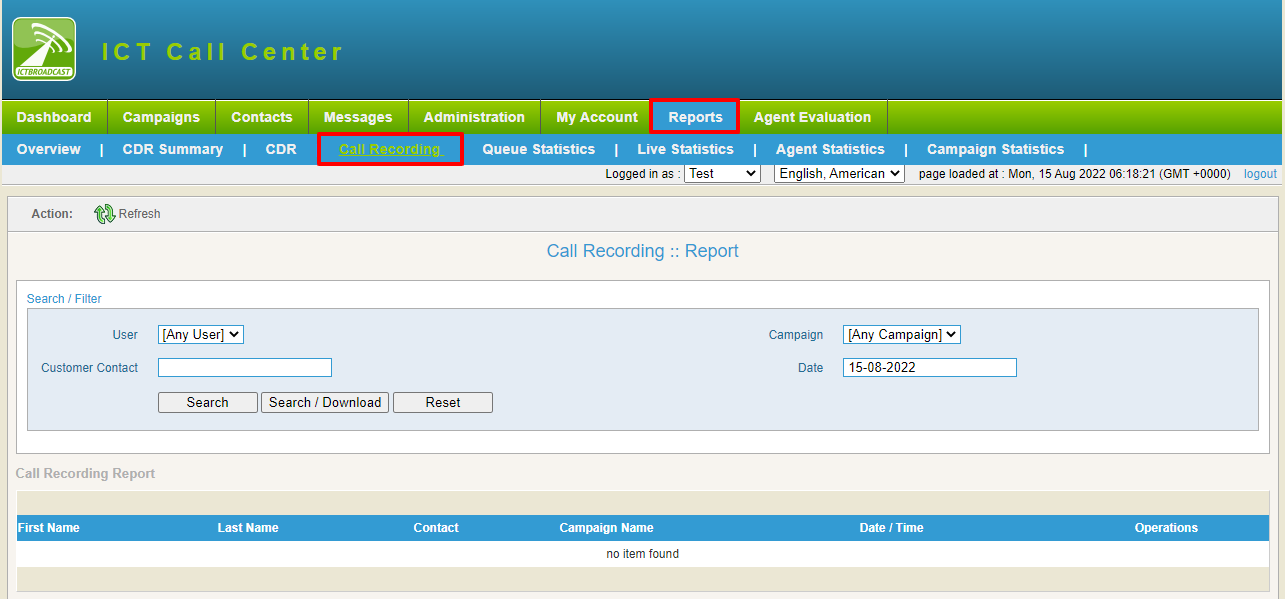
It shows lists of call recording reports.
Go to Reports from the main menu, and click on Call Recording from the sub-menu.
It will show the existing call recording reports listed in the figure below.
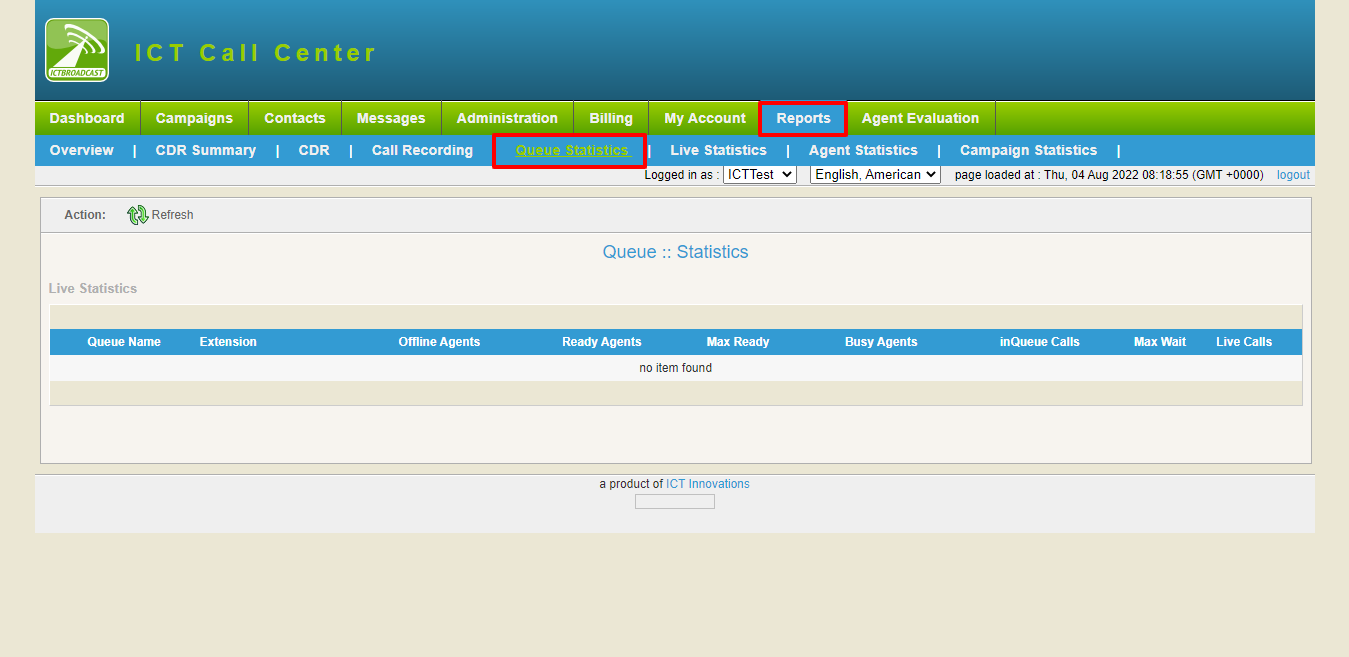
Queue Statistics shows the list of numbers added to the queue while the call was processed. In addition, it gives information about the offline agents, ready agents, busy agents, maximum calls, and maximum wait.
Go to Reports from the main menu. Then, click on Queue Statistics from the sub-menu.
It will show an interface as shown in the below figure:
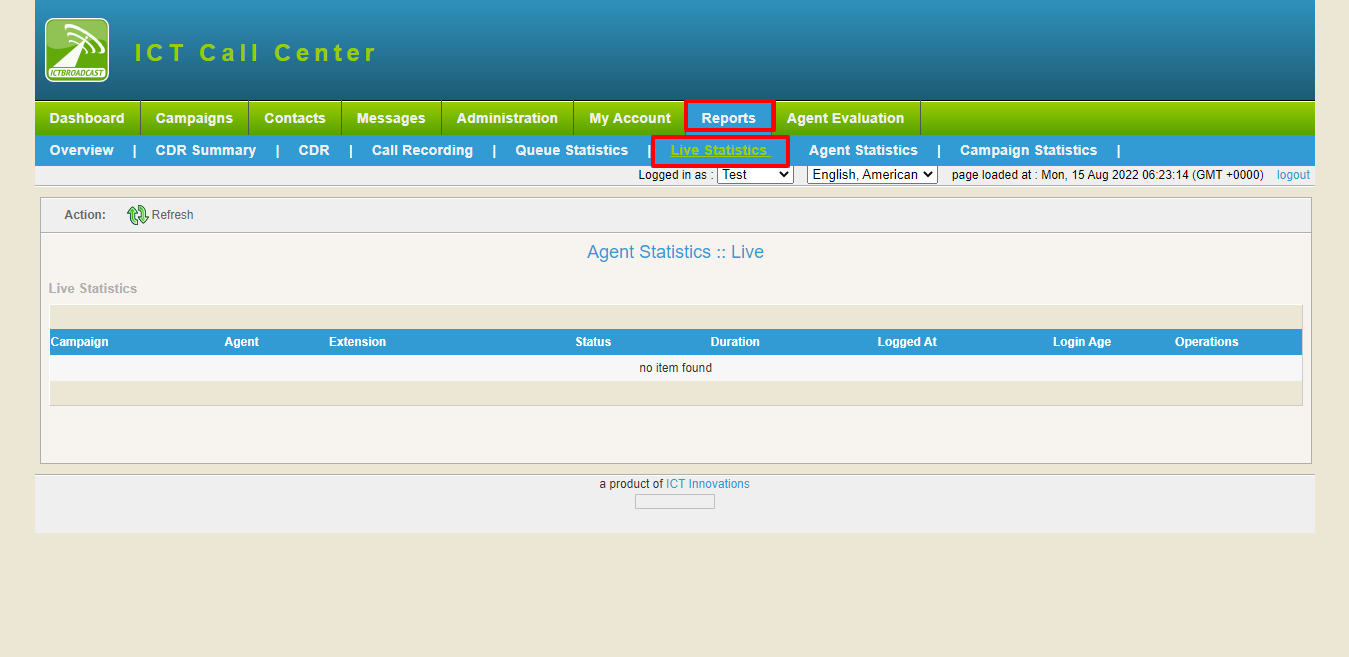
Live Statistics shows the information about currently processing calls. For example, it shows the campaign, Agent, Extension, Status, Duration time when the agent logs in, how much time the agent is login, and operations.
Go to Reports from then, click menu. Then, click on Live Statistics from the sub-menu.
It will show an interface as shown in the below figure:
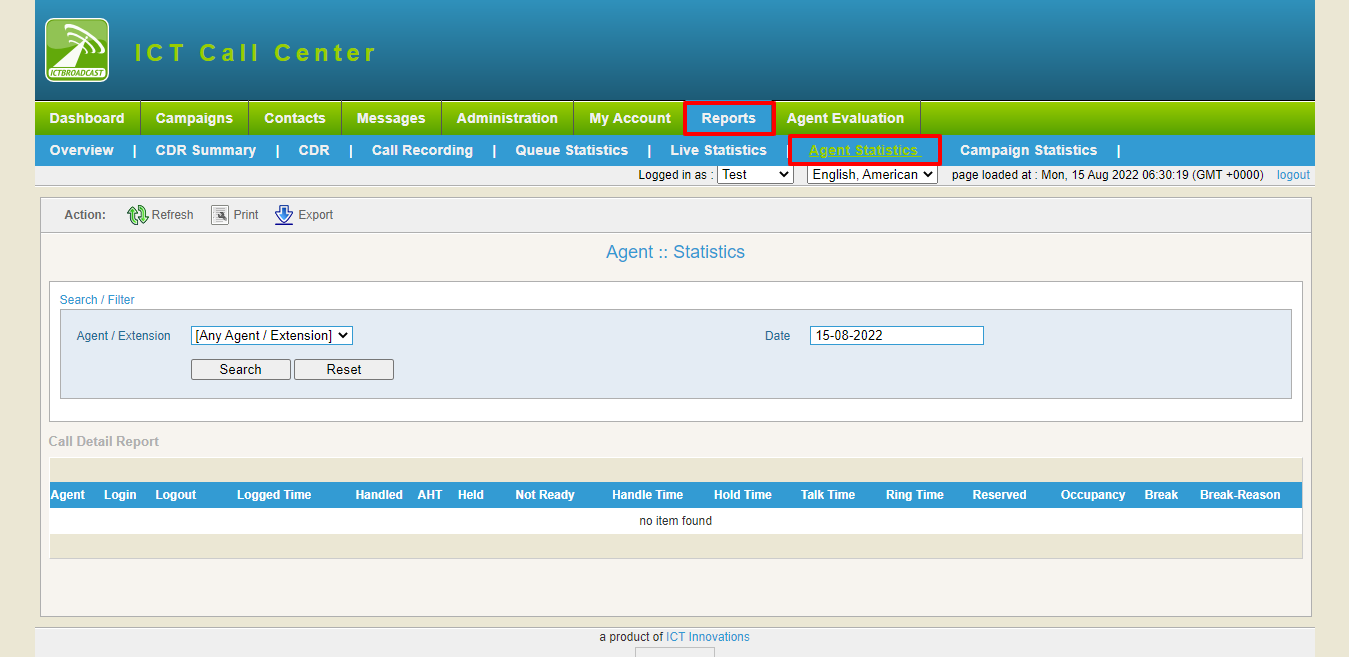
Agent Statistics shows the overall summary of each Agent. It shows the agent login time, logout time, the time that the agent takes to answer the calls, and everything we want to monitor about the agent. We can also filter out the desired agent result of some selected date.
Go to Reports from the main Then, Click on Agents Statistics from the sub-menu.
It will show an interface as shown in the below figure:
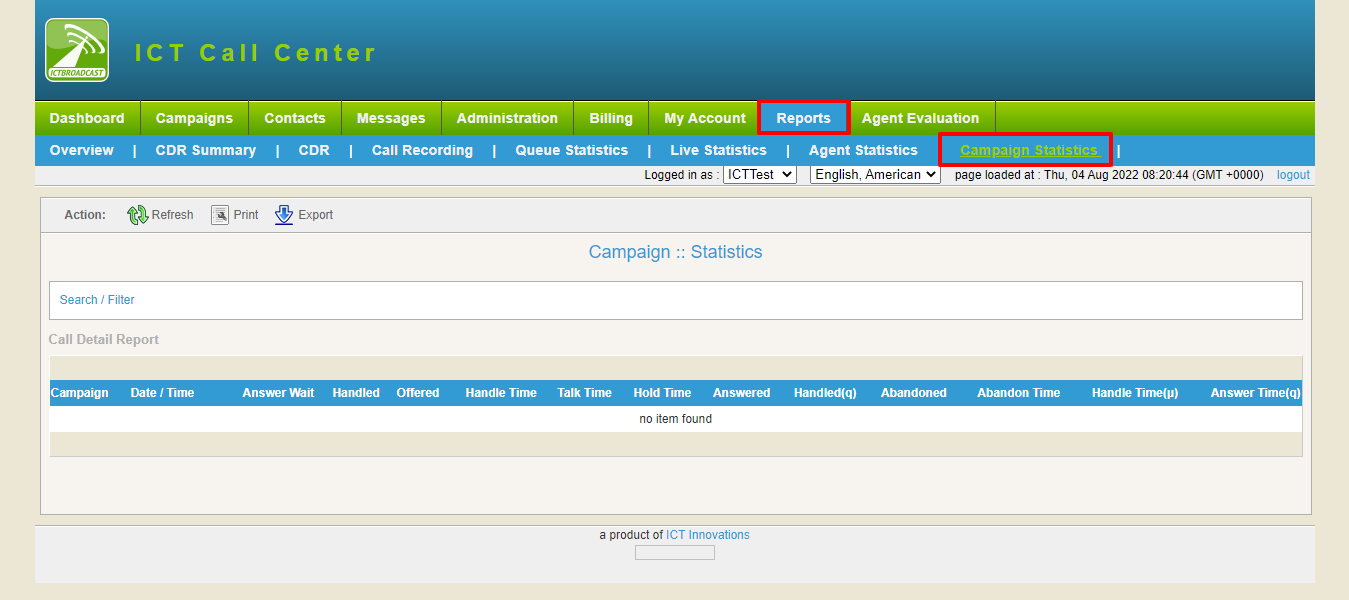
Campaign statistic shows the detail of each campaign. The list of the Campaign will be displayed. We can also filter the desired result according to our needs and requirements.
Go to Reports from the main menu, and Click on Campaigns Statistics from the sub-menu.
It will show an interface as shown in the below figure:
Agent Evaluation report shows the CDR summary associated with each extension. It shows the agent’s talk, ring time, and hold time. Through agent evaluation, we can evaluate the performance of the agents. We can also filter out the desired agent’s desired result at some chosen date.
Go to Agent Evaluation from the main menu, and click on Evaluation Form from the sub-menu.
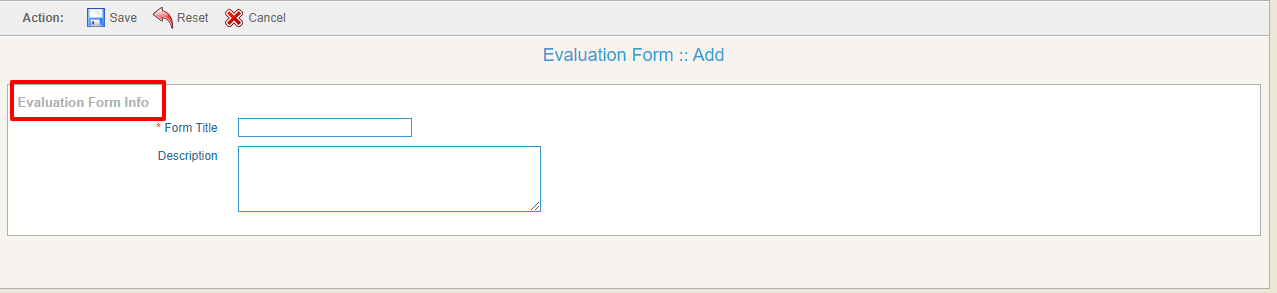
It will show a list of forms, as shown in the below figure. You can create a new evaluation form here.
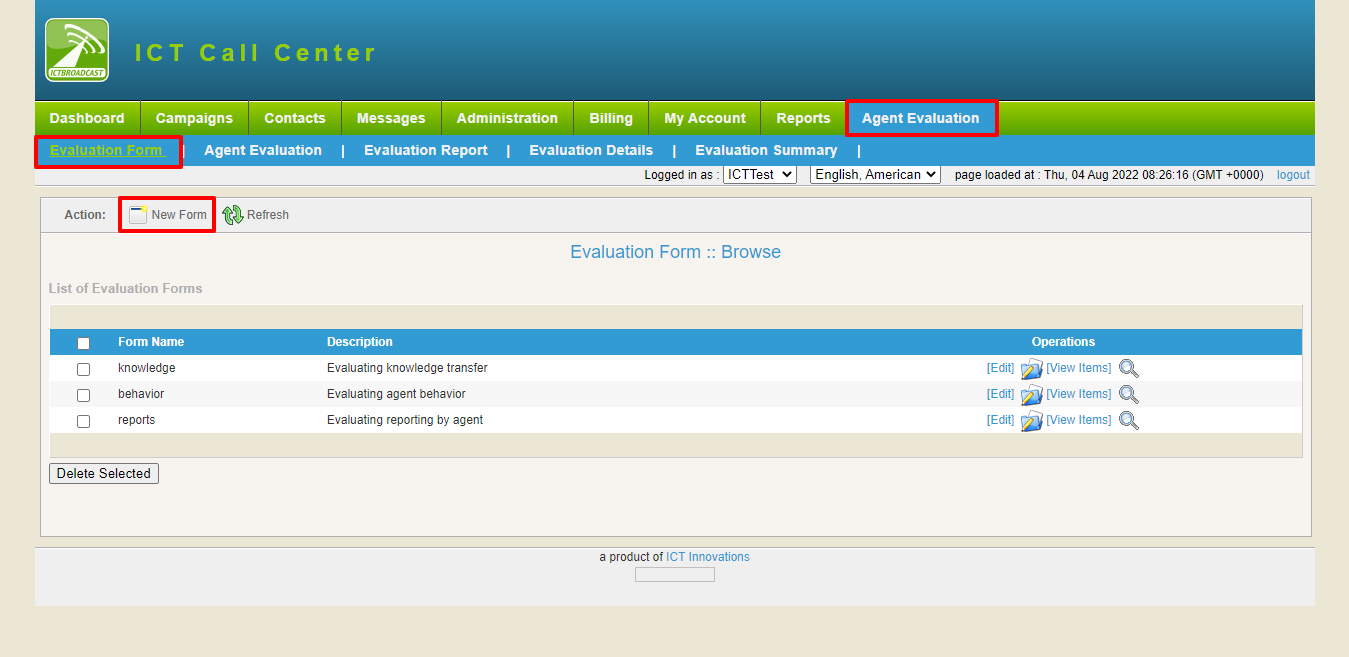
For adding a new form, press the new form button, as shown in the above figure.
Fill the Evaluation form with the required fields:
Write the title in the field box.
Next, write a description in the description box.
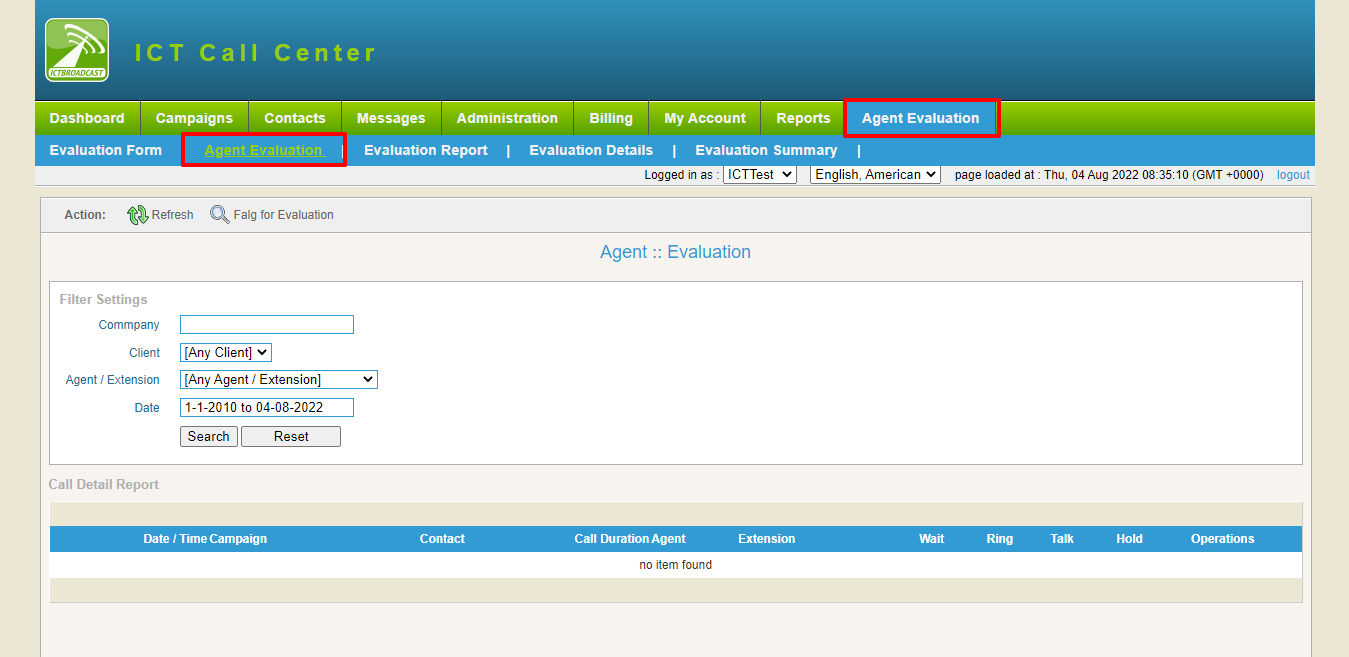
Agent Evaluation report shows the CDR summary associated with each extension. It shows the agent’s talk, ring, and holds time. Through agent evaluation, we can evaluate the performance of the agents. We can also filter out the desired agent’s desired result at some chosen date.
Go to Agent Evaluation from the main menu. Then, click on Agent Evaluation from the sub-menu.
It will show an interface as shown in the below figure:
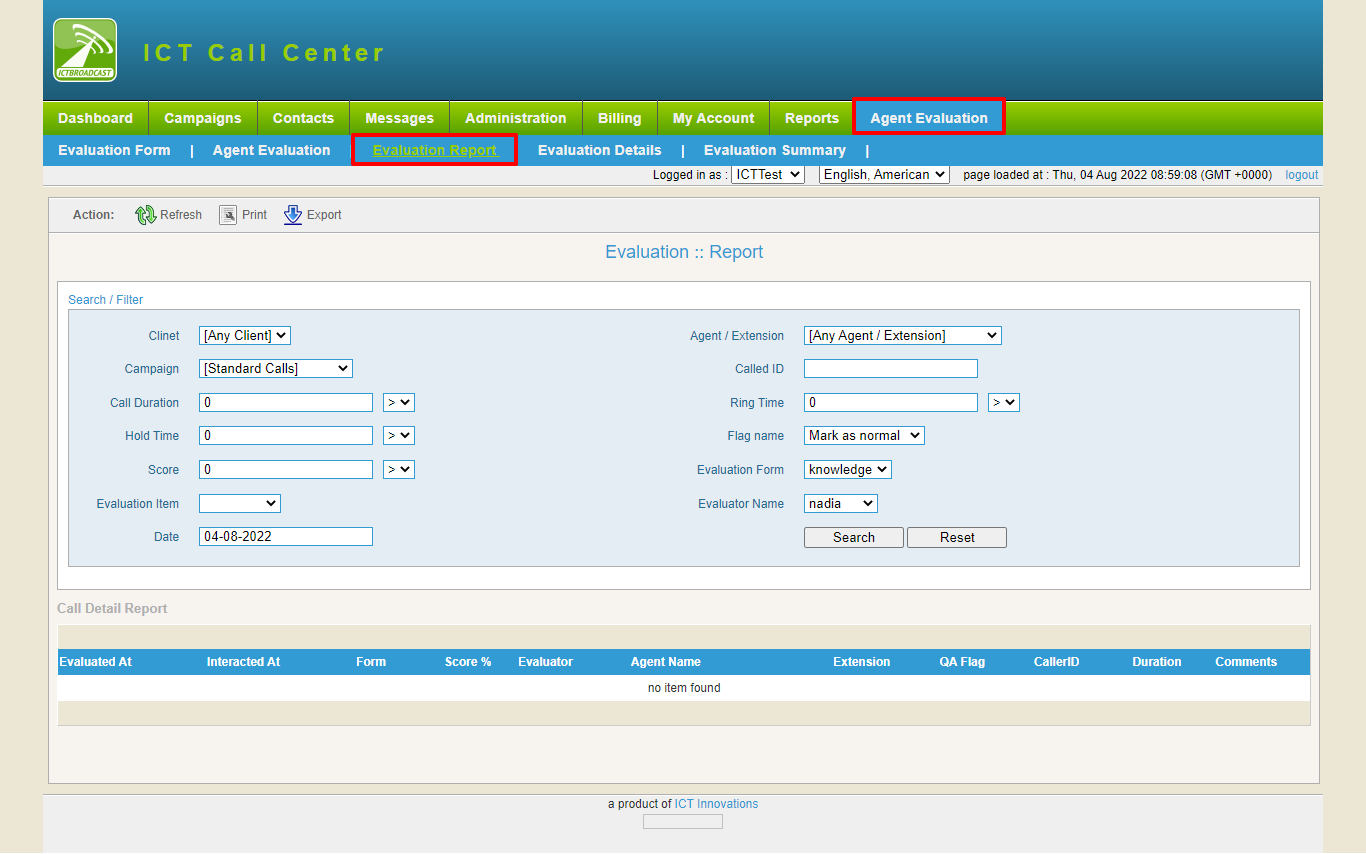
Evaluation Report shows the list of the agent performance. It shows the call duration and the comments of each call. We can also filter out the result of the desired agent and the desired extension. It also provides the option to export and print the result.
Go to Agent Evaluation from the main menu. Then, click on Evaluation Reports from the sub-menu.
It will show an interface as shown in the below figure:
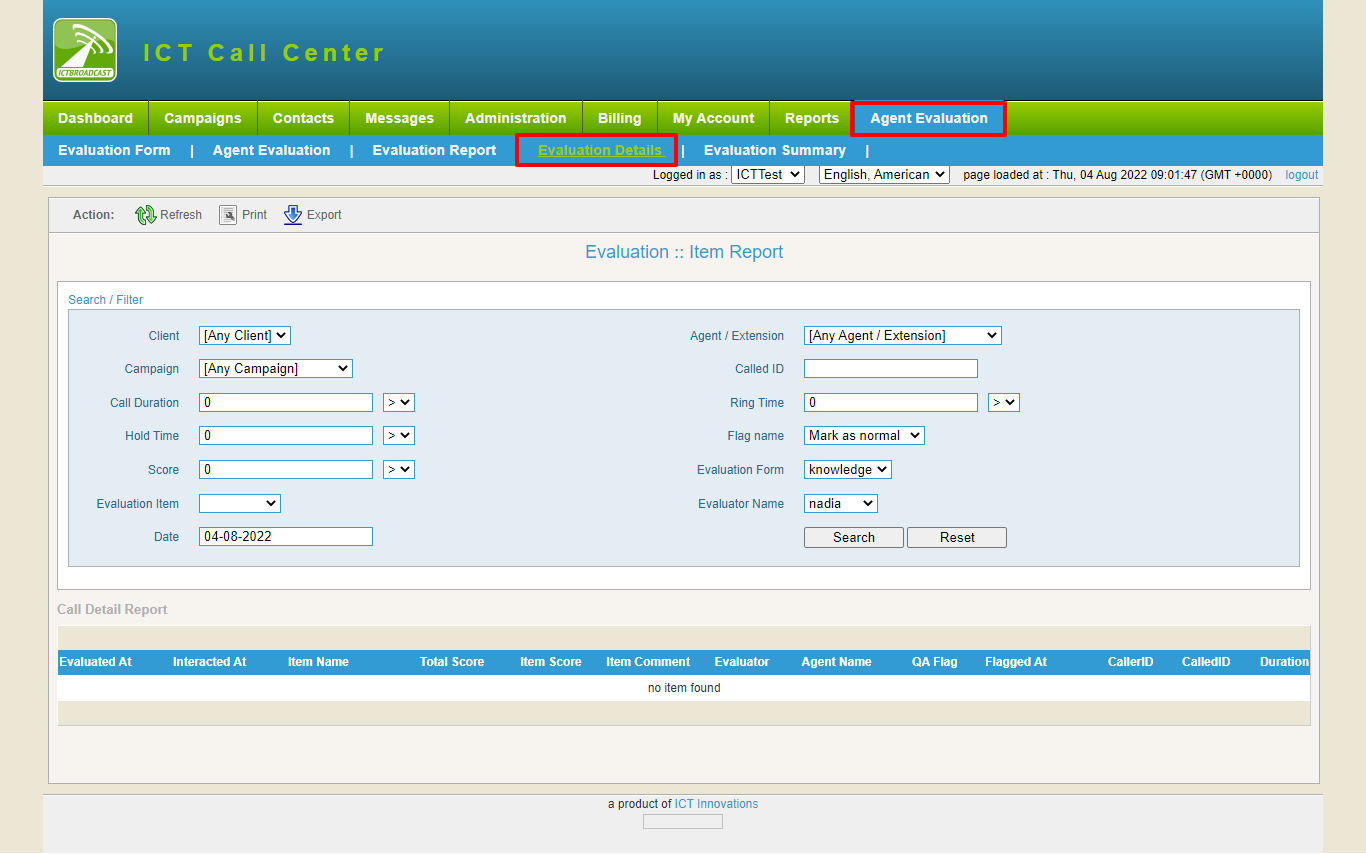
Evaluation Details show the list of the agent performance. It shows the call duration and the comments of each call. We can also filter out the result of the desired agent and the desired extension. It also provides the option to export and print the result.
Go to Agent Evaluation from the main menu. Click on Evaluation Details from the sub-menu.
It will show an interface as shown in the below figure:
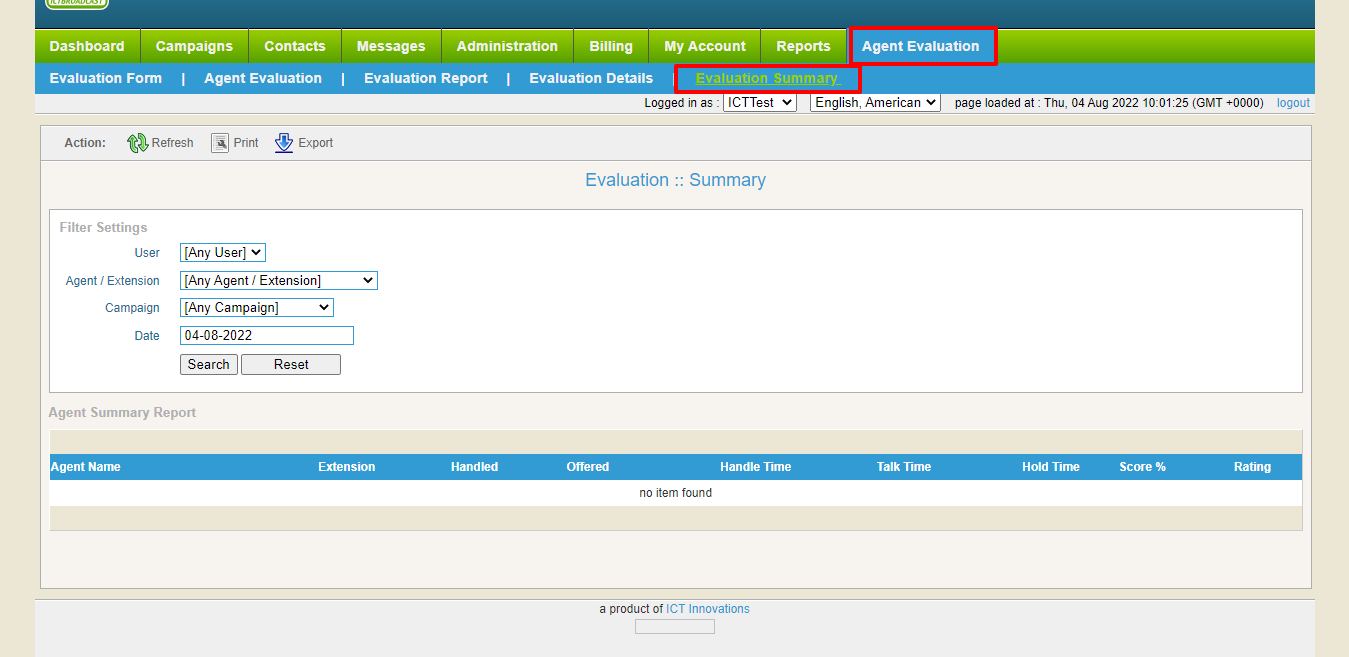
Evaluation Summary presents the summary of the agent’s call. It gives you all the details about the agent’s call. It tells the agent’s name, extension, talk time, hold time, and score.
Go to Agent Evaluation from the main menu. Click on Evaluation Summary from the sub-menu.
It will show an interface as shown in the below figure: