Overview
ICTBroadcast is multi-tenant Voice, SMS & Fax broadcasting software solution for SMB’s and Service Providers. ICTBroadcast has smart autodialer and smart predictive dialer capabilities. It enables service providers to offer broadcasting services to their users. It can be scaled to blast thousands of simultaneous calls using either VoIP or PSTN. ICTBroadcast can handle most voice broadcasting scenarios. It is simple, reliable and easy to use and has user friendly web portal to manage.
Add Gateway/ Trunk:
SIP Gateway / Trunks is basically a call organization and termination point. A trunk is an interface that enables users to connect with recipients using SIP networks.
Steps:
-
Open the navigation menu and select the main menu Administration
-
select the sub menu Gateway from main menu and click on it
-
Click on the New trunk button from Trunk list page
-
Add page will open, admin has to add/enter required information in desired fields
-
Enter gateway/trunk name, Select type, select status and Select Gateway type such as Asterisk, Twilio, Http and swift mailer.

-
Enter CPS limit, maximum channel capacity and prefix
-
Select or Enter Caller ID Format

-
Note: if your trunk configuration is on IP base then you not need to add register string just add gateway setting and dial string

User Management:
ICTBroadcast is a web-based auto dialer software that offers separate web portals for Administrators and Users. It facilitates complete campaign management for every user. Each user can manage, monitor, and run multiple campaigns separately and independently.
User Roles:
There are two Roles in the Broadcast Enterprise Edition.
ADMIN :
Admin is the owner of ictbroadcast setup. Admin manage and monitor overall ictbroadcast setup and resources. Admin create users and allocate resources to them. Admin create and manage over all system resources such as extensions/DID’s. Admin also configure trunk.
USER :
User create new campaigns. User manage and monitor campaigns and all his resources and his data.
Add New User
Users can create and monitor his campaigns. User can add contacts and record message.
Steps:
-
Open the navigation menu and select the Administration menu
-
select the sub menu User management from main menu and click on it
-
Click on the New User button from User list page
-
Add page will open, admin has to add/enter required information in desired fields
-
Enter Username, select status as active and select user role

-
Add password, retype password and enter pin code

user password
-
Add personal Contact information such as Email, first name, last name, phone number address and Select country

-
Select Time zone, Language and Theme
Assign Resources
Administrators can assign resources to Users .Assigning specific ‘Timeslot’ and Days of week to run campaigns. User will only run the campaign in the allotted Time slot and selected Days of week. users will run campaigns at allowed Timeslot and Days of week otherwise the running campaigns will stop immediately.
Assign Resources to Users:
Steps:
-
Open the navigation menu and select the main menu Administration
-
select the sub menu Client management from main menu and click on it
-
select the User Account from User list and click on Assign resources button
-
Resource Assignment page will open, Admin can Allowed time slot to User to run campaign in allowed time

-
Admin can assign permission to Users

Agent/ Extension Management:
Admin can create an agent/extension and assign it to Users. Agents can make/receive/transfer inbound and outbound calls and communicate with caller recipients.
Add new Agent/Extension
Steps:
-
Open the navigation menu and select Administration menu
-
select the sub menu Agent/Extension from main menu and click on it
-
Click on the New trunk button from Extension list page
-
Add page will open, admin has to add/enter required information in desired fields
-
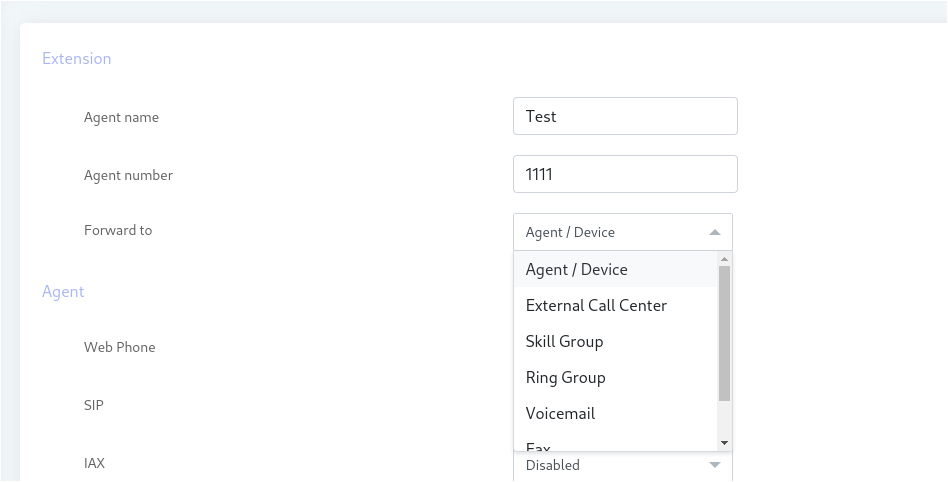
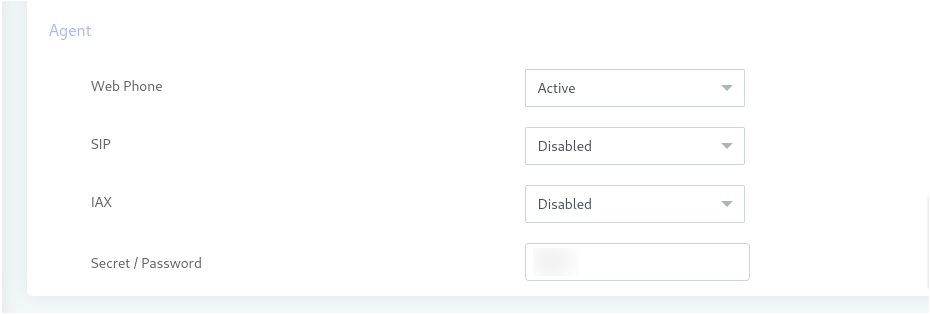
Enter Agent name, agent number and Forward to from drop down menu
-
Select web phone as active, SIP and IAX will disable and enter secret password for login
Forward Agent to External Call center:
You can forward incoming call to External call center number, External private PBX and personal phone number.
Steps:
-
Open the navigation menu and select Administration menu
-
select the sub menu Agent/Extension from main menu and click on it
-
Click on the New agent button from Extension list page
-
Add page will open, admin has to add/enter required information in desired fields
-
Enter Agent name, agent number and Select Forward to as External Call center

-
Enter external call center information such as Enter ip/hostame, select protocol, Enter user name and password
-
Enter Extension/phone and call limit

Forwarding agent to Agent/device:
You can make and receive call through webRTC agent panel through internet by using Login information. Agent call dial manually calls through webphone.
Steps:
-
Open the navigation menu and select Administration menu
-
select the sub menu Agent/Extension from main menu and click on it
-
Click on the New trunk button from Extension list page
-
Add page will open, admin has to add/enter required information in desired fields
-
Enter Agent name, agent number and Forward to from drop down menu
-
Select web phone as active, SIP and IAX will disable and enter secret password for login
Assign Agent/ Extension to Users:
Steps:
-
Open the navigation menu and select the main menu Administration
-
select the sub menu User Management and click on it
-
select the User account from user list page and click on Assign Extension button from operation menu
Add Inbound DID:
DID number is the number that caller will dial and the system will receive that call.
Steps:
-
Open the navigation menu and select the main menu Administration
-
select the sub menu Inbound DIDs from main menu and click on it
-
Click on the New DID button from trunk list page
-
Add page will open, admin has to add/enter required information in desired fields
-
Enter DID number and description
-
Select the assigned to option as System or Available to users

Assign DID to Users:
-
Open the navigation menu and select the main menu Administration
-
select the sub menu User management and click on it
-
select the user account from user list page and click on assign DID button from operation menu

-
DID Assignment page will open, Admin select the DID number and click on assign selected button
