1: Overview:
ICTBroadcast SP Edition is white label, multi-tenant and unified communications blended call center and auto dialer software supporting Voice, SMS; Fax and Email communication technologies suitable for Enterprises, carriers and Internet Telephony Service Providers to offer hosted services to their customers. ICTBroadcast features autodialer, predictive dialer, progressive dialer, preview dialer, power dialer and manualdialing capabilities. ICTBroadcast SP Edition features Rest APIs, multi service billing, advance routing, payment management and rating that enables service providers to offer call center and telemarketing services to their customers.
ICTBroadcast SP Edition can be scaled to blast thousands of simultaneous calls, handle most telemarketing and call center scenarios. It is simple, reliable and easy to use and has a user-friendly web portal to manage.
2: ICTBroadcast Configuration
Please follow below steps to start using ICTBroadcast SP Edition
1) Add Regions:
There is a list of regions available in the system if you need to add a new region specifically ICTBroadcast facilitates adding new regions.
Steps:
- Open the navigation menu and select the Billing main menu
- Select the sub menu regions under main menu and click on it
- Click on New region button from region list page
- Add region page will open, Admin has to add required information in desired fields
- Enter the region code and region name and click on save button

2) Add Countries
There is a list of Countries available in the system if you need to add a new country specifically ICTBroadcast facilitates adding new Country.

Steps:
- Open the navigation menu and select the Billing main menu
- Select the sub menu Countries under main menu and click on it
- Click on New Country button from region list page
- Add region page will open, Admin has to add required information in desired fields
- Enter Country name, country Code digit and Country dialing code

- Select region and timezone then click on save button

3) Add destination:
ICTBroadcast provides a complete route and rate management system. You can manage destinations, configure routes, and set destination rates.

Steps:
- Open the navigation menu and select the Billing main menu
- Select the sub menu Carrier/destinations under main menu and click on it
- Click on New destination button from region list page
- Add region page will open, Admin has to add required information in desired fields
- Enter the Destination name, prefix and OCN/PLMN

- Select the carrier type from drop down such as email, phone, mobile and voip.
- Select country and timezone as you require

4) Add Gateway/trunk:
SIP Gateway / Trunks is basically a call organizations and termination point. A trunk is an interface that enables users to connect with recipients using SIP networks.Steps:
- Open the navigation menu and select the main menu Administration
- select the sub menu Gateway from main menu and click on it
- Click on the New trunk button from Trunk list page
- Add page will open, admin has to add/enter required information in desired fields
- Enter gateway/trunk name, Select type, select status and Select Gateway type such as Asterisk, Twilio, Http and swift mailer

- Enter CPS limit, maximum channel capacity and prefix
- Select or Enter Caller ID Format

Note: if your trunk configuration is on IP base then you not need to add register string just add gateway setting and dial string.

5) What are Routes:
if multiples trunks are configured for different countries / destinations then admin can add routes of specific country/destination supported by said trunk as an example if trunk A is configured for USA and Trunk B configured for Canada then you can add routes of USA against Trunk A and add routes for Canada for Trunk B and ICTBroadcast setup will contacts accordingly.
6) Add Routes:
Steps:
- Open the navigation menu and select the main menu Billing
- select the sub menu Routes from main menu and click on it
- Click on the New route button from Route list page
- Add page will open, admin has to add/enter required information in desired fields
- Select Service and Select trunk (for which trunk route will used)


add route2
7) What are Rate plans?
Rate plans are used to create different set of rates of countries / destinations and assign these Rate Plans to Tenants / Users as per requirement as an example if admin like to assign rate A of specific destination to tenant A and assign rate B of same destination to Tenant B, admin will create different Rate Plans and assign these Rate Plans to Tenants / Users accordingly.
8) Add Rate plan:
Steps:
- Open the navigation menu and select the Billing Menu
- select the sub menu rate plan from main menu and click on it
- Click on the New rate plan button from rate plan list page
- Add page will open, admin has to add/enter required information in desired fields
- Enter rate plan name and description
- select the permission group and select the permissions from filter section

9) Add Rates:
In ICTBroadcast the purpose of rate plan is that if we are using multiple trunks for specific countries then we can add separate rate for each country according to assigned rate plan and services. Steps:
- Open the navigation menu and select the main menu Billing
- select the sub menu rate from main menu and click on it
- Click on the New rate button from rate plan list page
- Add page will open, admin has to add/enter required information in desired fields
- Select the rate plan and Services
- Select the VoIP block and VoIP rate

- Select billing block, enter billing rate, select first interval and select increment interval.

- Select regions, country and destinations of selected country

3: User Management
ICTBroadcast is a web-based multi-tenant auto dialer software that offers separate web portals for Administrators and Users. It facilitates complete campaign management for every user. Each user can manage, monitor, and run multiple campaigns separately and independently.

3.1: User Roles:
ADMIN :
Admin is the owner of ictbroadcast setup. Admin manage and monitor overall ictbroadcast setup and resources. Admin create tenant/client and allocate resources to him. Admin create and manage over all system resources such as extensions/DID’s. Admin setup billing, set rate plan, rates and configure trunk, routes.
TENANTS/CLIENT :
tenant/client manage users, supervisor and agent accounts. Tenant creates and manages multiple users,supervisor and agent accounts. tenant/client assign resources to each users such as extension and DIDs.
USER :
User create new campaigns. User manage and monitor campaigns and all his resources and his data.
SUPERVISOR :
Supervisor monitor campaigns and reports of one or multiple users and agents of same tenant.
AGENT :
Agent make/receive/transfer call and communicate with callers /call recipients. Agent manages inbound and outbound campaigns such as predictive, progressive and preview campaigns.
3.2) Assign Resources:
Administrator can assign resources to tenants .Assigning specific ‘Timeslot’ and Days of week to run campaigns. User will only run the campaign in the allotted Time slot and selected Days of week. Tenant and his users will run campaigns at allowed Timeslot and Days of week otherwise the running campaigns will stopped immediately.
Assign resources to Tenant/client account:
Steps:
- Open the navigation menu and select the main menu Administration
- select the sub menu Client management from main menu and click on it
- select the client account from client list page and click on Assign DID button from operation menu

- Resource Assignment page will open, Admin can Allowed time slot to Tenant/Client to run campaign.

- Admin can assign permission to tenant/client

client list
User under ownership of “Master account” are only applicable for resources that Admin a assign to Master.
3.3: Add new Client
Admin can create and manage client/company account. Admin assign resources,DIDs and Extensions to client and all users under that client can use his all resources.

client
Steps:
- Open the navigation menu and select the Administration menu
- select the sub menu Client management from main menu and click on it
- Click on the New client button from Client list page
- Add page will open, admin has to add/enter required information in desired fields
- Enter client name, Select rate plan, enter maximum allowed channel and select status as active

- Enter personal information such as Email,phone number, Address, company name and select Country

- Select Time zone, Language and Theme
3.2: Add new user:
User can create and monitor his campaign. User can add contacts and recording message.
Steps:
- Open the navigation menu and select the Administration menu
- select the sub menu User management from main menu and click on it
- Click on the New user button from User list page
- Add page will open, admin has to add/enter required information in desired fields
- Enter User name, select Client account from owner by section
- Select status as active and select/assign role

- Add password, retype password and enter pin code

- Add personal Contact information such as Email, first name, last name, phone number , address and Select country

- Select Time zone, Language and Theme
Note: User can be created as client too by selecting create new client from Owner by field.

3.3: Add Payment
Admin can add payment/balance to client accountsand all users will use his credit for running campaigns.
Steps:
-
- Open the navigation menu and select the Billing menu
- select the sub menu Payments from main menu and click on it
- Click on the New Payment button from Route list page
- Add page will open, admin has to add/enter required information in desired fields
- Select the paid by Account and enter comment (optional)
- Enter total paid amount, select payment type and enter payment date

4: Agent/Extension Management:
Admin can create agent/extension and assign it to client/company account. Agent can make/receive/transfer inbound and outbound calls and communicate with caller recipients.
4.1: Add new Agent/Extension
Steps:
- Open the navigation menu and select Administration menu
- select the sub menu Agent/Extension from main menu and click on it
- Click on the New agent button from Extension list page
- Add page will open, admin has to add/enter required information in desired fields
- Enter Agent name, agent number and Forward to from drop down menu
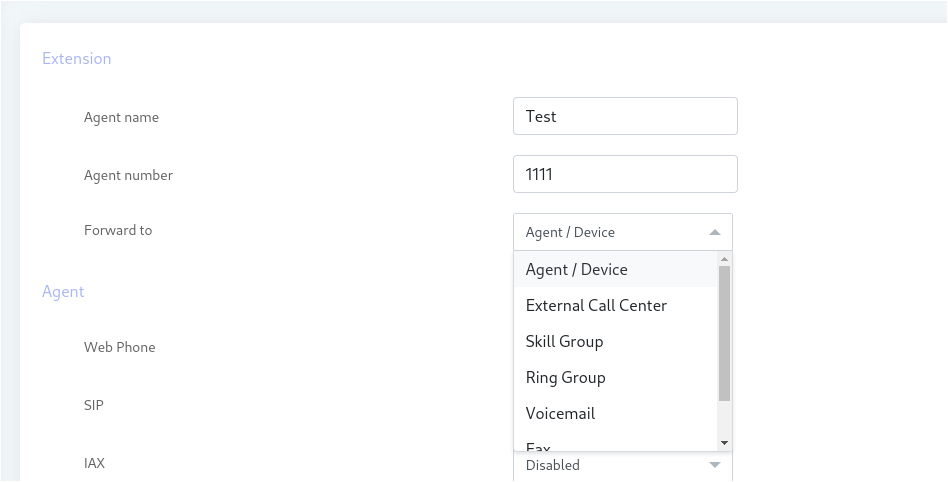
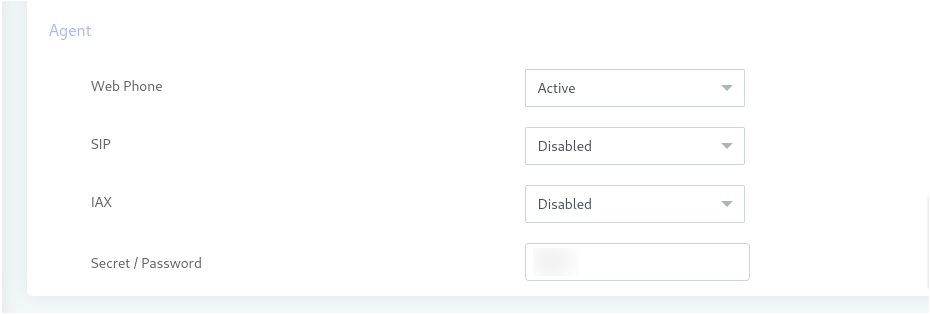
- Select web phone as active, SIP and IAX will disable and enter login password
Forward Agent to External Call center:
You can forward incoming call to External call center number, External private PBX and personal phone number
Steps:
- Open the navigation menu and select Administration menu
- select the sub menu Agent/Extension from main menu and click on it
- Click on the New agent button from Extension list page
- Add page will open, admin has to add/enter required information in desired fields
- Enter Agent name, agent number and Select Forward to as External Call center

- Enter external call center information such as Enter ip/hostame, select protocol, Enter user name and password
- Enter Extension/phone and call limit.

Forwarding agent to Agent/device:
You can make and receive call through the webRTC agent panel through the internet by using the Login information Agent can dial manual calls through webphone.
Steps:
- Open the navigation menu and select Administration menu
- select the sub menu Agent/Extension from main menu and click on it
- Click on the New extension button from extension list page
- Add page will open, admin has to add/enter required information in desired fields
- Enter Agent name, agent number and Forward to from drop down menu
- Select web phone as active, SIP and IAX will diable and enter login password

Assign Extension to Users:
Admin can assign extension to users.
Steps:
- Open the navigation menu and select the main menu Administration
- select the sub menu Client management from main menu and click on it
- select the client account from client list page and click on Assign extension button from operation menu

4.2: Add Inbound DID
DID number is the number that caller will dial and the system will receive that call.
Steps:
- Open the navigation menu and select the main menu Administration
- select the sub menu Inbound DIDs from main menu and click on it
- Click on the New DID button from trunk list page
- Add page will open, admin has to add/enter required information in desired fields
- Enter DID number and description
- Select the assigned to option as System or Available to users

Assign DID to Users:
- Open the navigation menu and select the main menu Administration
- select the sub menu Client management from main menu and click on it
- select the client account from client list page and click on Assign DID button from operation menu
- DID Assignment page will open, Admin select the DID number and click on assign selected button

Available DID list
Note: All users under master will used Assigned DID for inbound calling
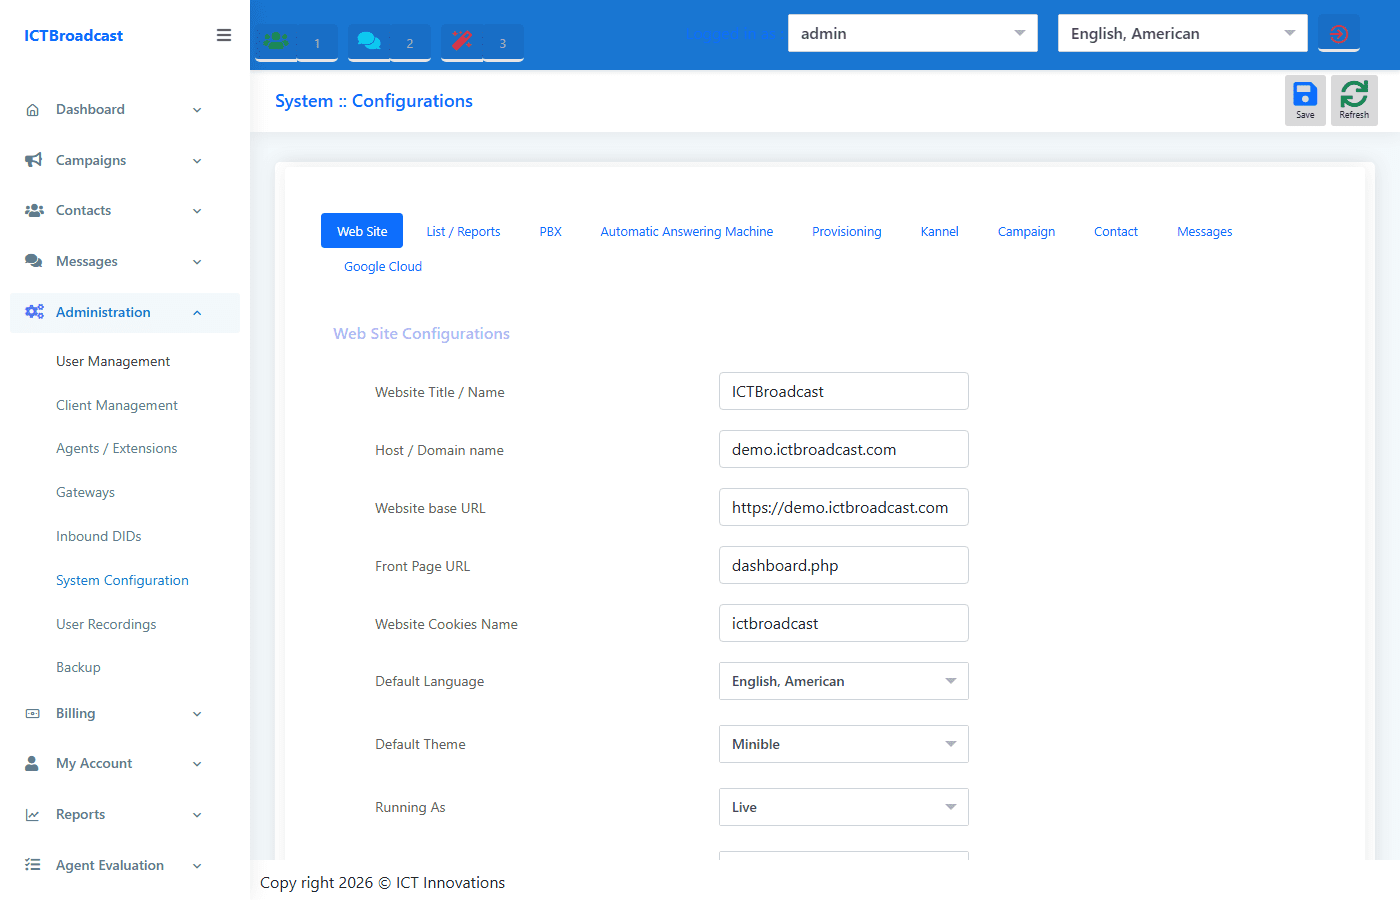
5: System Configuration
ICTBroadcast SP Edition includes a System Configuration panel where the administrator controls global platform settings. To access it, go to Administration > System Configuration from the main menu.
The System Configuration panel is organised into the following tabs:
Web Site:
Controls the public-facing portal settings — site name, logo, support URL, and white-label branding. Admins can upload a custom logo and set a custom domain here for each tenant’s branded experience.
PBX (Asterisk):
Sets the connection parameters for the Asterisk PBX engine — host, AMI port, AMI username, and AMI password. These settings are pre-configured during installation and rarely need to change unless the PBX server is migrated.
Kannel SMS Gateway:
ICTBroadcast uses Kannel as its SMS gateway for outbound and inbound SMS campaigns. Configure the following fields to connect to your Kannel installation:
- Kannel Host: IP address or hostname of the server where Kannel is running.
- Kannel Port: Port Kannel listens on (default: 13013).
- Kannel Username: Kannel send-SMS username.
- Kannel Password: Kannel send-SMS password.
- URL Path for Send SMS: Path to the Kannel send-SMS endpoint, e.g.,
/cgi-bin/sendsms. - Kannel Message Size: Maximum character size per SMS segment (160 for GSM-7, 70 for Unicode).
After saving, create a Gateway record (Administration > Gateways) and set the Gateway Type to Kannel to link campaigns to this SMS provider.
Google Cloud Integration (TTS / Speech Recognition):
ICTBroadcast supports Google Cloud Text-to-Speech and Speech-to-Text for high-quality voice synthesis and voice input in IVR flows. To activate:
- Create a Google Cloud project at console.cloud.google.com and enable the Cloud Text-to-Speech API and Cloud Speech-to-Text API.
- Generate a Service Account key (JSON format).
- In ICTBroadcast System Configuration, paste the JSON credentials into the Google Cloud Credentials field.
- Select your preferred TTS Language and Voice Name from the dropdowns.
- Save. All TTS applications in IVR Designer will now use Google Cloud voices instead of the built-in engine.
6: Backup and Restore
ICTBroadcast provides a built-in backup utility that exports your data to a local folder or a remote FTP/SFTP server. Regular backups protect your campaigns, contacts, recordings, and billing data.
How to create a Backup:
- Go to Administration from the main menu.
- Select Backup from the sub-menu.
- Click New Backup.
- Select a Folder/Directory on the local server to store the backup archive, or configure a remote destination (see below).
- Click Save to run the backup immediately.
Remote Backup Server:
To send backups to a remote FTP/SFTP server, fill in the Backup Server Access section:
- IP / Hostname: Address of the remote FTP/SFTP server.
- Port: FTP port (default 21) or SFTP port (default 22).
- Username: FTP/SFTP login username.
- Password: FTP/SFTP login password.
- Folder Name: Remote directory where backups will be stored.
Restore:
To restore from a backup, SSH into the server and use the ICTBroadcast restore script pointing to the backup archive file. Contact ICT Innovations support for guided restore assistance if required.